[New...]
- Create a new style file, start pattern-making.
- Allow user to use the system-provided base: skirt,bodice, pant, and sleeve. (In V7.0, Base library is moved to be a single menu [Base], for more information about it, please refer to the section of [Base] Menu in this chapter.)
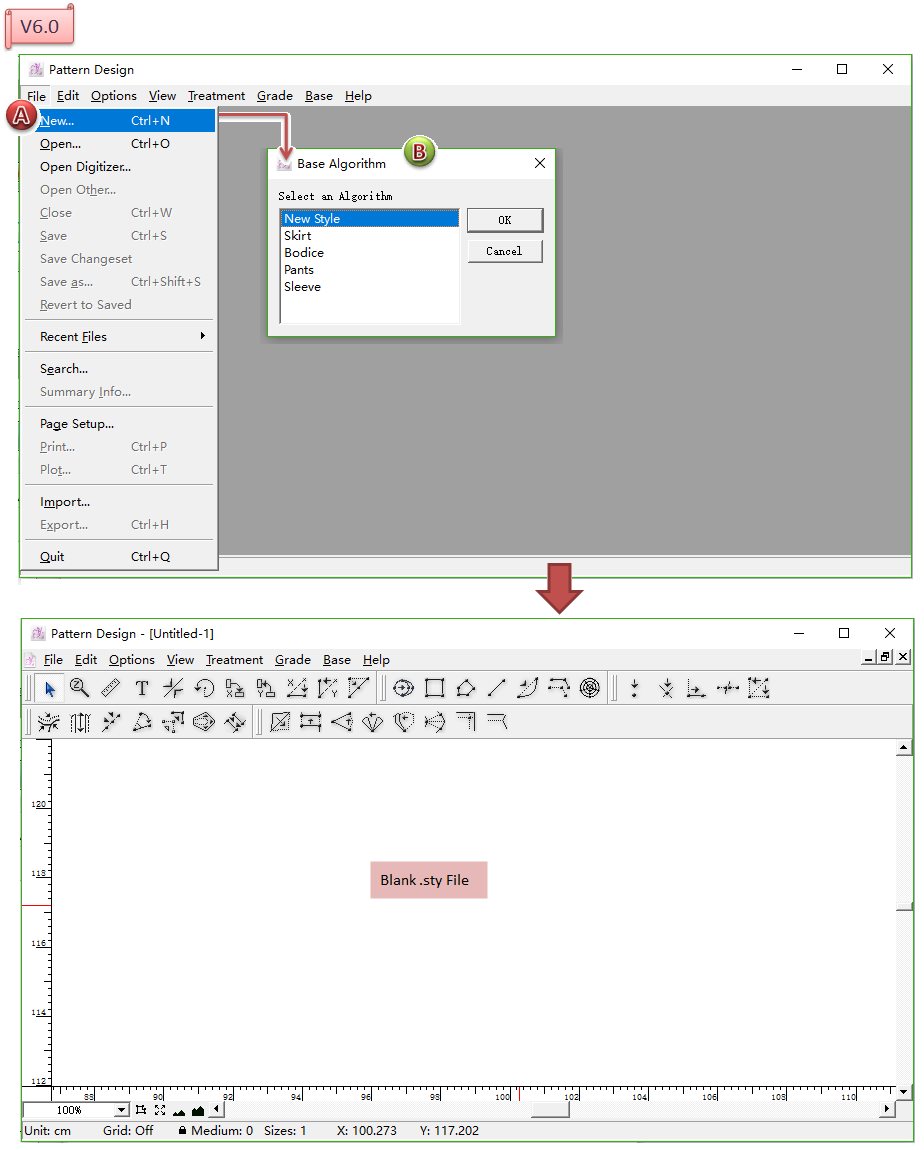
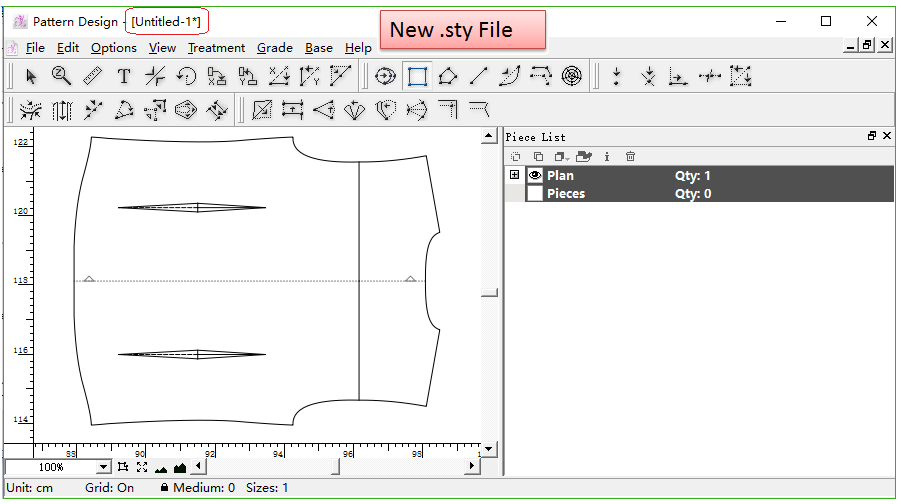
How to create an empty style file
In V6.0, the steps to create a new style file are as follows:
- Click Menu [File] - [New...];
- Base Algorithm dialog box appears, select New Style, and click [OK] button
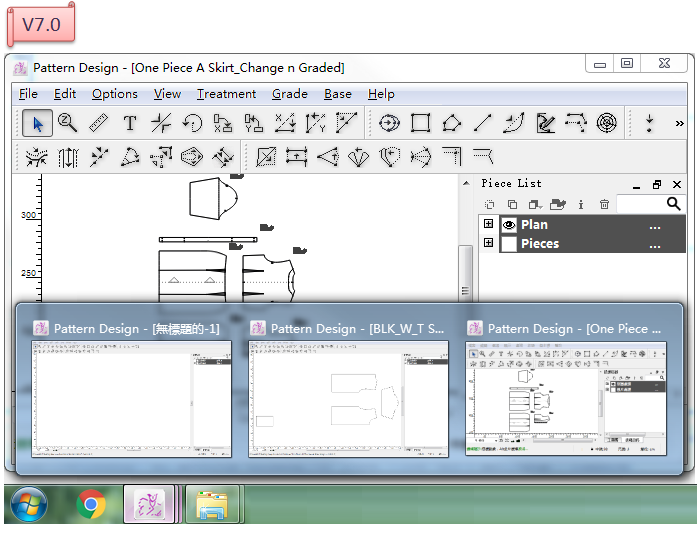
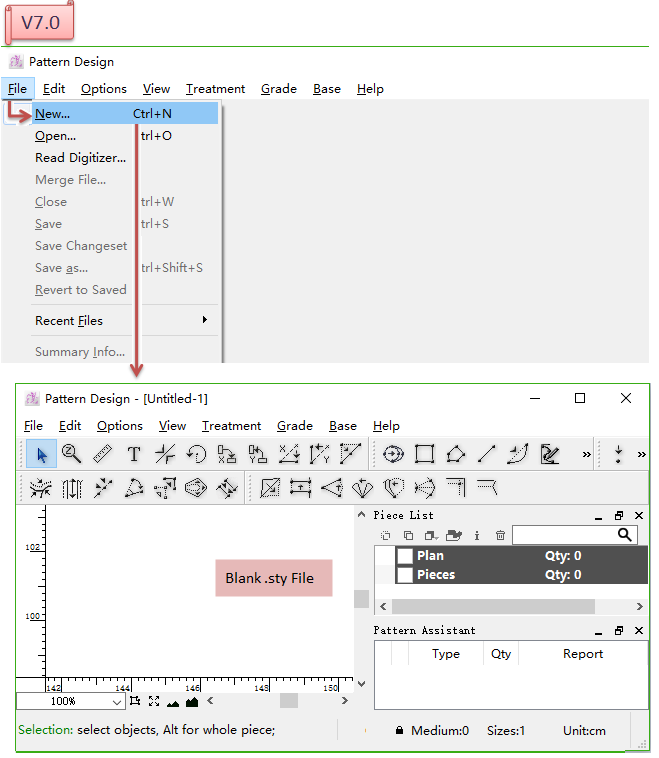
In V7.0, user can create an empty style file by clicking menu [New...] directly.
備註
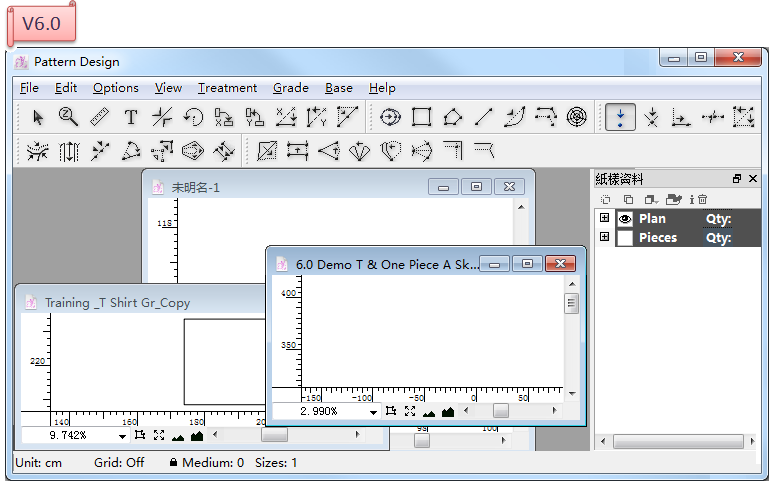
In V7.0, one window for one file. When you create a new file, or open other files, the software will open a new window. But in V6.0, all the files share one window.
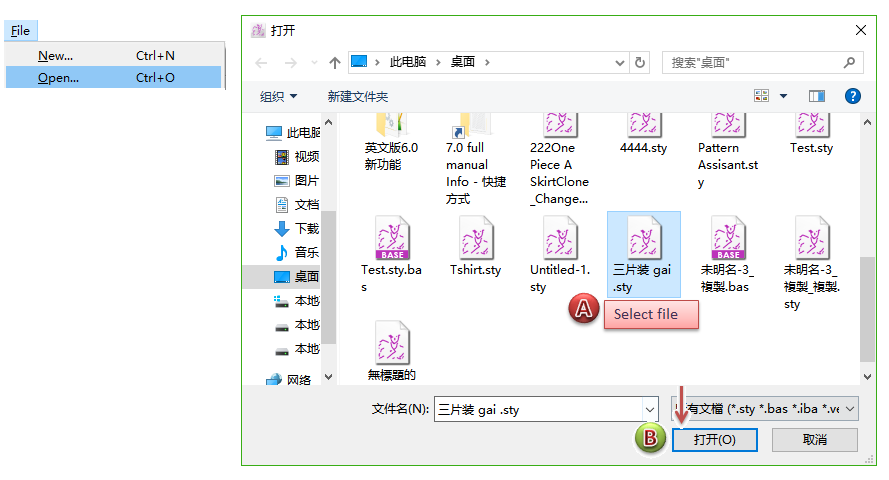
[Open...]
Open an existing pattern file (.sty) / (.bas)
備註
Support both Gerber native file (.zip) and Lectra native file (.iba/.vet) and can be opened directly.
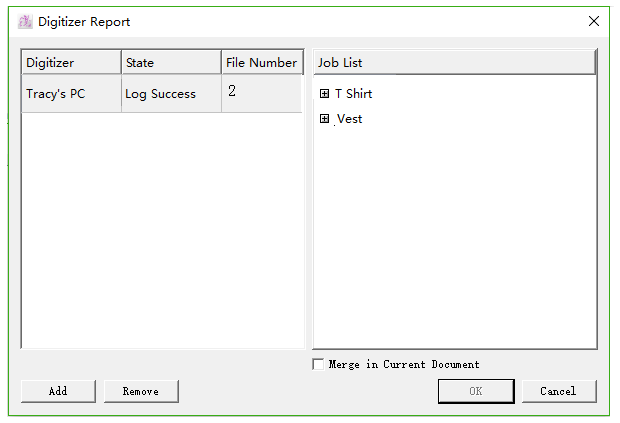
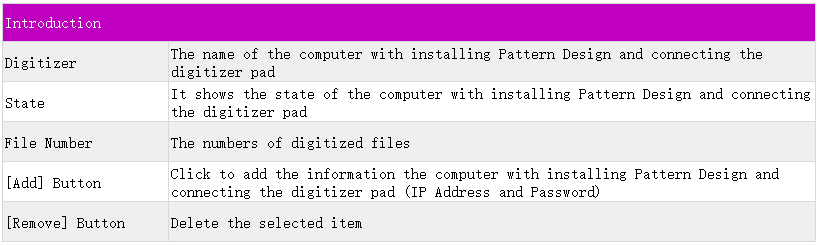
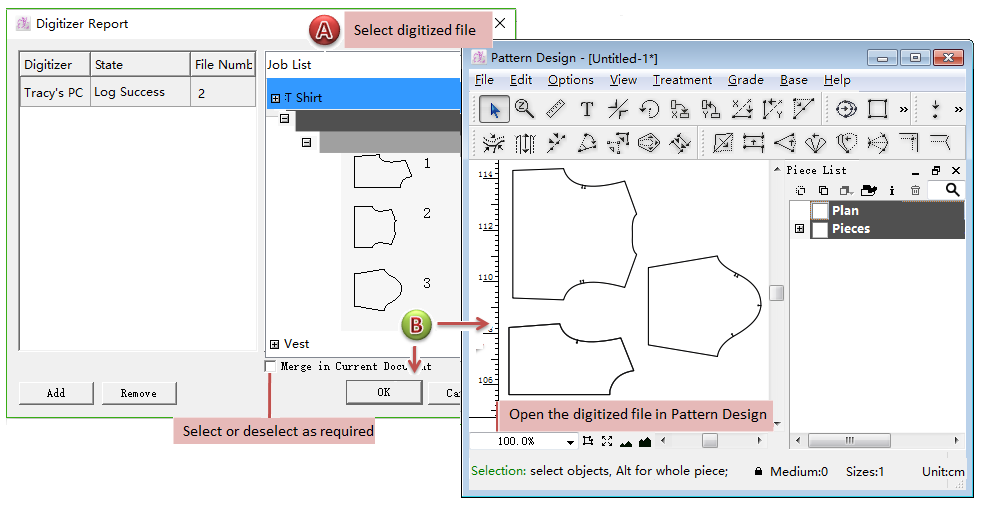
[Read Digitizer...]
Open a digitized file into Pattern Design application.
Click plus
to check the pieces in digitized file.
Merge in current document: Select this item to merge a new-open digitized pattern file (.sty) into the current one, otherwise, the system will open a blank .sty file for the new-open digitized pattern file (.sty).
Select desired digitized pattern file, click [OK] to open:
[Cancle]button: click this button to close [Digitizer Report] dialog box.

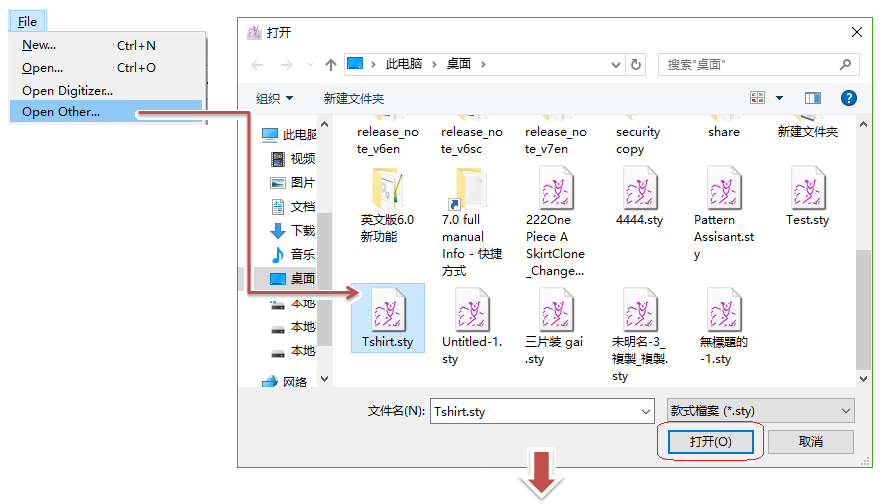
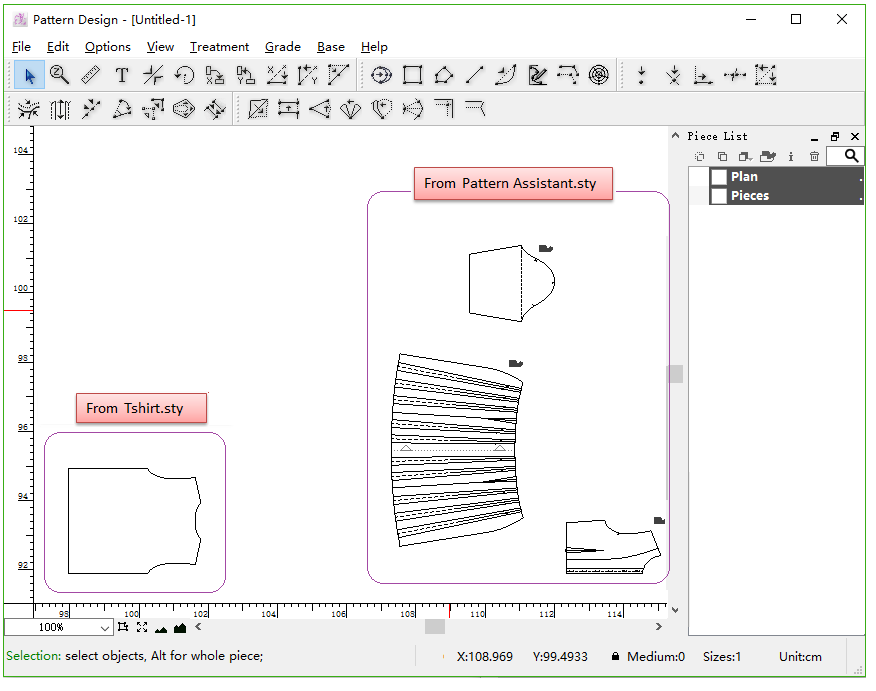
[Open Other...]
Allow user to add the pieces from other pattern file into the current file.
For example, in the file of Pattern Assistant.sty, user clicks [Open Others...], select the file named Tshirt.sty, then the pieces and elements in Tshirt.sty will be added into Pattern Assistant.sty.
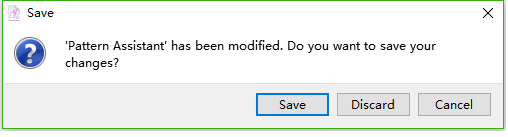
[Close...]
Close the window of current pattern file.
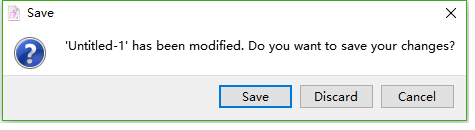
If the current pattern hasn’t been modified, the window close directly; if the file was modified, the system will show a warning dialog box for user to choose if save the lastest modification. Click [Save] to save lastest modification; click [Discard] to give up saving the lastest modification and remain unchanged; click [Cancle] to close the warning dialog box and continue to work on the file.
[Save...]
Remember to save the file once you make any change of existing file or create a new one.
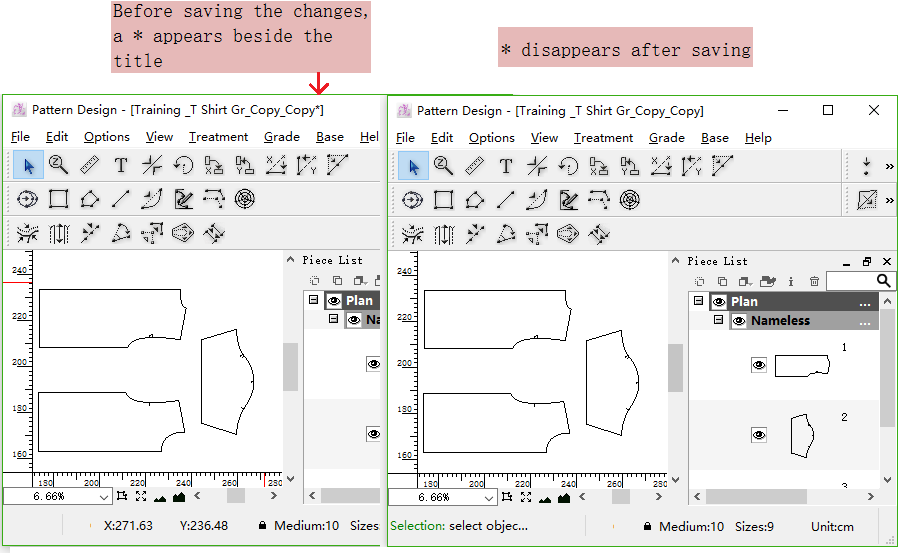
If user works on the exsiting file, click [Save...], file will be saved under the same name. Before clicking [Save...], a symbol * appears beside the file title, it will disappear once the file is saved.
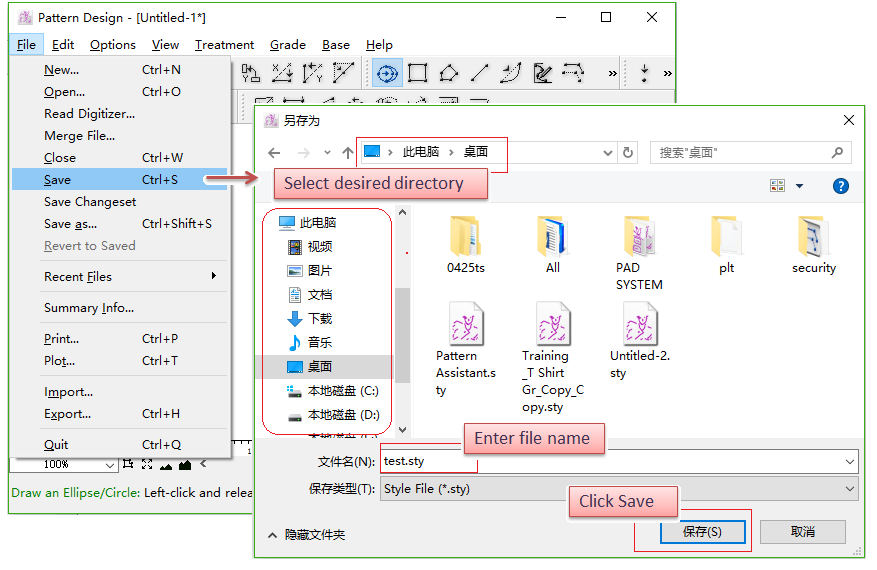
If user works on a new file, click [Save...], the system request to enter the file name and choose the directory, together with the file format.
[Save Changeset]
This function is added for users to manage and check the modification of the files.
This function just save at most 3 changeset, for example, the current file is Test.sty, the changeset that can be saved are Test_1,Test_2 and Test_3 during the process of modificaiton.
How to use [Save Changeset] function
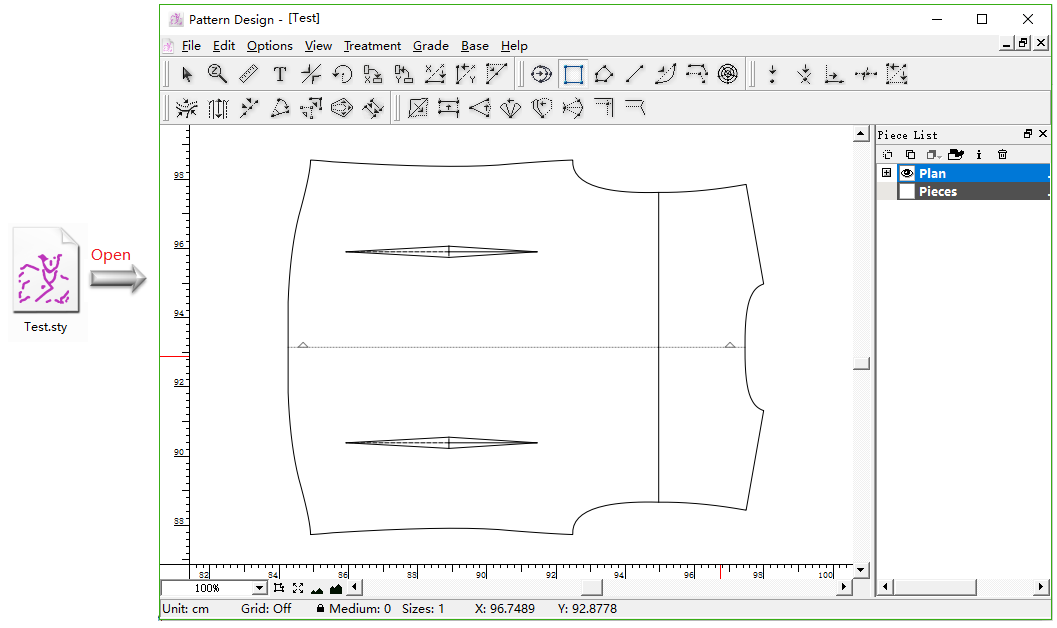
Take a pattern file Test. sty as an example:
Open Test.sty;
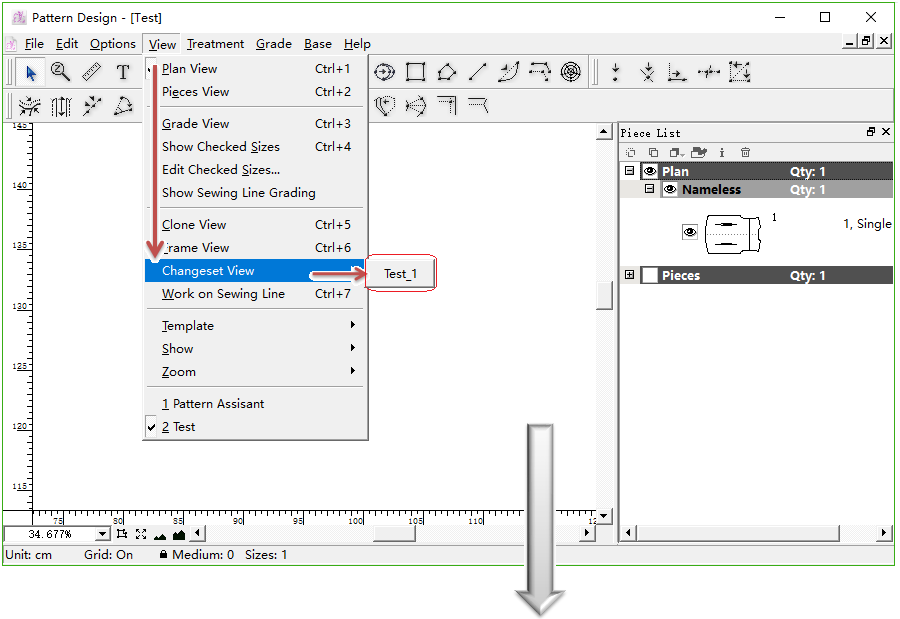
Modify the file, like lengthen the clothes, then left-click menu [File] - [Save Changeset]. Then click menu [View] - [Changeset View], it saved a changeset Test_1.
備註
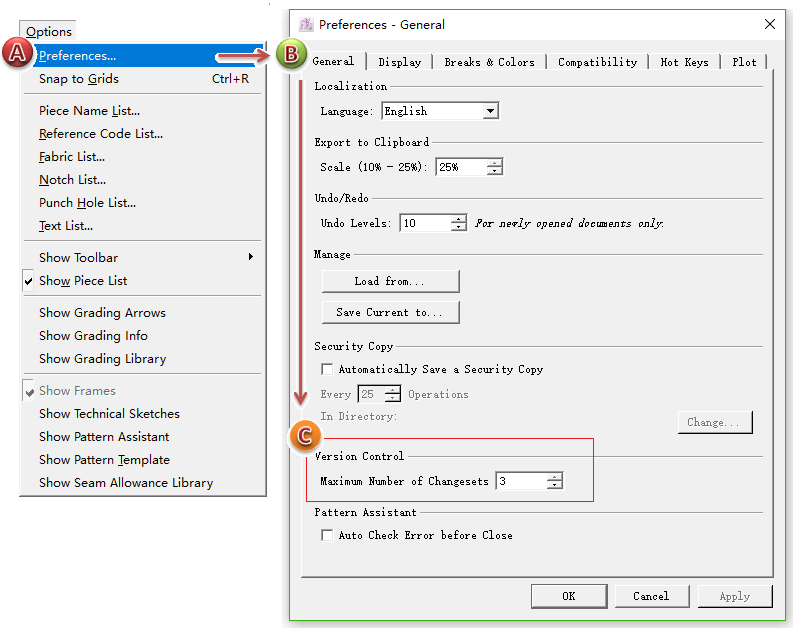
After each modificaiton, repeat to click [Save Changeset], it will save at most 3 changeset. Users can set it here:
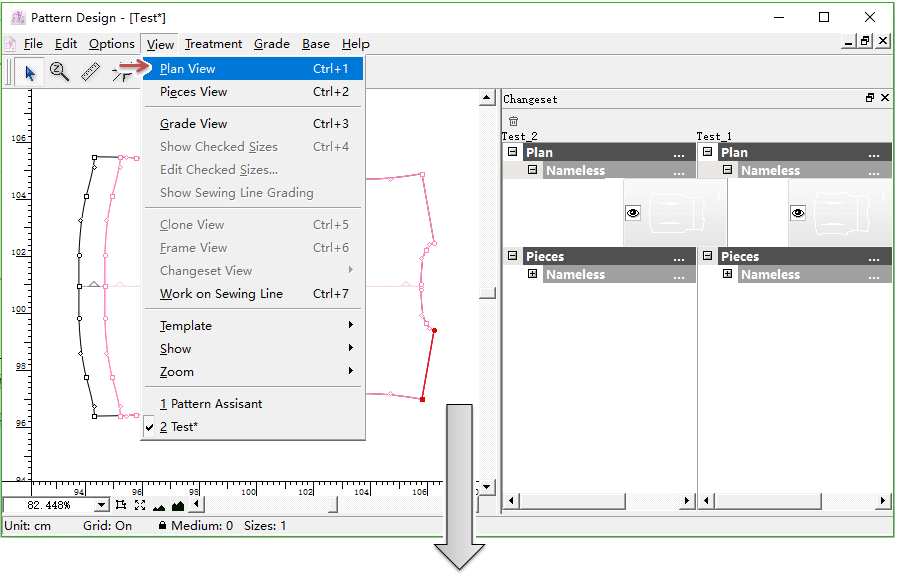
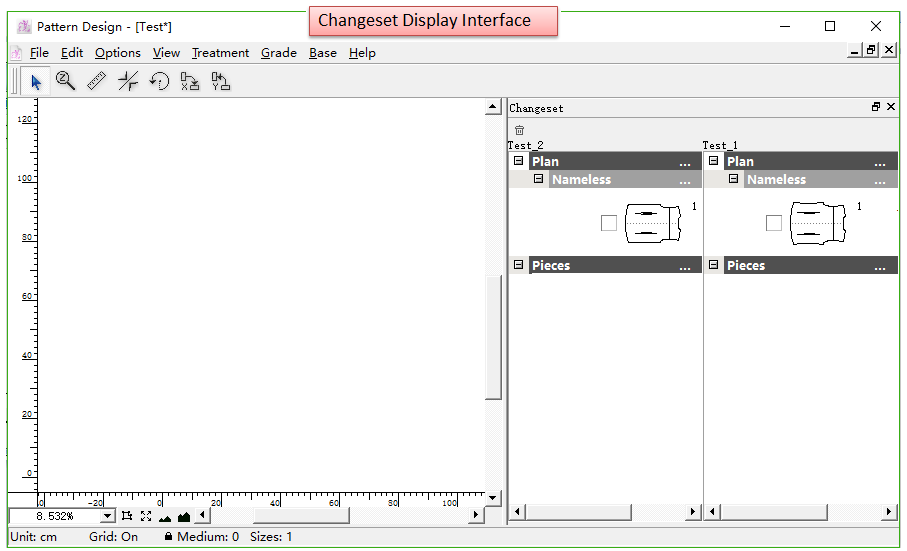
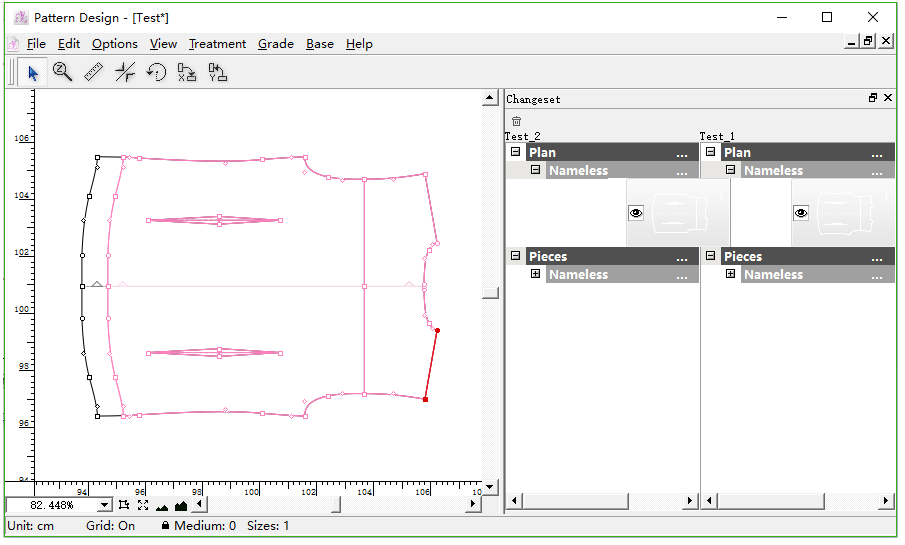
Click menu [View] - [Changeset View] - Test_1, it turns to the changeset display interface. Test_2 is the lastest modified file, Test_1 is the former one.
備註
The newest file after modificaiton is always the last one, if save two changeset Test_1 and Test_2, then the newest current file is Test_3 after modificaiton.
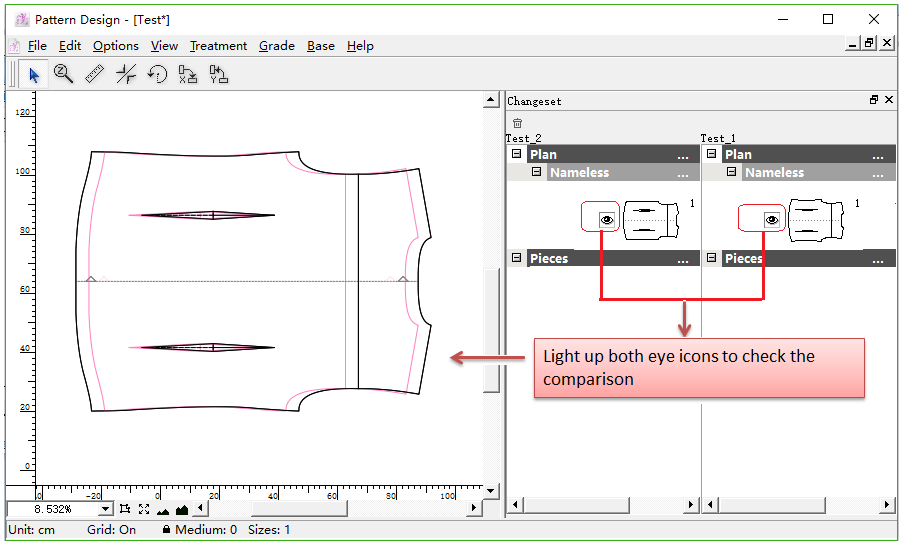
Light up the eye icons before the piece item in the sidebar, the piece shows in the working area and align to the center point by defualt. Test_2 (the newest file after modificaiton) shows in black, Test_1 (the changeset before modification) shows in red.
備註
These tools now are available under the Changeset View state. They can be used to move/measure/rotate...
Use
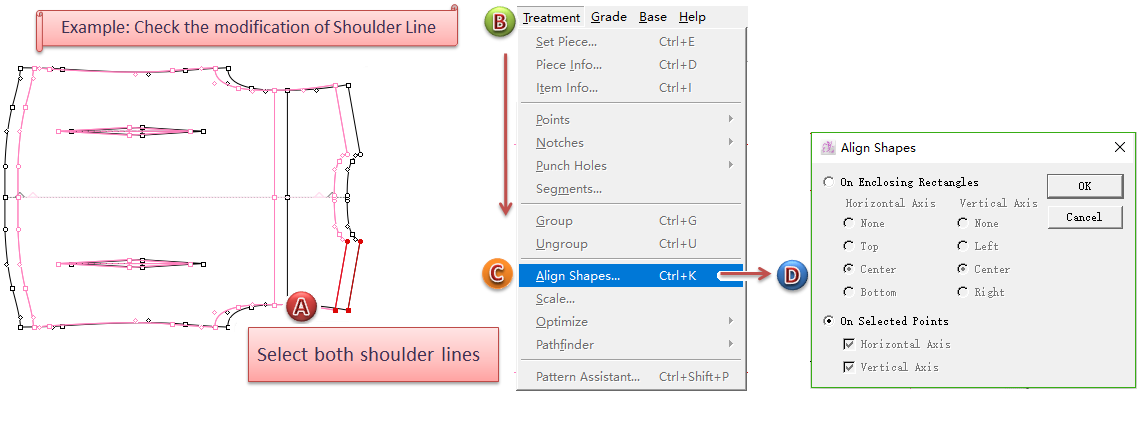
Pointer tool to move and align the pieces to check modificaiton, or click menu [Treatment] - [Align Shapes] to align pieces and check the modificaiton.
For example, select [Align Shapes...] to check:
備註
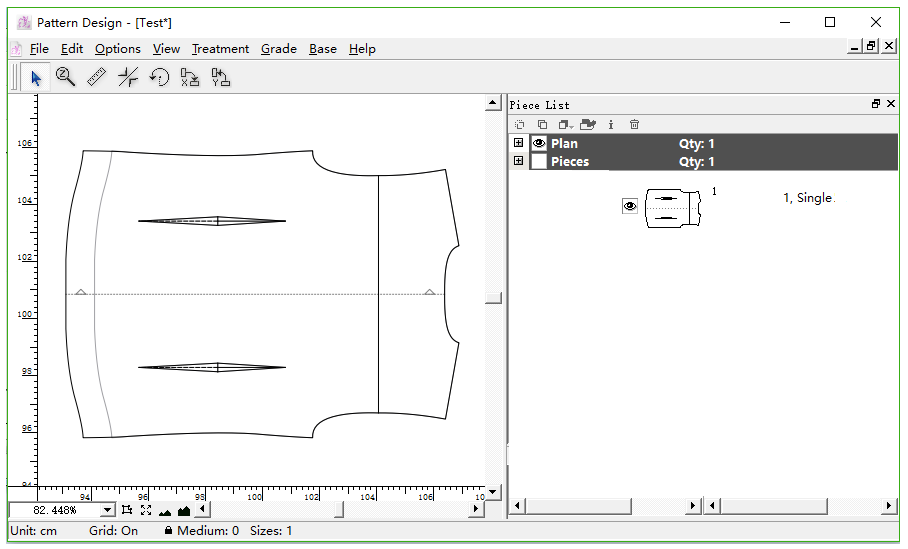
Click menu [View] - [Plan View] or [Pieces View], it will turn changeset display interface into regular display interface for drawing pieces

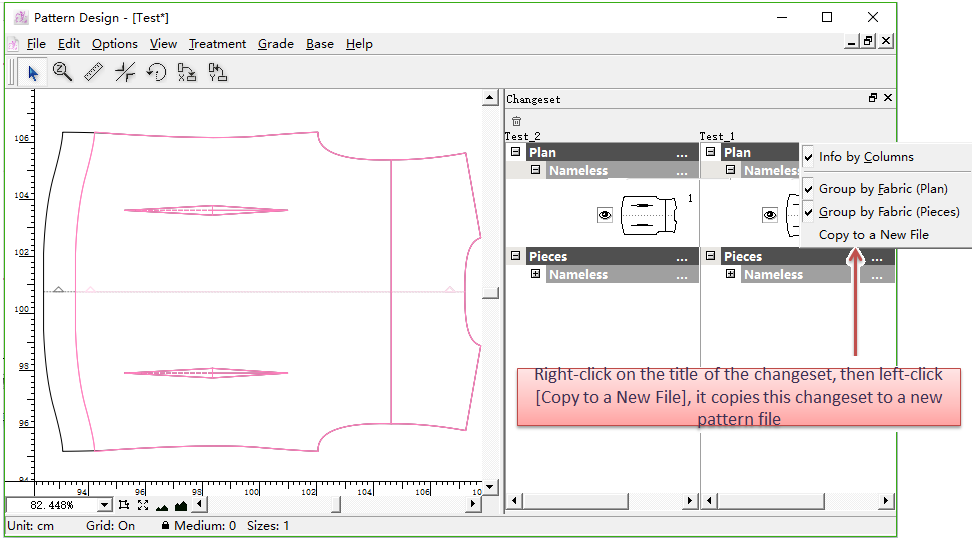
Copy changeset to a new .sty file
Move the cursor to corresponding changeset title and right-click it, the pull-down menu appears, click [Copy to a New File], the interface will go to a new one of a new (.sty) file, all the selected pieces of changeset will paste in the new (.sty) file.
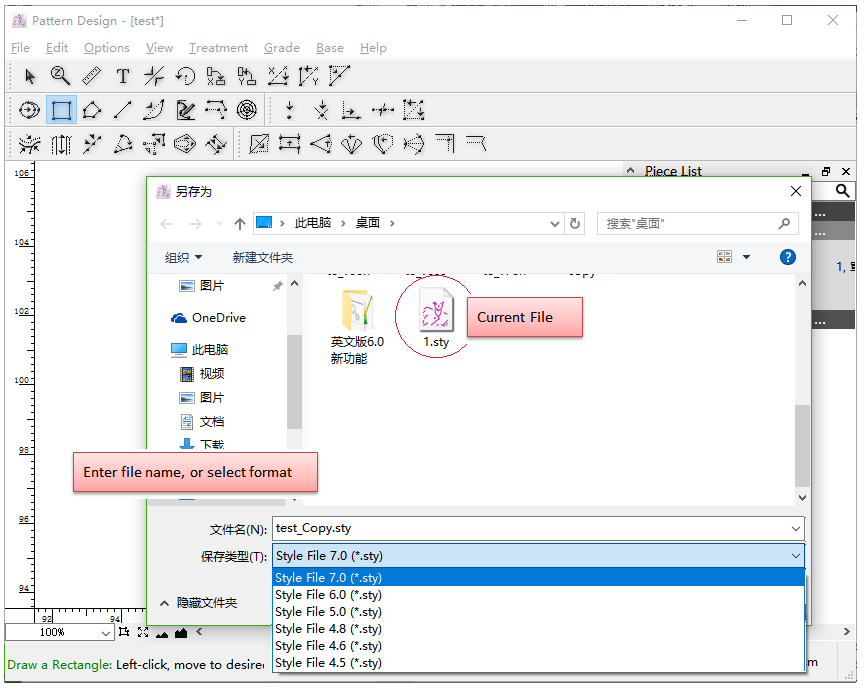
[Save as...]
Allow user to save an exsiting file under different name or directory or different version (defualt is current version, if user wants a lower version of the file, select it).
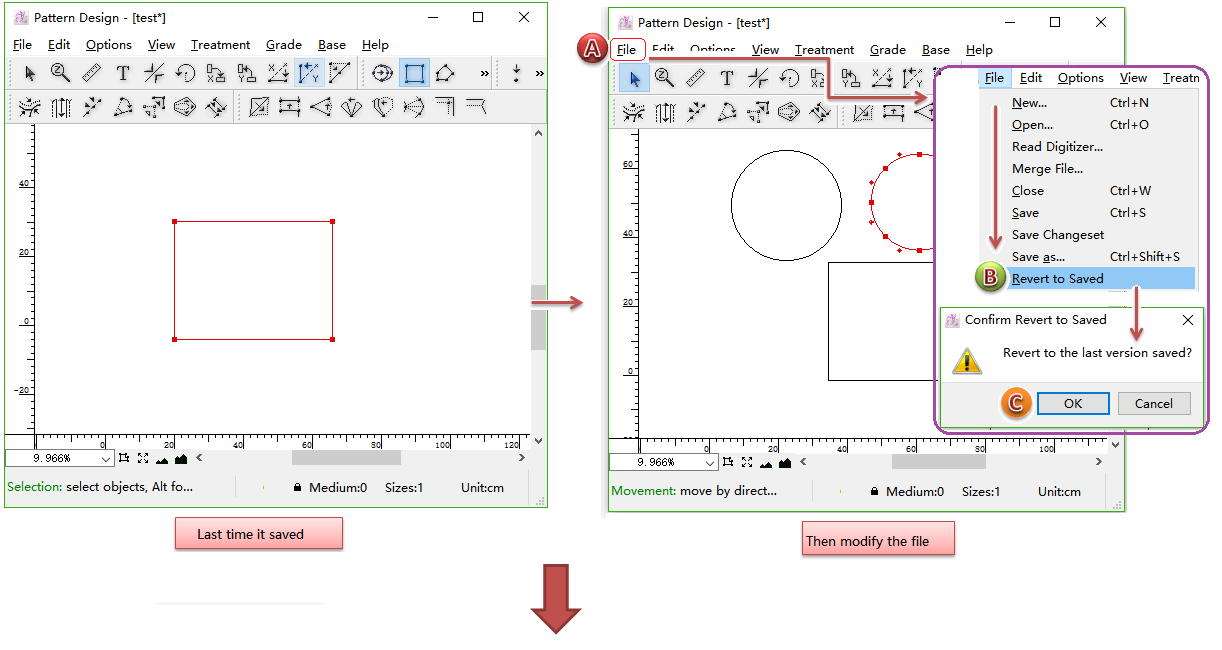
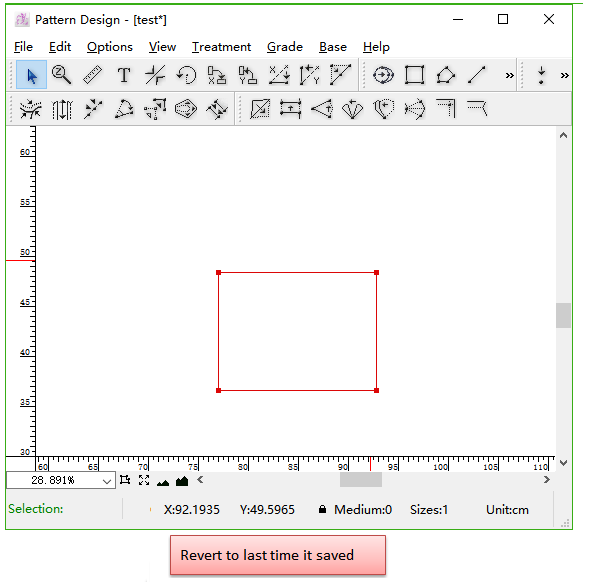
[Revert to Save...]
Allow user to undo all the steps of pattern modifications and revert to last-saved file.
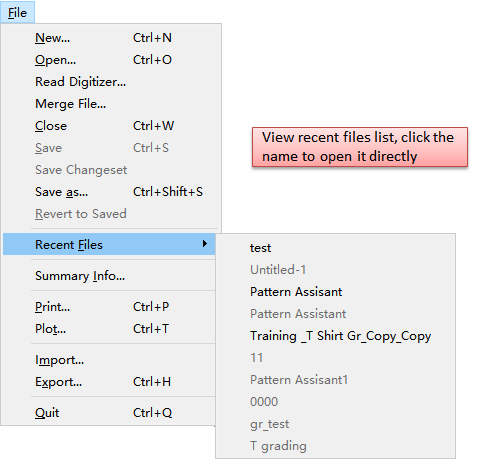
[Recent File...]
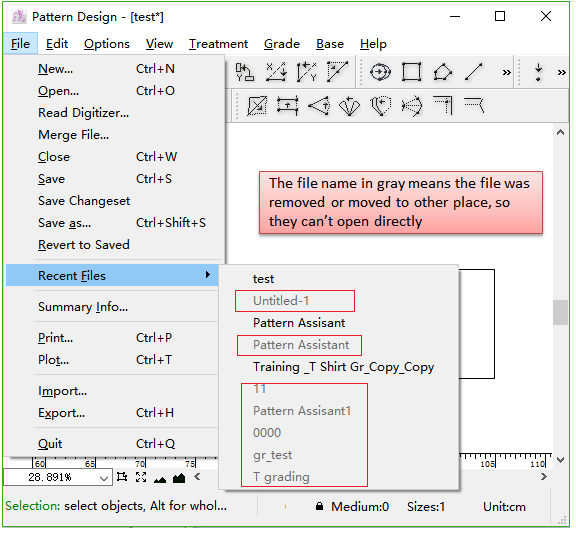
Allow user to check files (up to 10 files) recently being worked on. Open desired file directly by clicking the name on the list.
If the file was removed or its location was changed, the name on the list was shown in gray. User can’t open it directly by clicking it.
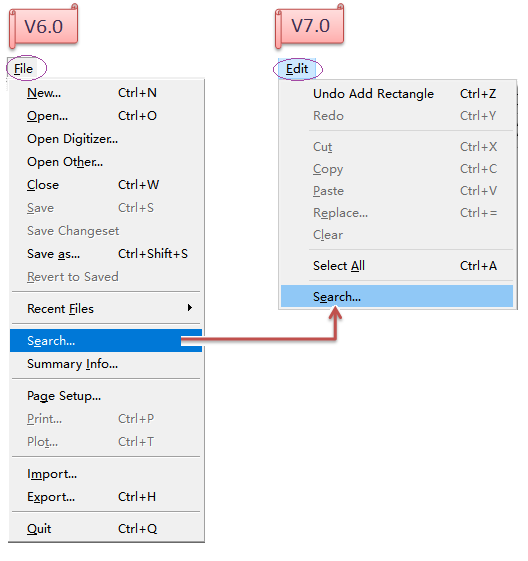
[Search...]
In V7.0, [Search...] item is move from [File] Menu to [Edit] Menu.
For more detailed information about [Search...], please refer to the introduction section of [Edit] Menu.
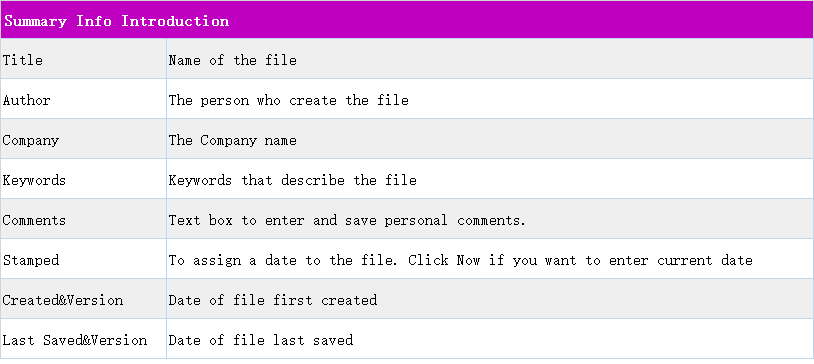
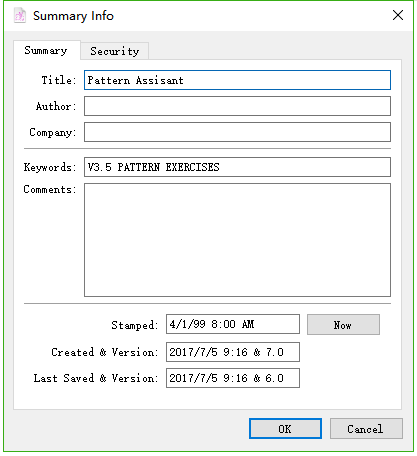
[Summary Info...]
Allow user to enter or save useful information to describe the file and facilitates file search easily.
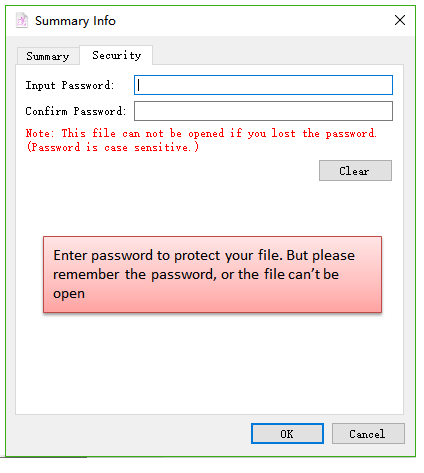
Add a password for the file:
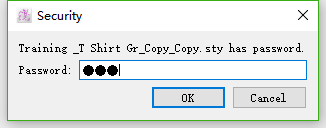
Enter password to open the file:
Password is case sensitive. Therefore, user must remember the password, or the file fails to open.
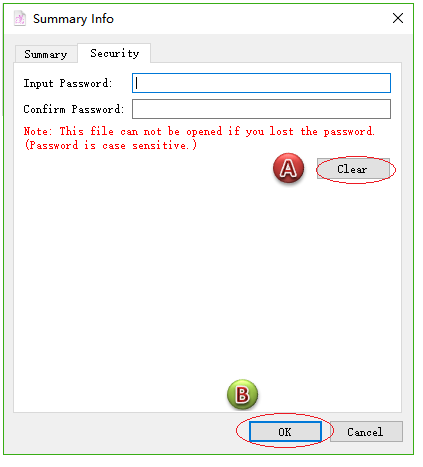
Click [Clear] and [OK] button, then click [Save] to remove the password.
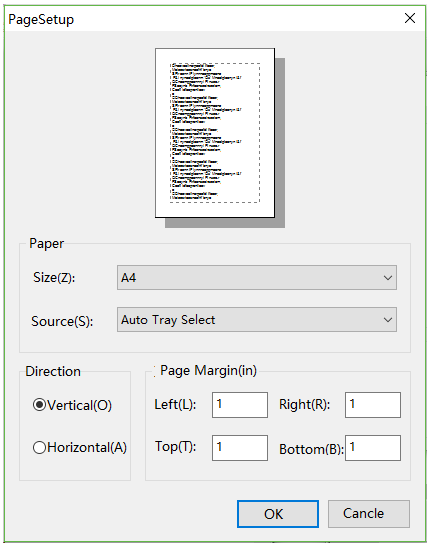
[Page Setup...]
In V7.0, the postion of [Page Setup...] is move from [File] Menu to the dialog box of [Print...].
For more information, please refer to the section of [Print] introduction.
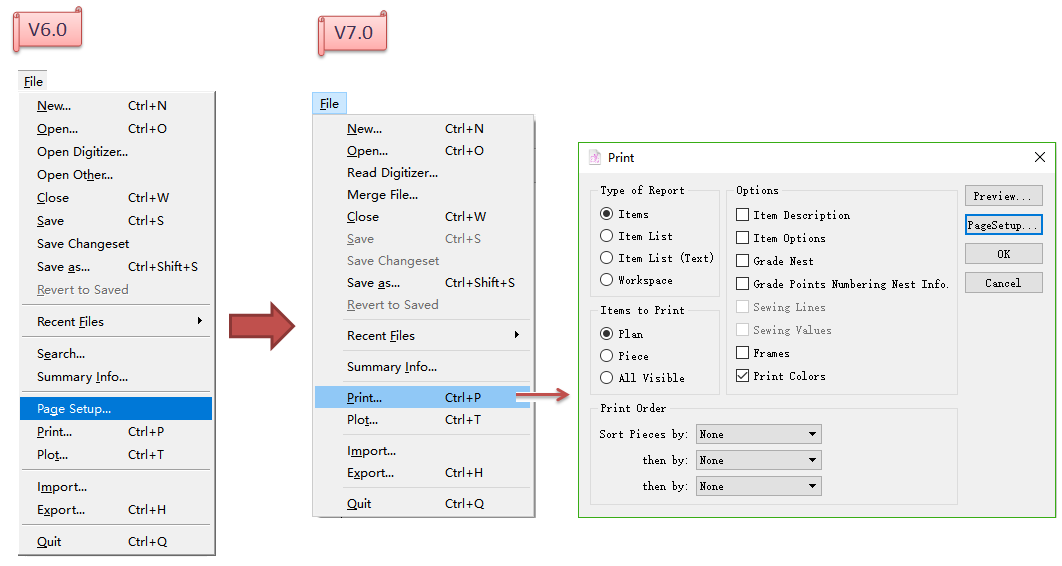
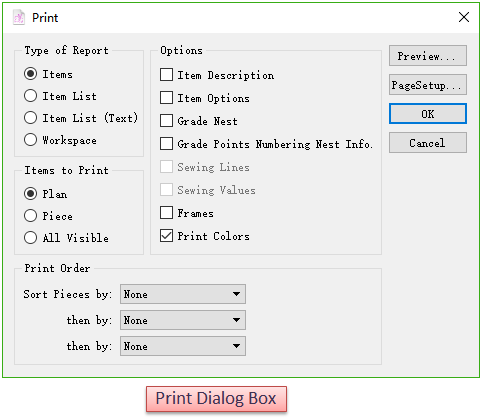
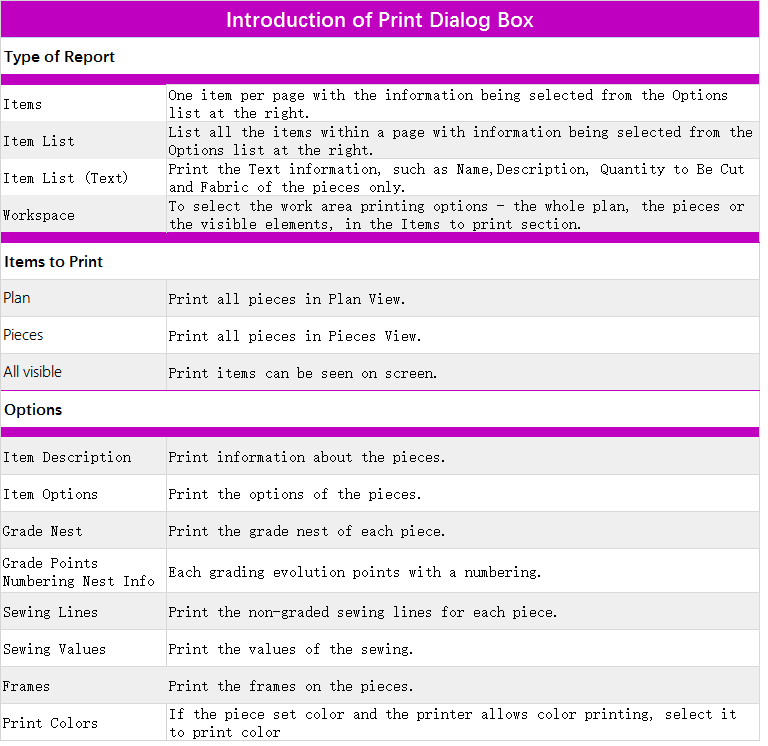
[Print...]
To set your print instructions before printing. Print results would be based on your selection and you can click preview to view the results before sending to print.
- Print Order
Allow to organize the print sequence as required. User can make multiple selections or none of these options.
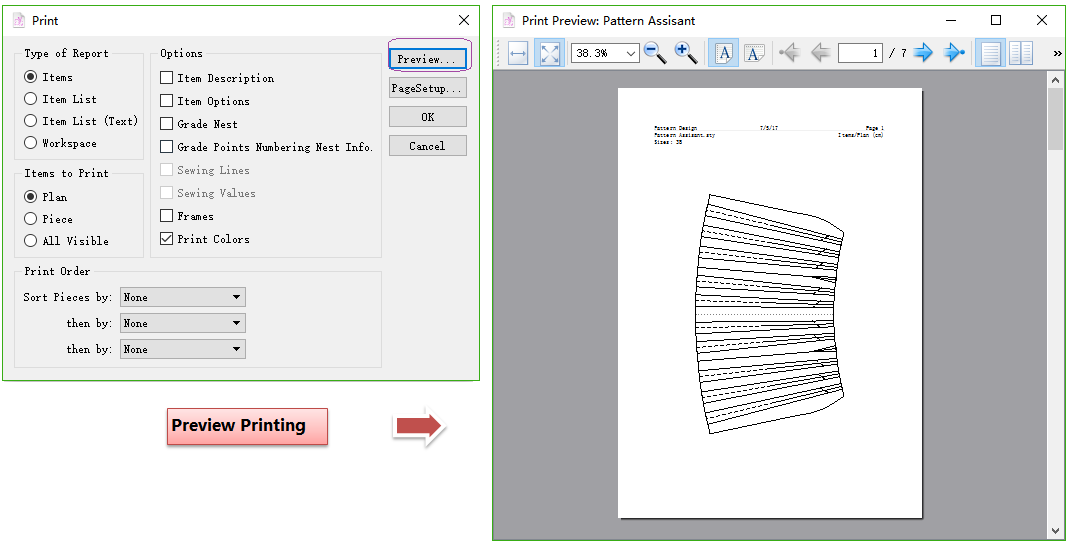
Click [Preview] button to preview the printing result:
User can open [Page Setup...] dialog box to set the Printer, Paper Size, Printer Tray, Paper Orientation, etc.
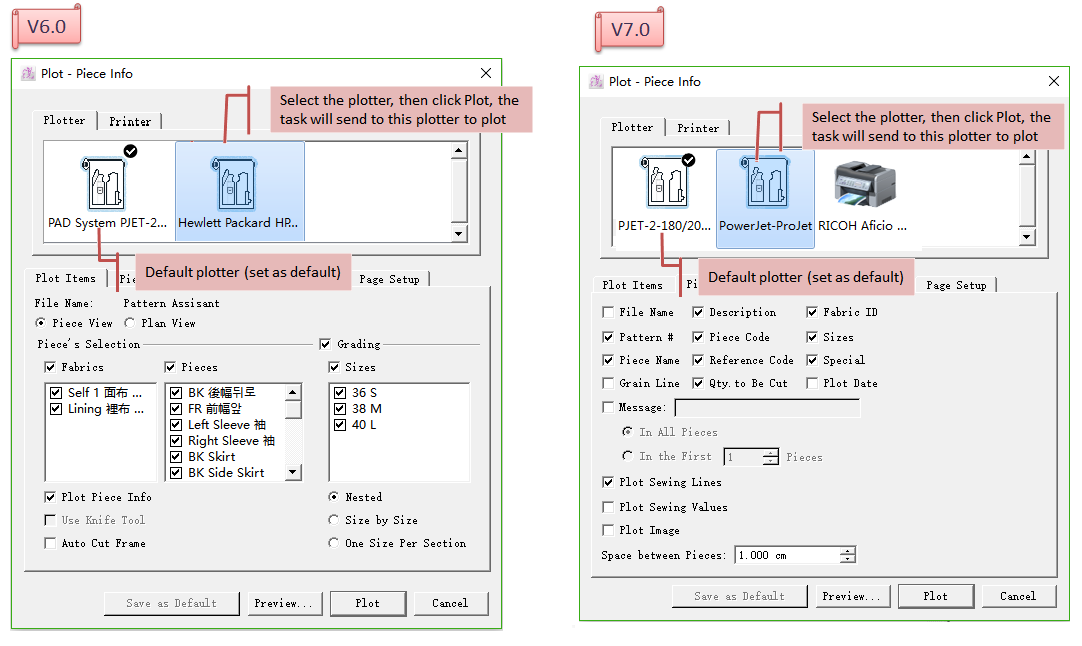
[Plot...]
Allow user to plot the pattern pieces either in Plan View or Piece View for manufacturing. User can choose the piece information and plot them on the piece.
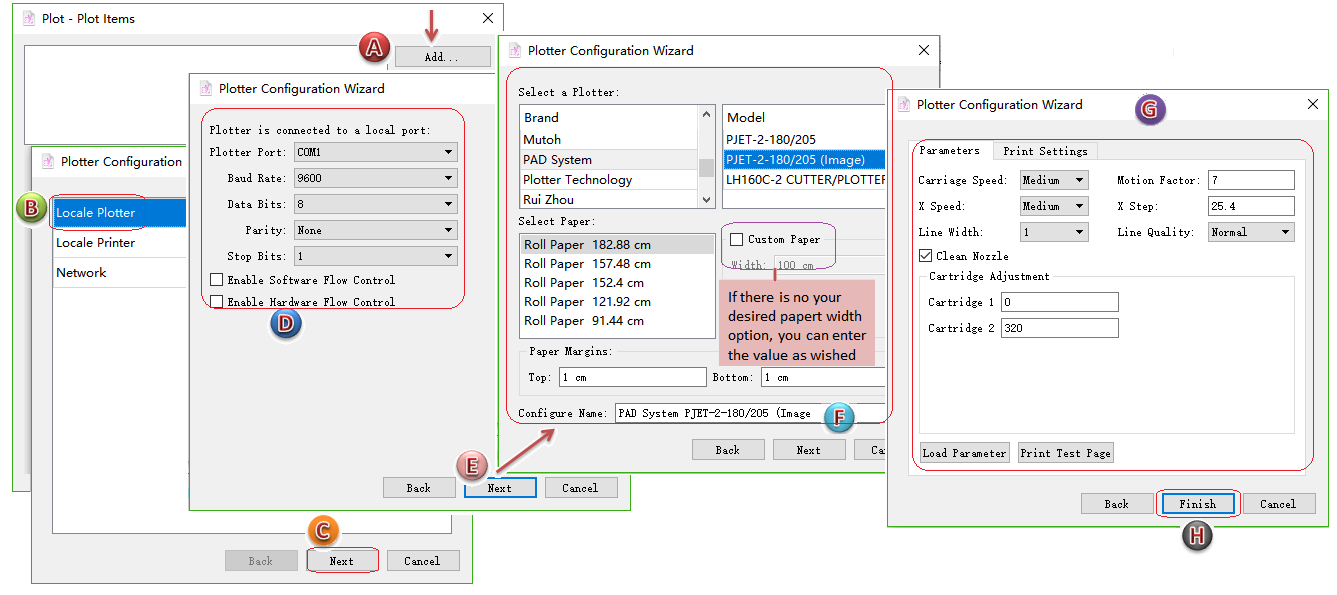
Add locale plotter/printer/network plotter
In V7.0, here is the new position of Add locale plotter/printer/network. The original position of the function is under Menu [Options] - [Preferences] - [Plot].
Click [Add] button, open the Plotter Configuration Wizard Dialog Box, and select the desried locale plotter/printer/network plotter.
For example:
- To add PAD Plotter:
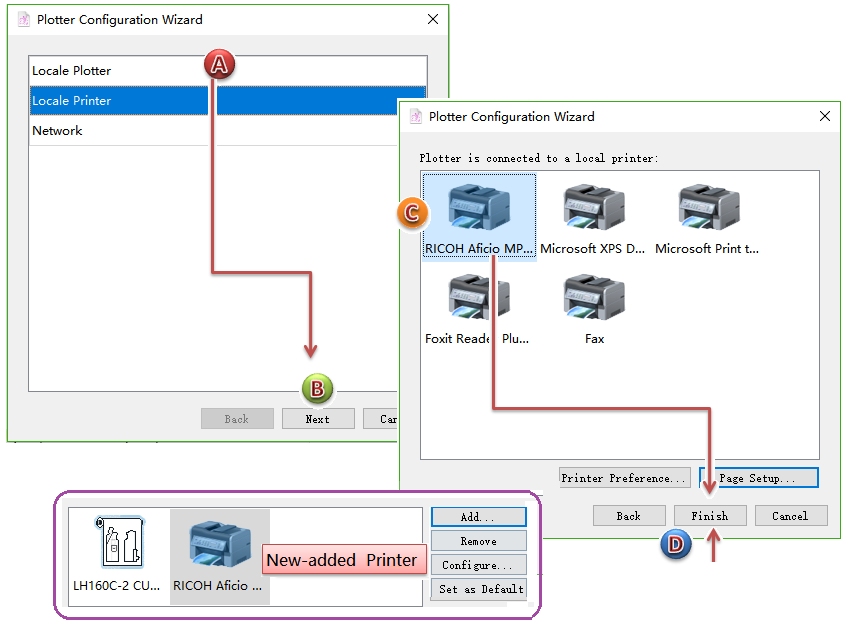
- To add a printer:
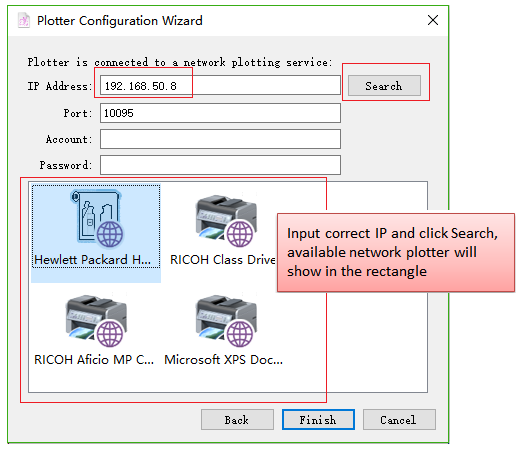
- To add a plotter found in the local area network, after connecting the plotter, user can send the pattern file to plot by network.
How to do:
- Click [Add] - [Network];
- Enter the IP address of the computer connecting the plot in “IP” item;
- Click [Search] then the plotters are shown in the dialogbox, click the desired one, then click [OK] to finish.
If add more plotter, then:
- User can select the frequently-used plotter and click [Set as Default] to set it as default plotter, then the tasks will be sent to this plotter by default. As image shown, the tick √ on the top-right corner of the plotter icon means this plotter is already set as default;
- If you don’t want to send the task to the default plotter, select the desired plotter on your own.
備註
In V6.0, the position of [Set as Default] is under Menu [Options] - [Preferences] - [Plot].
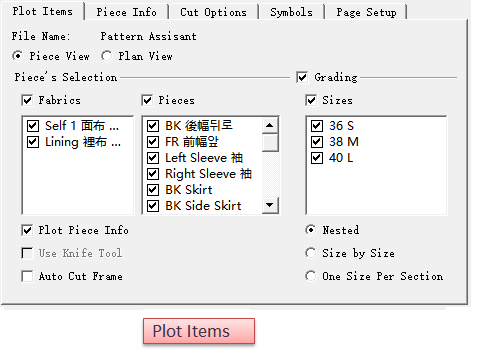
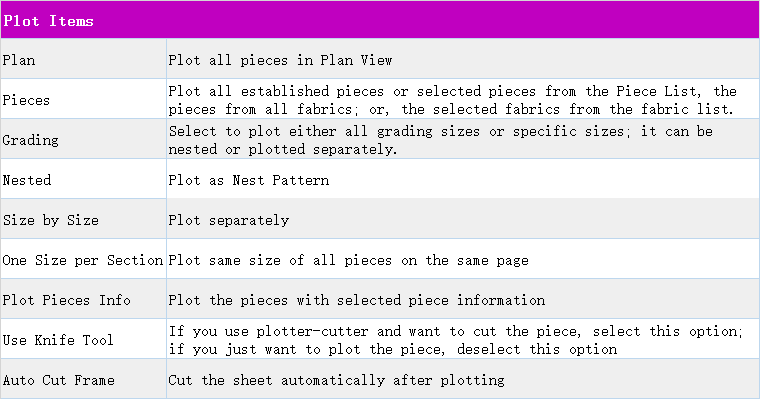
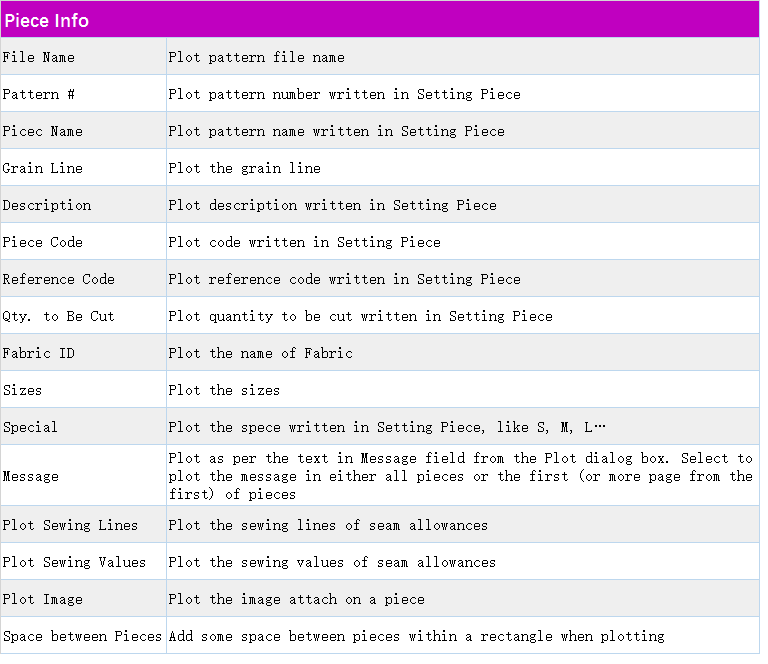
Plot Items
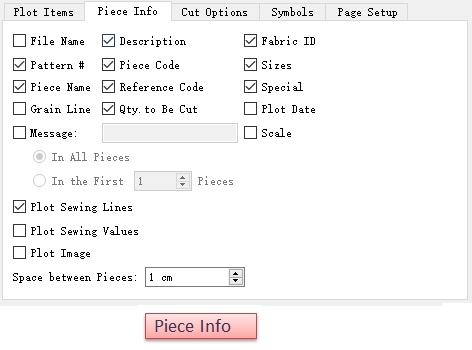
Piece Info
Allow user to select specific information to be plotted inside the pattern pieces.
Piece Info selectable items includes:
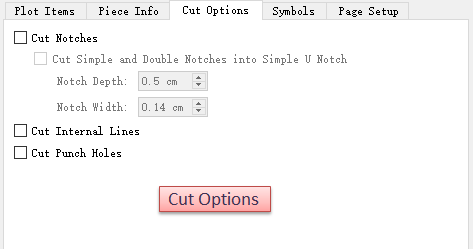
Cut Options
Allow user to specify setting for plotters equipped with cutters.

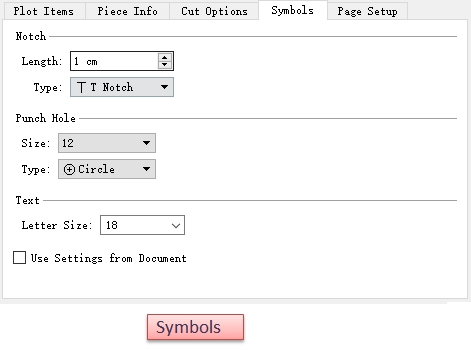
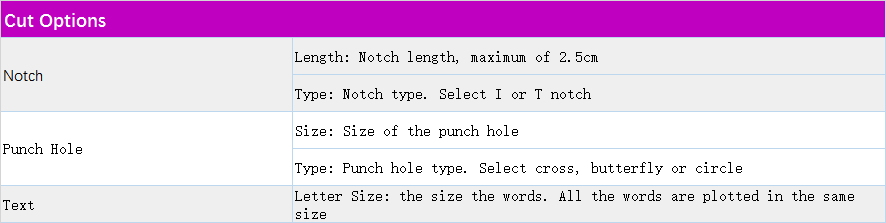
Symbols
Define and modify the length and type of both Notches and Punch holes; and also set the letter size of the piece description.
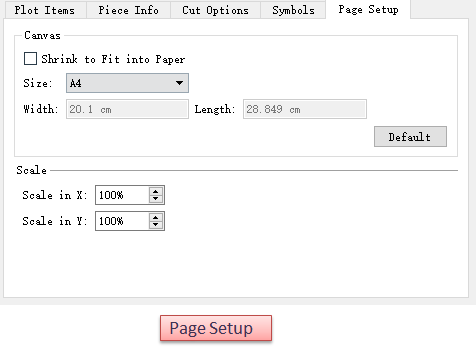
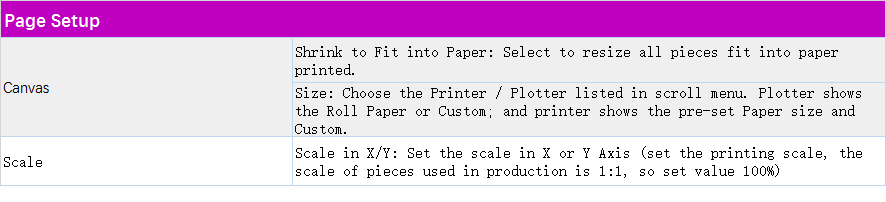
Page Setup
Define the paper size or use the paper setting from the Plotter driver.
If want to save the current settings as defaault (no need to select again next time), click [Save as Default] button.
After finishing settings, click [Preview] to see the result; close the [Preview] window to modify the settings if necessary.
Click [Plot]to execute plotting.

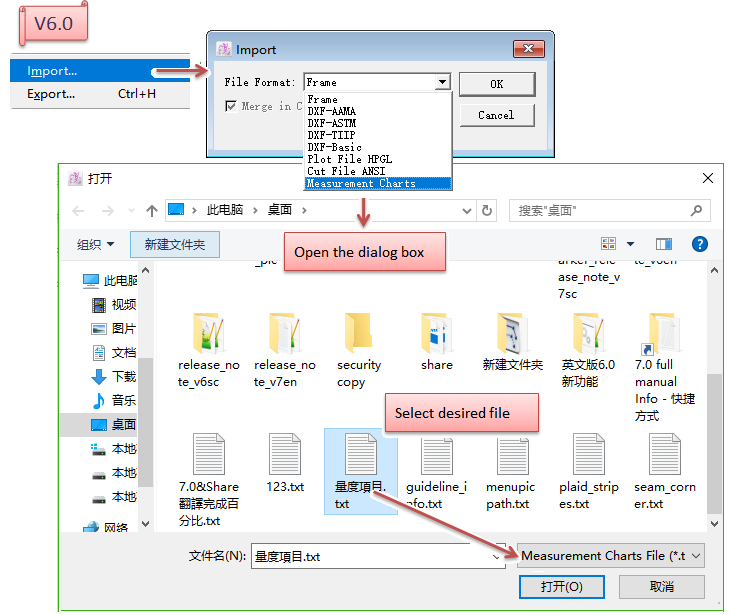
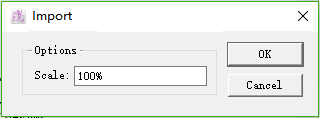
[Import...]
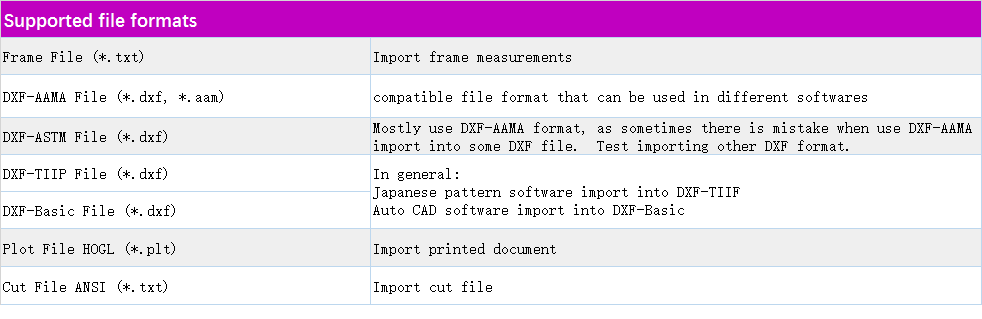
Select [Import...] item to import and open the desired file from other place, or import the desired file into the corresponding pattern file.
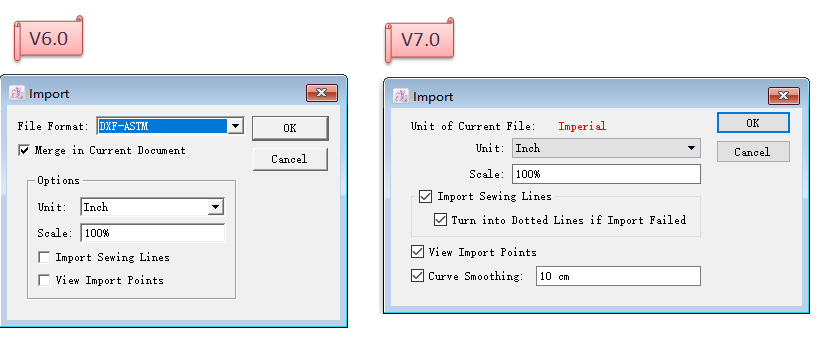
Click Menu [File] - [Import...], open the Import Dialog Box, select the desired file format, another dialog box appears. Choose the desired file from the dialog box.
For example:
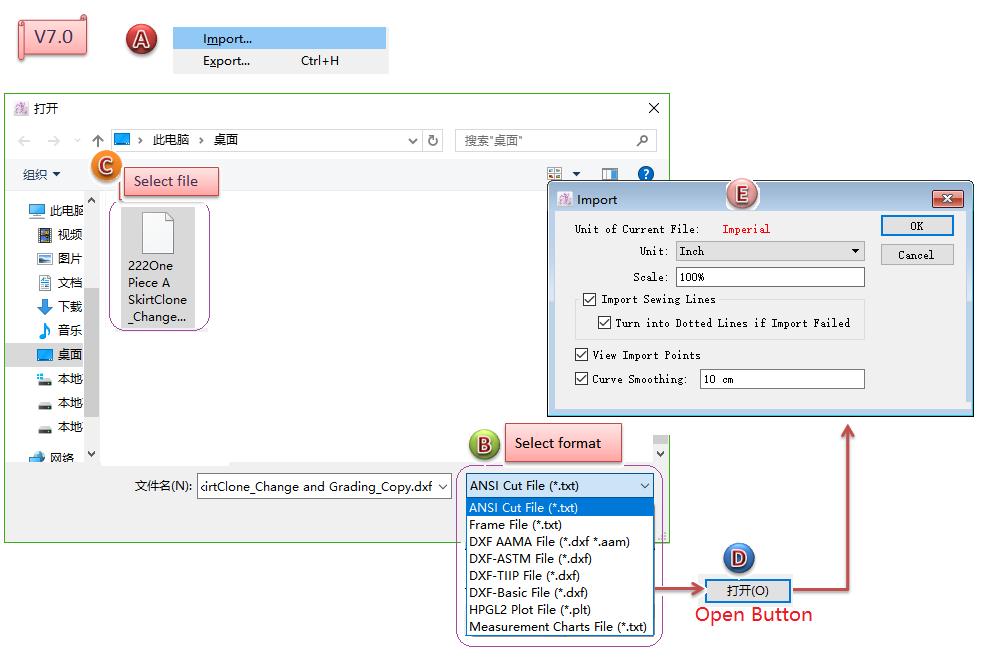
Position adjustment is made in V7.0. Click [Import...] to open dialog box. User now can select the desired file format and choose the file in the same dialog box.
For example:
V7.0 can read the unit of imported DXF Files automatically, facilitates user to quickly open the file.
Import Frames
For more information about importing Frames, please refer to Chapter Six Frames.
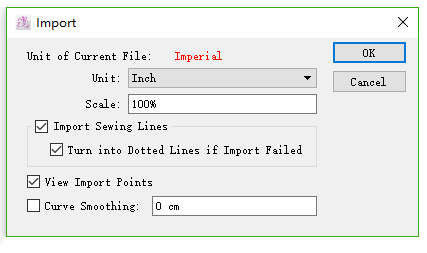
Import DXF-AAMA, DXF-ASTM and DXF-TIIP files
If user imports the DXF-AAMA, DXF-ASTM and DXF-TIIP format files, select the desired options in the dialog box shown as follows:

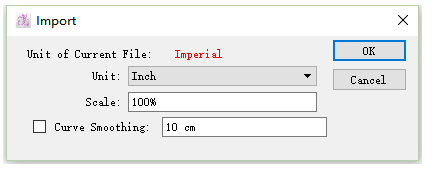
Import DXF-Basic
If user imports the DXF-Basic format files, select the desired options in the dialog box shown as follows:

Import HPGL and ANSI files
If user imports the HPGL and ANSI format files, select the desired options in the dialog box shown as follows:

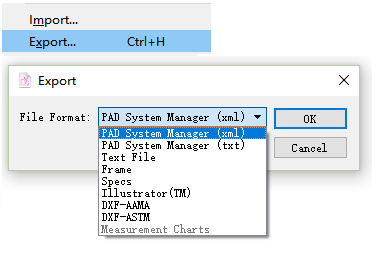
[Export...]
Allow user to send selected files to foreign systems or compatible software.
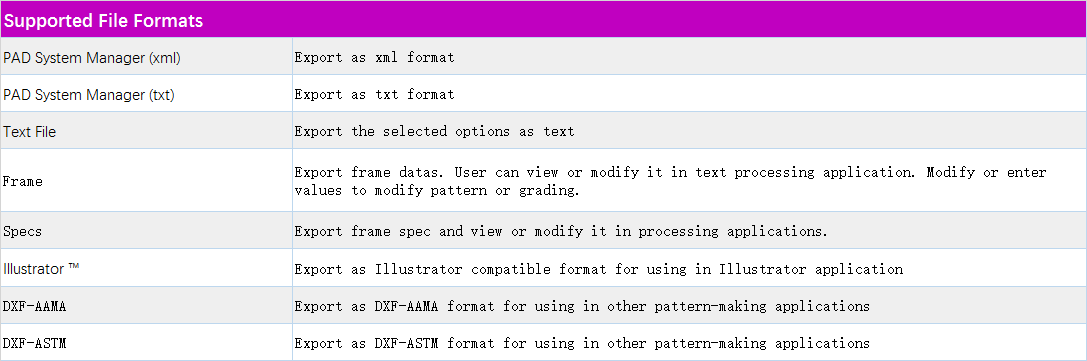
The file formats allowed to send are as follows:
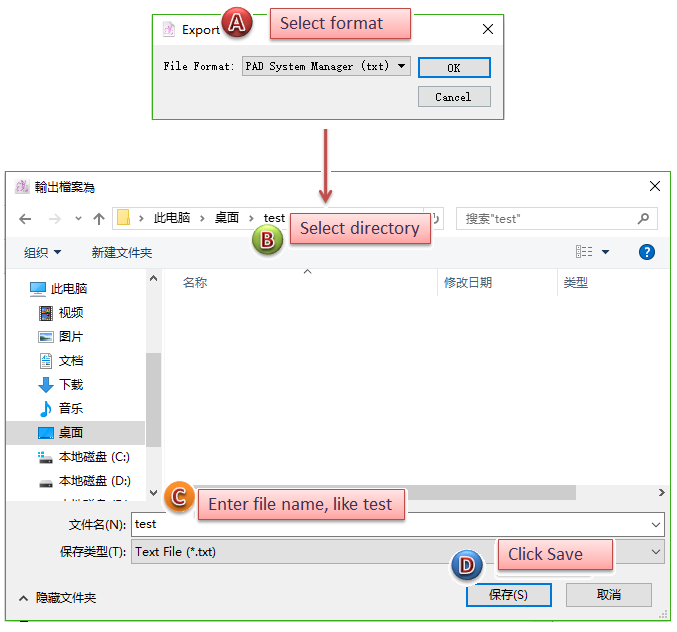
Export PAD System Manager (txt) / (xml)
Select the desired file format and click [OK], then enter file name and choose the directory. Click [Save].
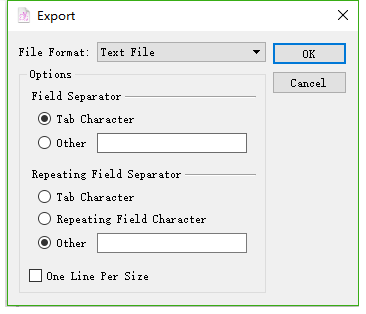
Export text file
If choosing export as Text File, the Text File option dialog box shows as follows:
Export Frame file
For more information about how to import Frames, please refer to Chapter Six Frames.
Export Frame - Specs file
For more information about how to import Frame - Specs file, please refer to Chapter Six Frames.
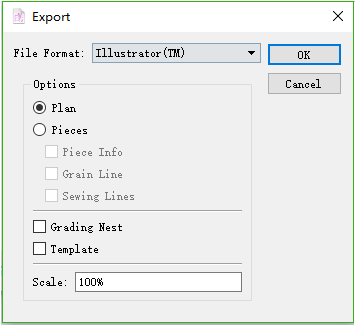
Export Illustrator (TM) file format
If choosing export as Illustrator (TM) File, the dialog box shows as follows:
Select the options and click [OK], Save dialog box appears. After selecting the directory and enter file name, click [OK].
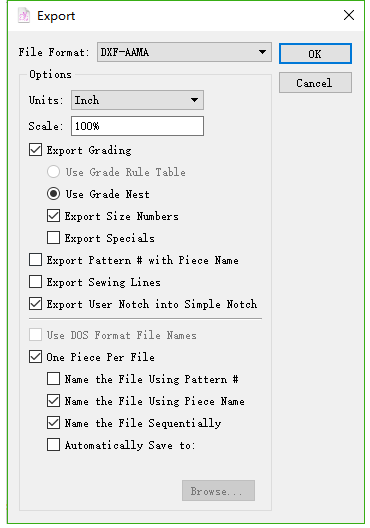
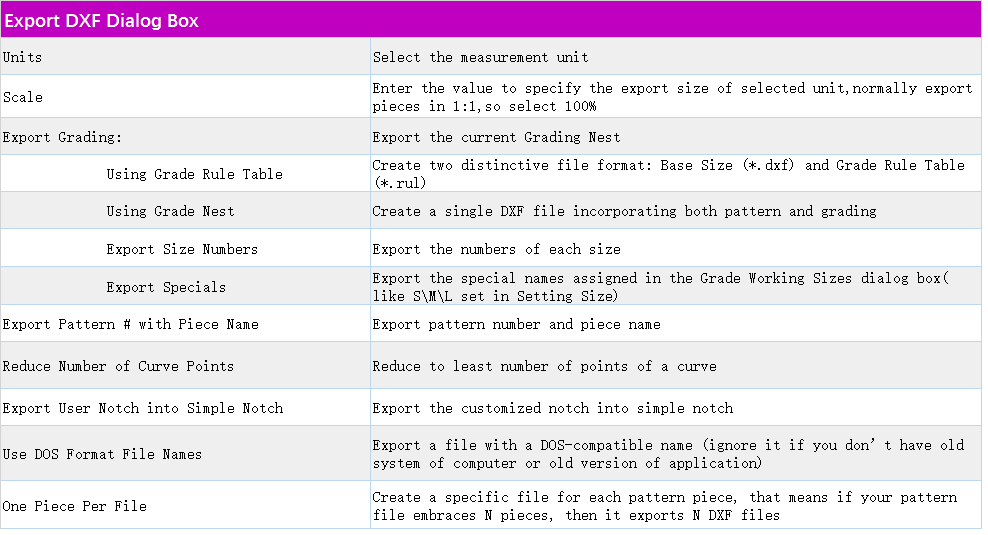
Export DXF-AAMA and DXF-ASTM file format
If choosing export DXF-AAMA and DXF-ASTM file format, the dialog box shows as follows:
Select the options and click [OK], Save dialog box appears. After selecting the directory and enter file name, click [OK].
[Quit]
Close this application and all the open files.
The application will close directly if no modification is made.
If there is any modification unsaved, a warning dialog box appears:
Save: Save the modification and close the window.
Discard: Give up saving the modification and close the window.
Cancle: Go back to the window, do not close the window.