Summary of [File] Menu:
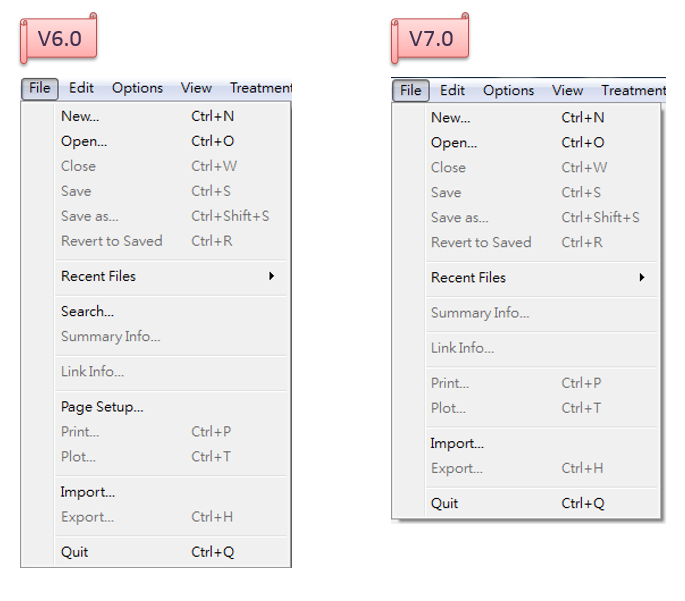
Some menu items of position is changed in different versions of software.
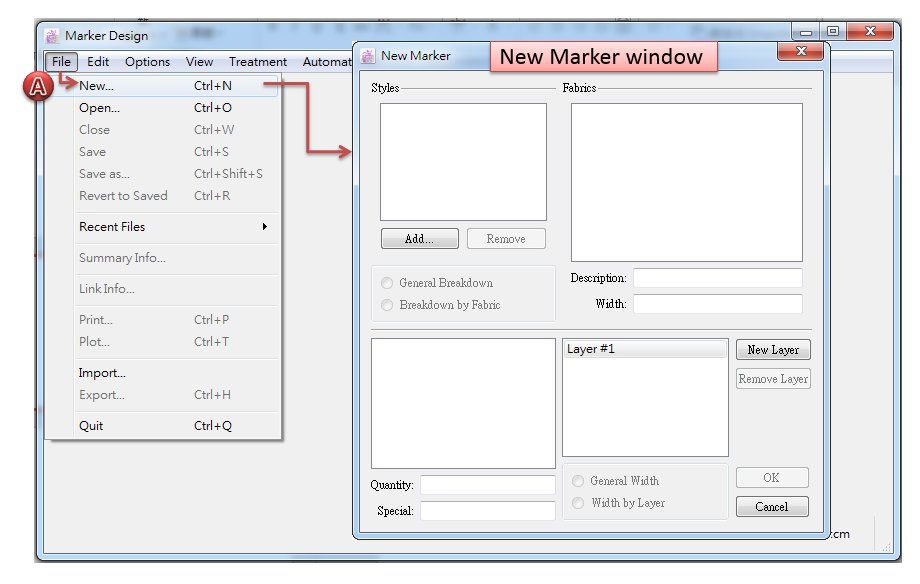
[New…]
Create new marker file for nesting.
How to create
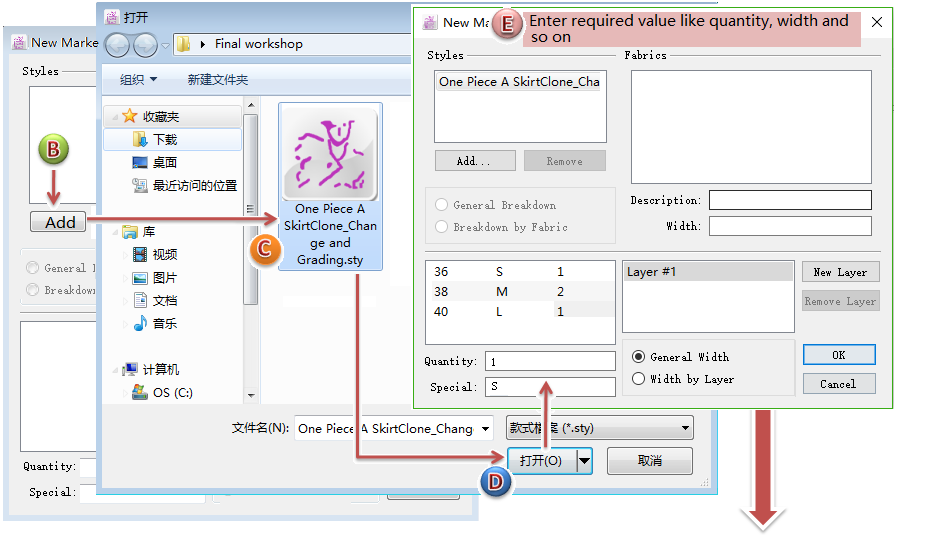
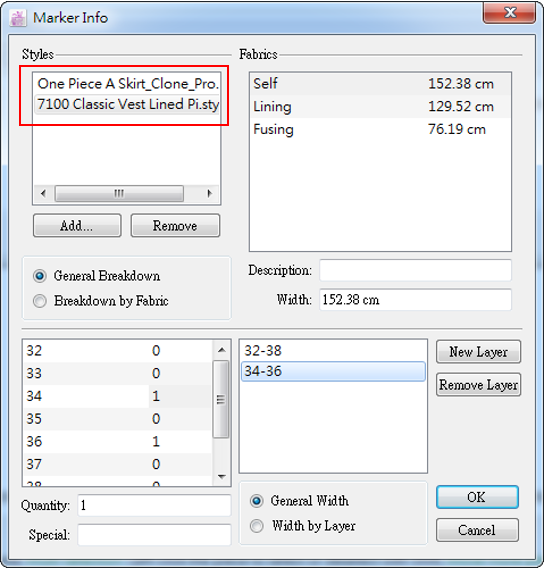
Click Menu [File]-[New…], the New Marker Dialog Box appears;
Click [Add] button to add the desired pattern file (.sty);
Enter the quantity, width and other information as requred;
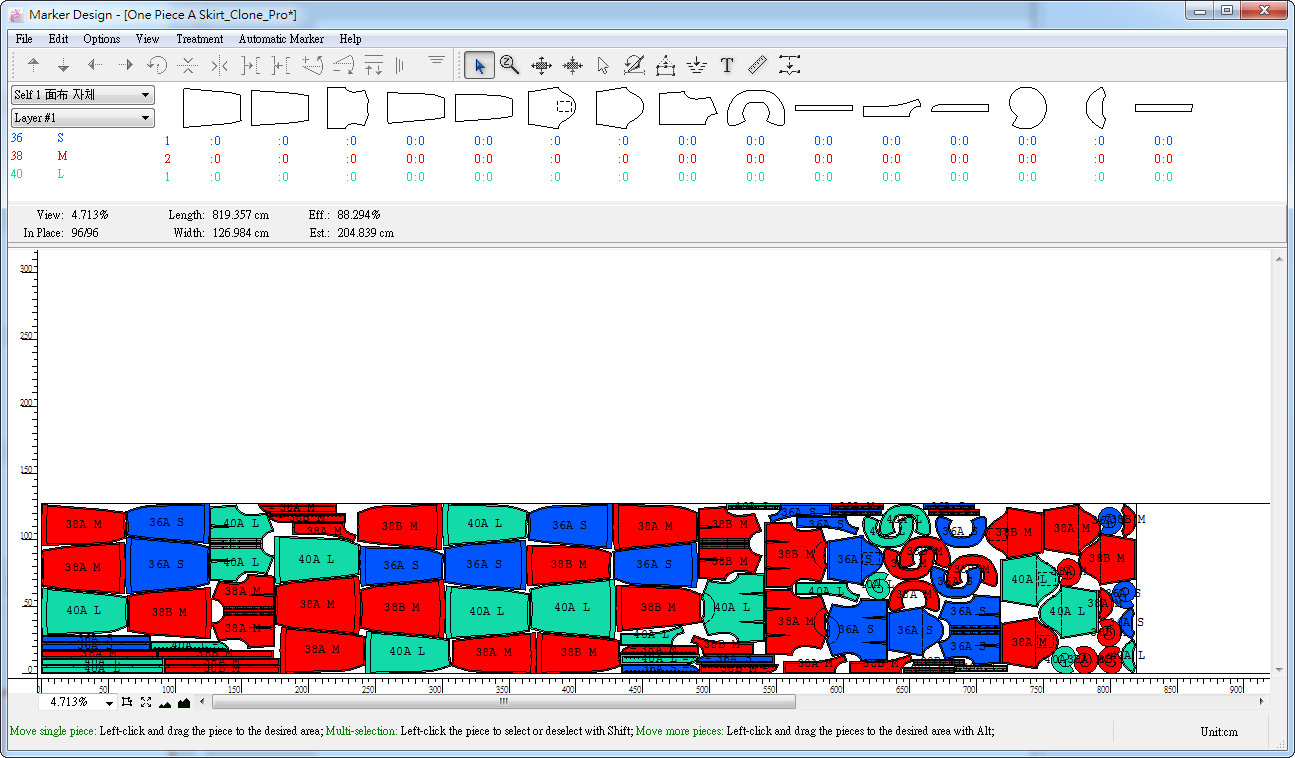
Click [OK] to make it a marker file, it turns to nesting interface and user can start nesting.
Note
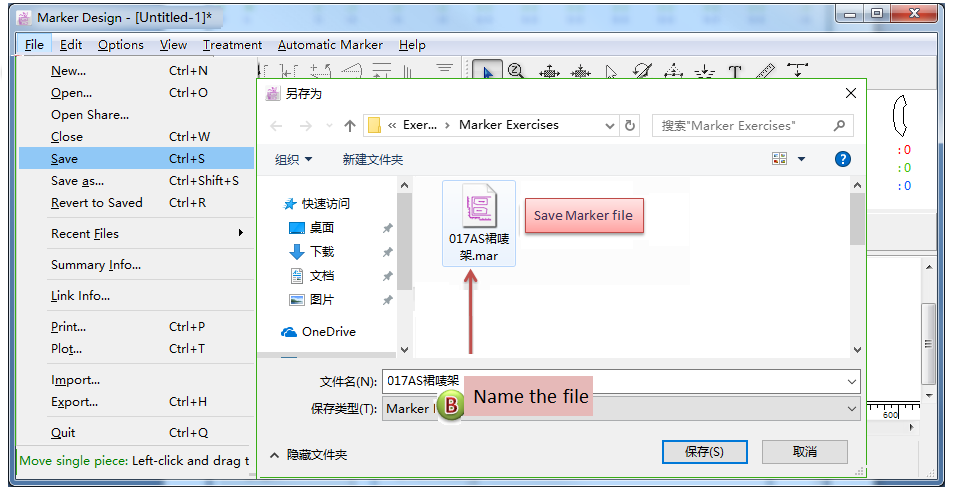
Click [File]-[Save], and enter name in the Save Dialog Box, then click [Save] button, to save the marker file.
Add more than one pattern file to Marker
User can add more than one pattern file one time into the same marker file:
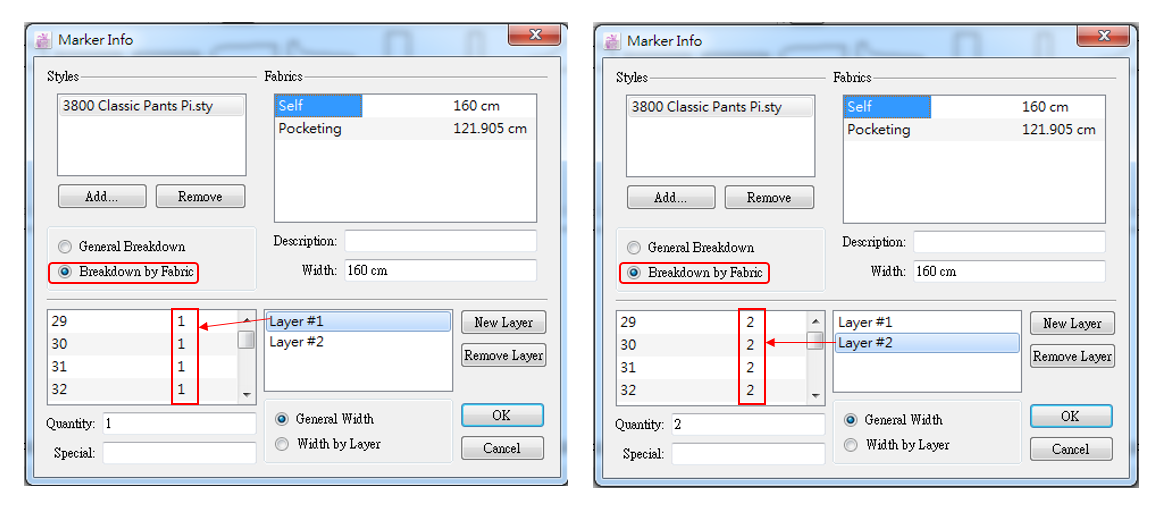
Set different breakdowns according to fabric/layer
Select [Breakdown by Facbric], the added file (with more than one fabric/layer)will obtain different breakdowns according to different fabrics, for example:
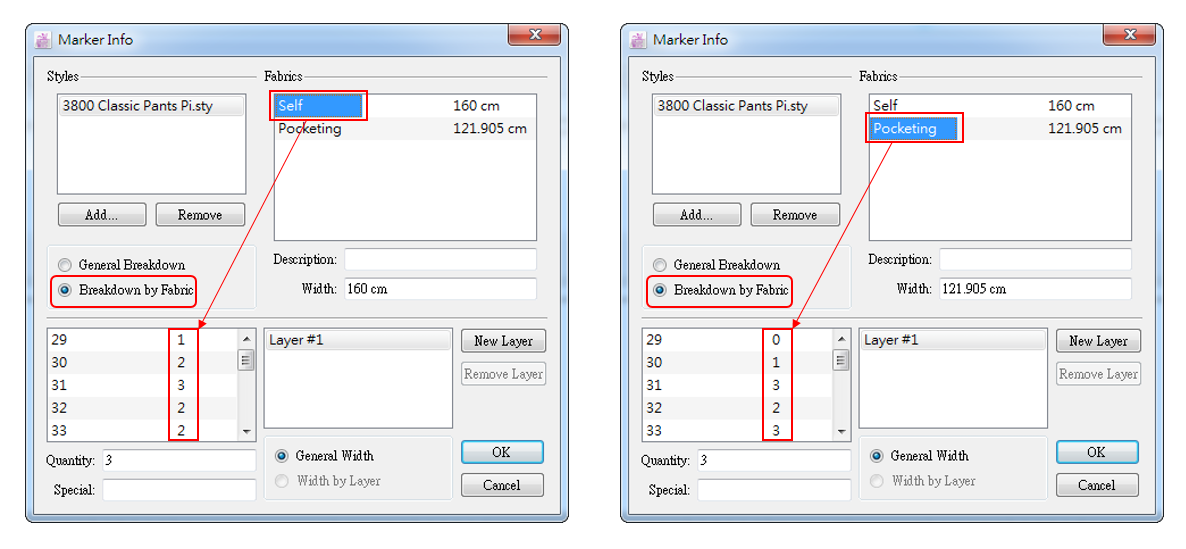
Select [Breakdown by Facbric], user can also set different breakdowns for different layers, for example:
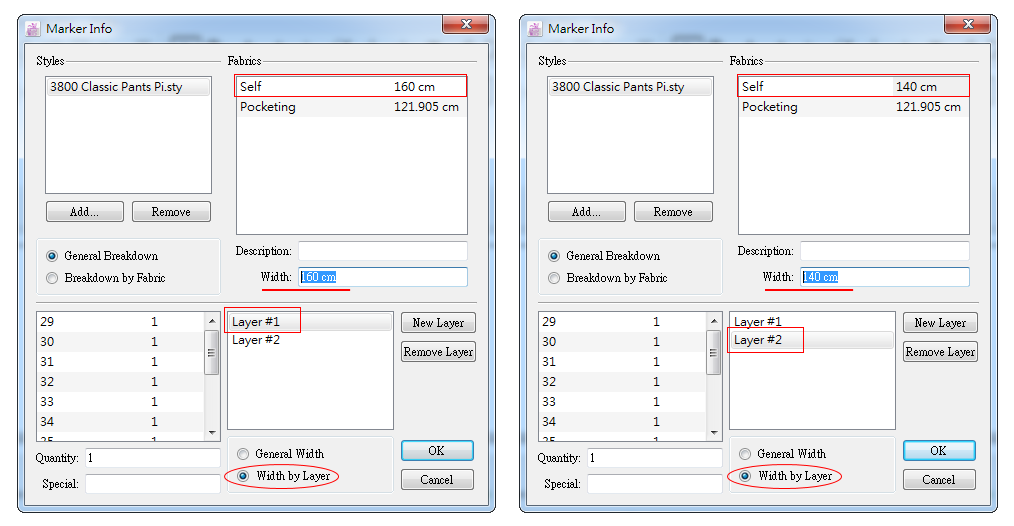
Set different width for different layers
Select [Width by Layer], user can set different width for different layers, for example:
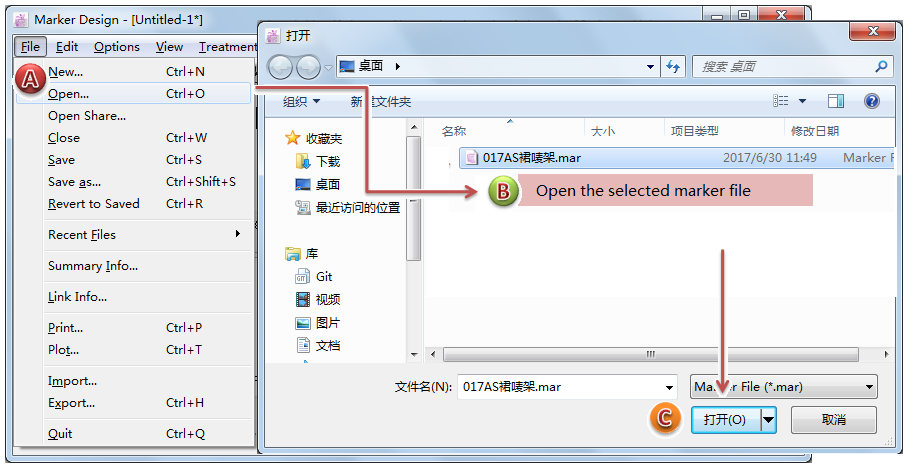
[Open…]
Open an existing marker file (.mar) / (.maa).
[Close…]
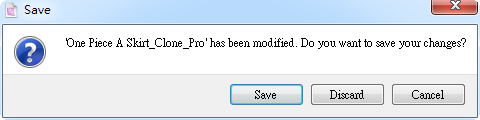
Close the active file. If the file has no unsaved modification, the application closes directly; if the file has unsaved modifications, the application opens a window asking you if you wish to save the open file. Click [Save] to save modification; click [Discard] to give up saving the modification and the file keeps the same as last time. Click [Cancle] to return to the current marker file.
[Save…]
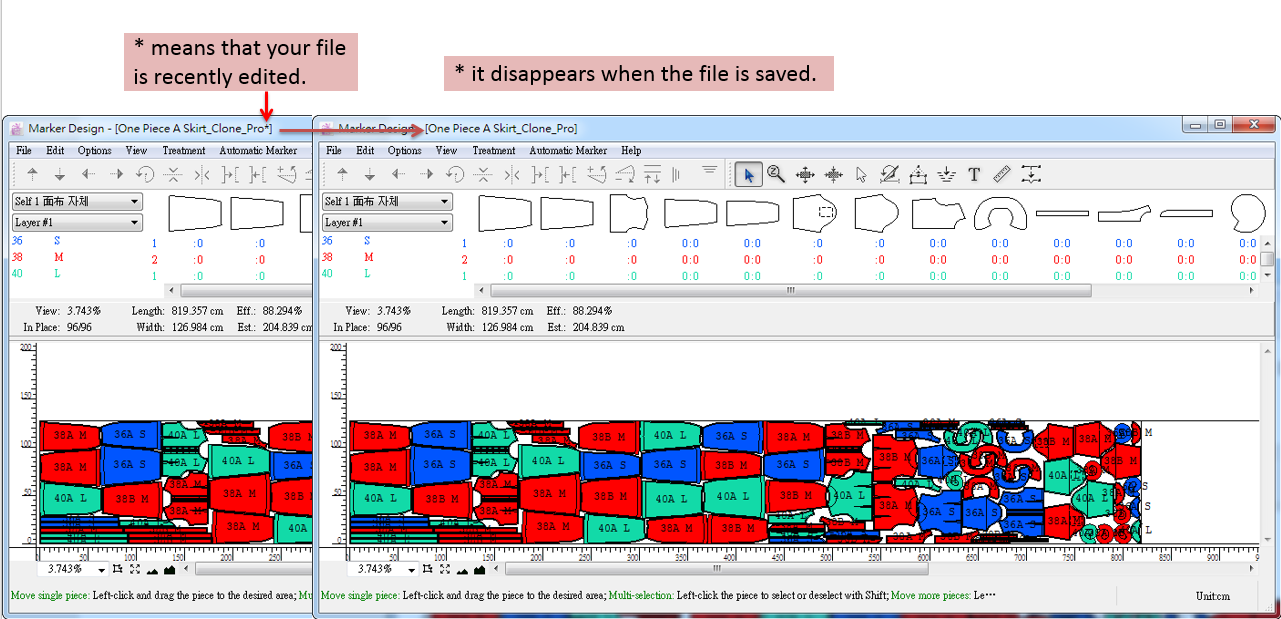
Allow user to save the modification for the current marker file, or save the new marker file.
If user is working on the current marker file (saved before) and want to save the modification, click [Save…], then the * shown beside the file title will disappear:
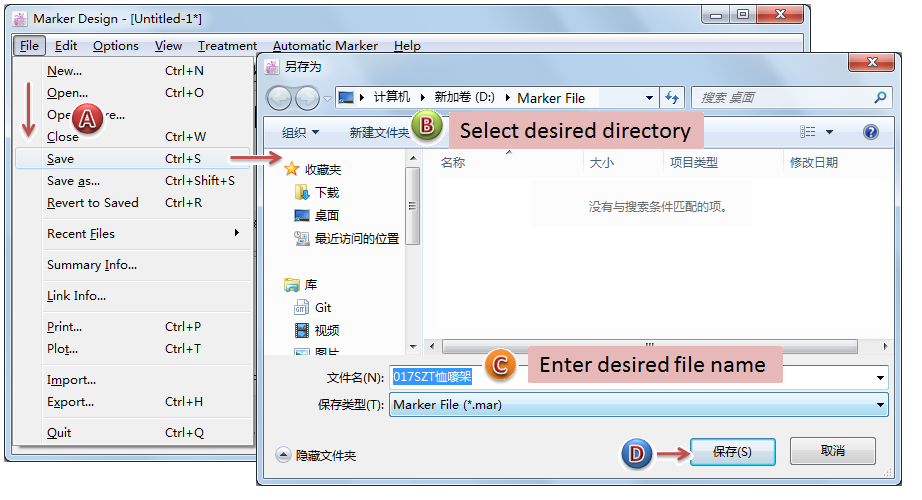
If user is working on the new marker file, click [Save…], the Save Dialog Box appears for user to enter file name, select file format, and choose the path.
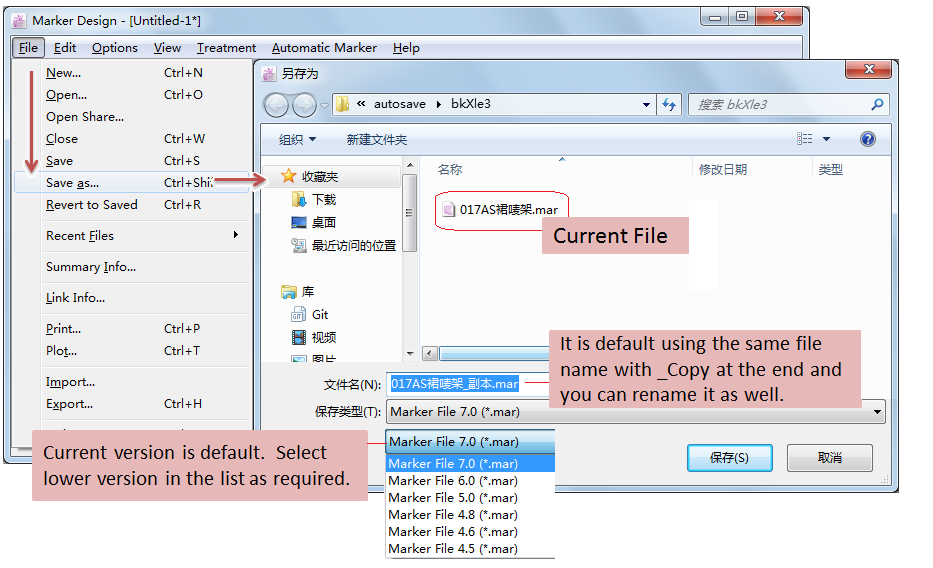
[Save as…]
Allow user to save an existing file under other directory/different name or in the different versions (current version is default, if want previous version, select it from the pull-down list).
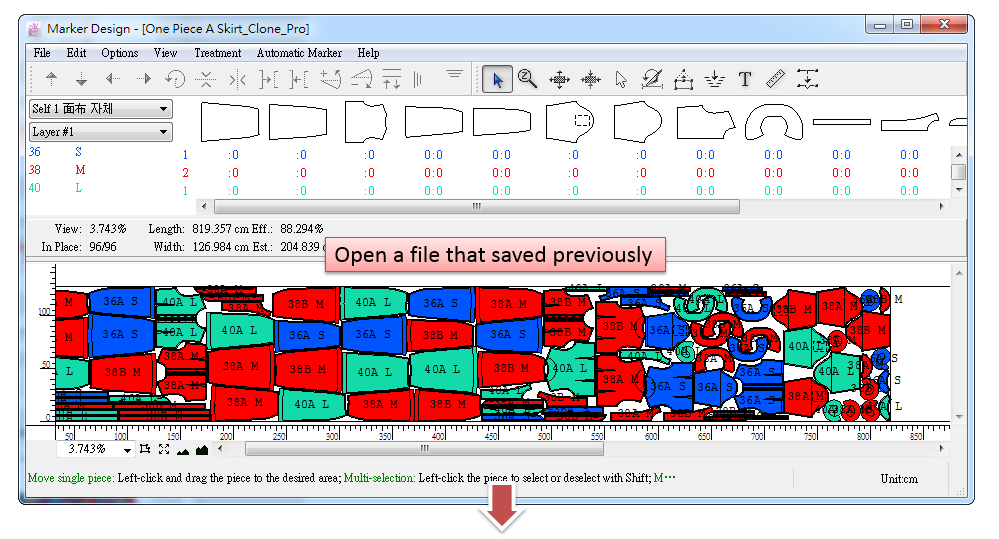
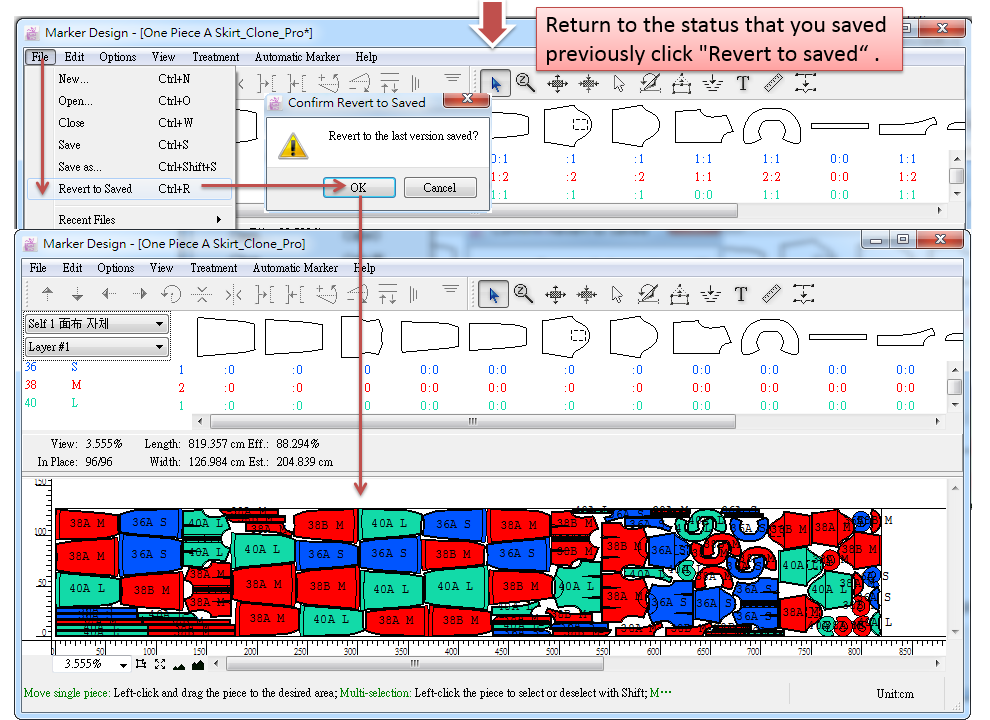
[Revert to Saved…]
It erases all preceding steps up to the last time the file was saved.

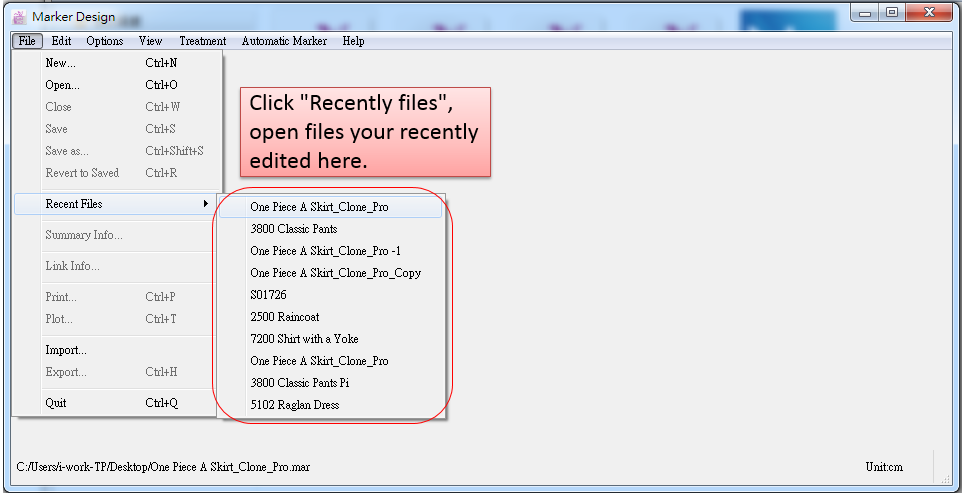
[Recent Files…]
Allow user to see and open the previous marker files in the list (10 files at most). Click the name to open the file.
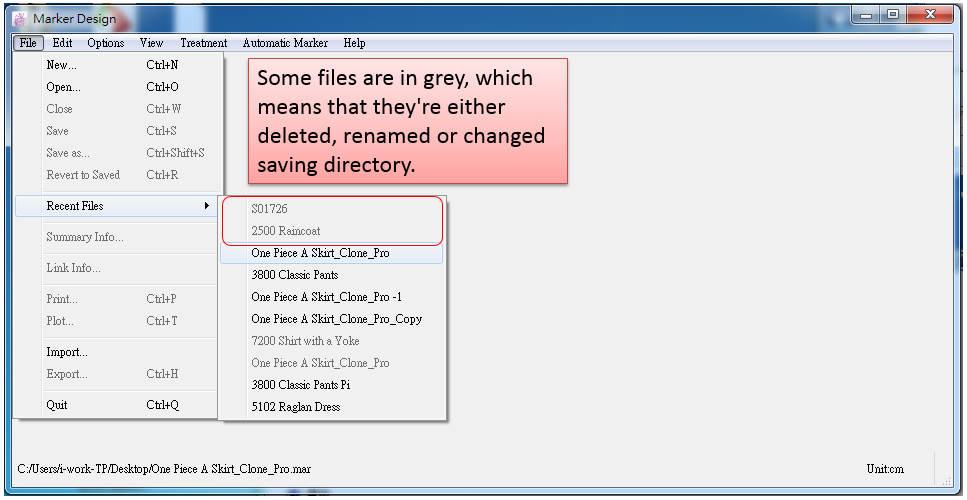
The file name in the list is shown gray if the file is removed or its directory is changed. It can’t be open this time.
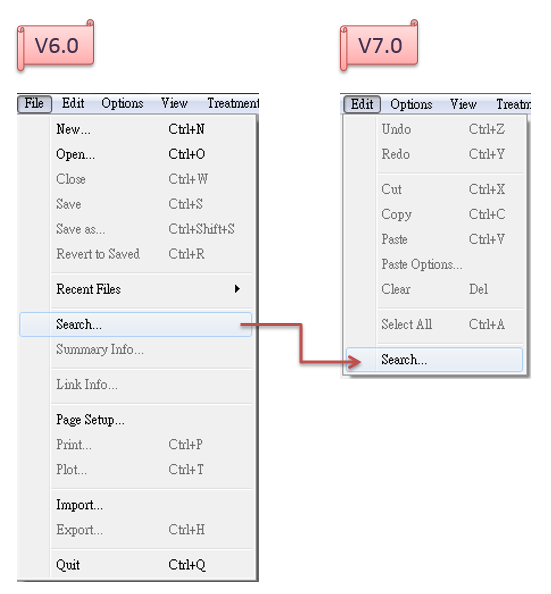
[Search…]
In V7.0, the position of [Search…] item is moved from [File] Menu to [Edit] Menu.
For more information about [Search…], please refer to the corresponding section in [Edit] Menu introduction.
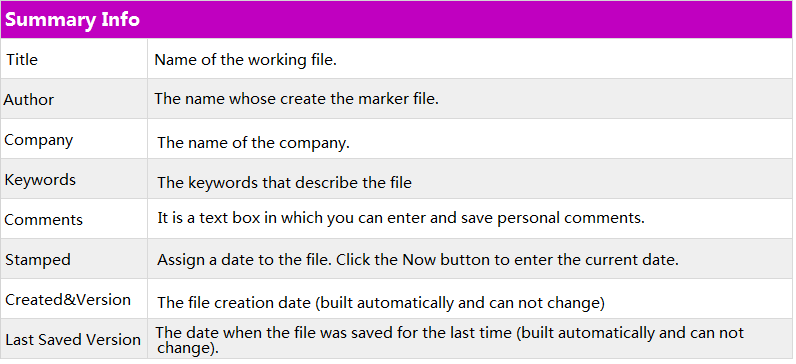
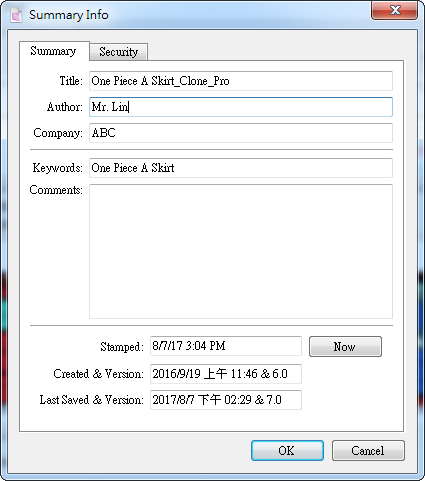
[Summary Info…]
Allow user to enter and save useful information to associate with the open file, facilitate user searching files.
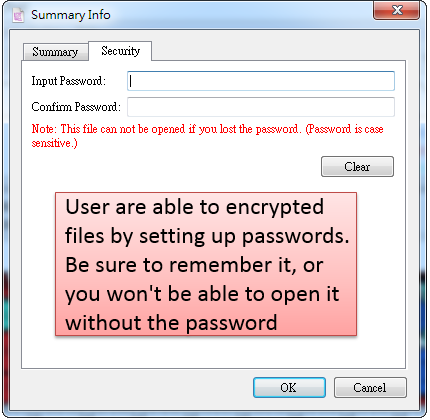
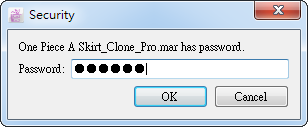
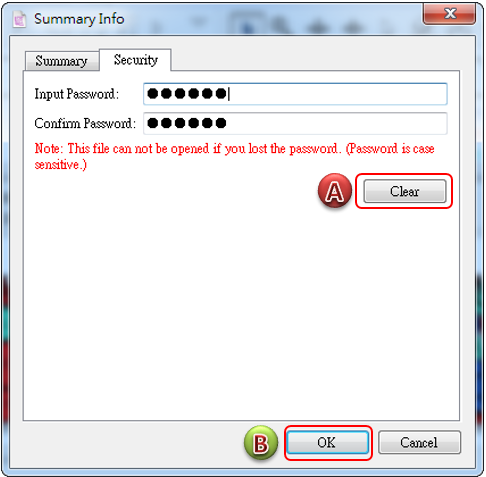
Set password for securing the file:
Only enter password can the file be open:
The password is case sensitive. Please remember your password, otherwise the file can’t be open.
If you want to delete the password, click [Clear] and [OK] Button, then clik [Save] in [File] Menu.
[Link Info…]
Allows user to update the marker file by linking it to one or more pattern files. All modifications made to the pattern are recognized by the marker application and the user is warned when such modifications are made and saved.
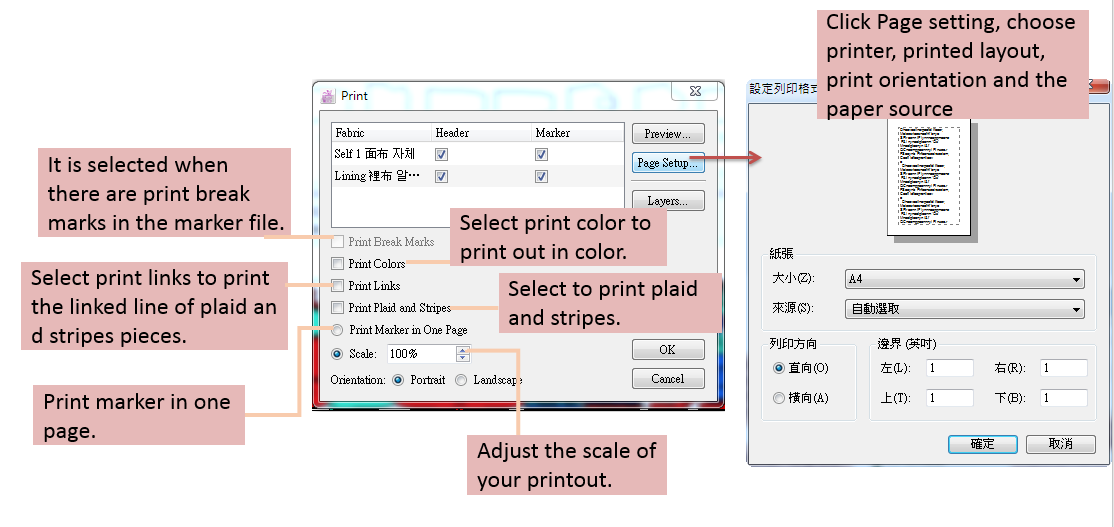
[Page Setup…]
In V7.0, the position of [Page Setup…] item is changed. It is moved to the dialog box of [Print…].
Get more information from introduction section of [Print].
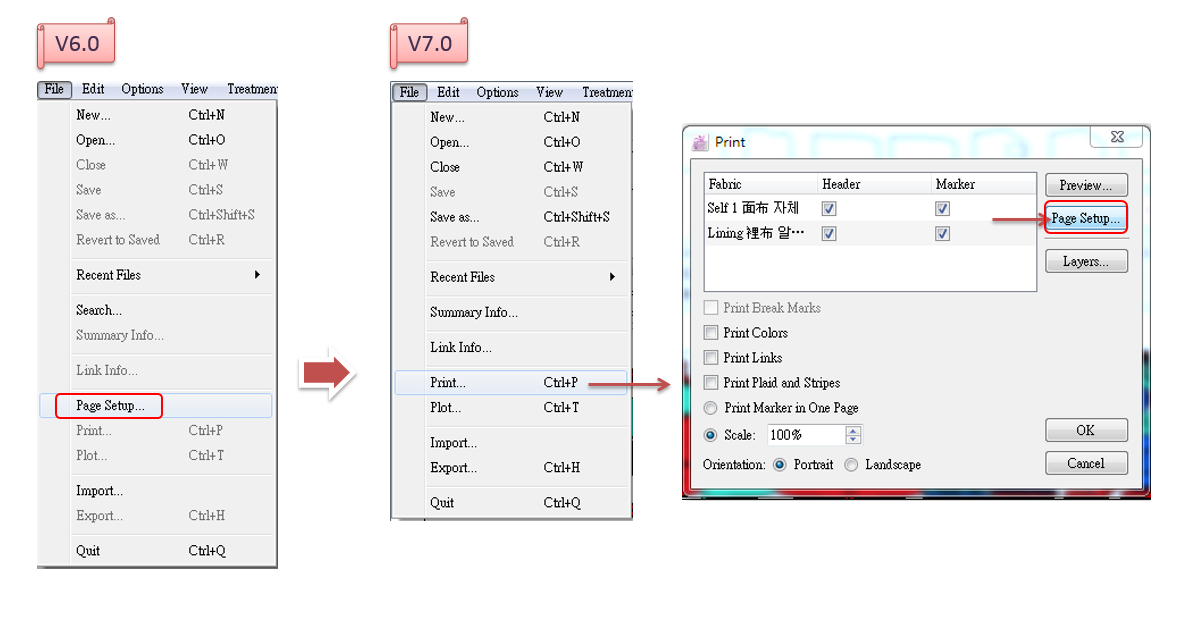
[Print…]
Establish information to prepare for the printing of the desired marker file.
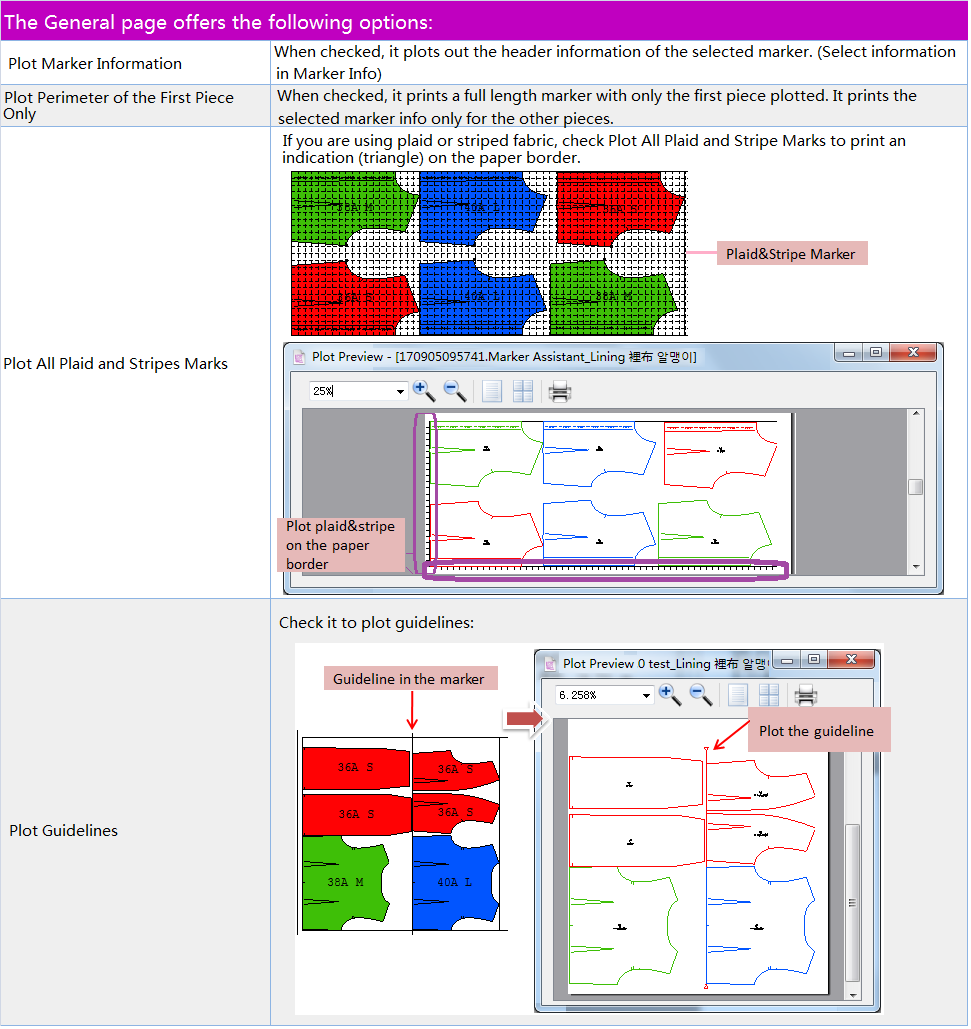
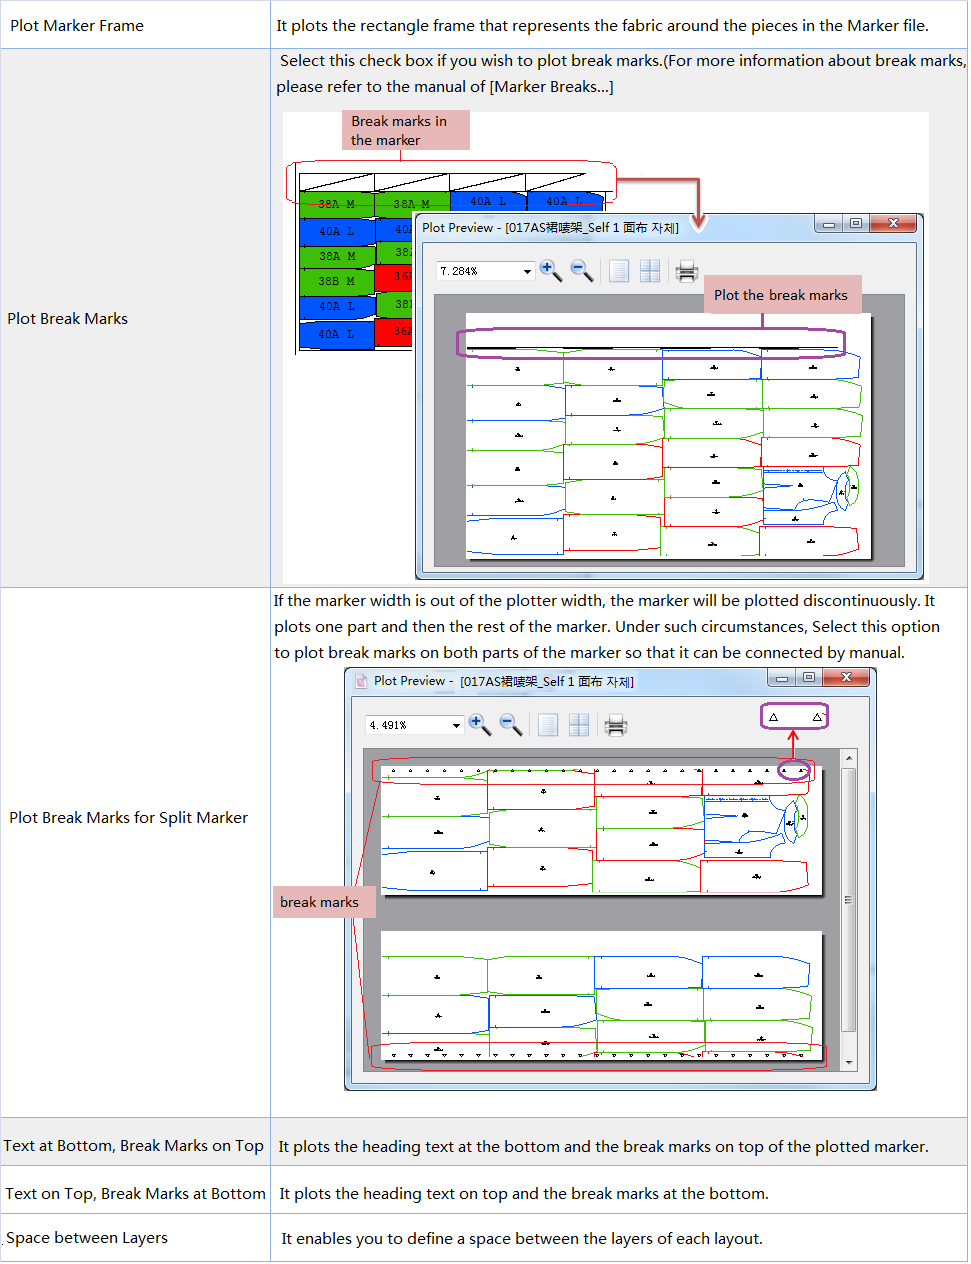
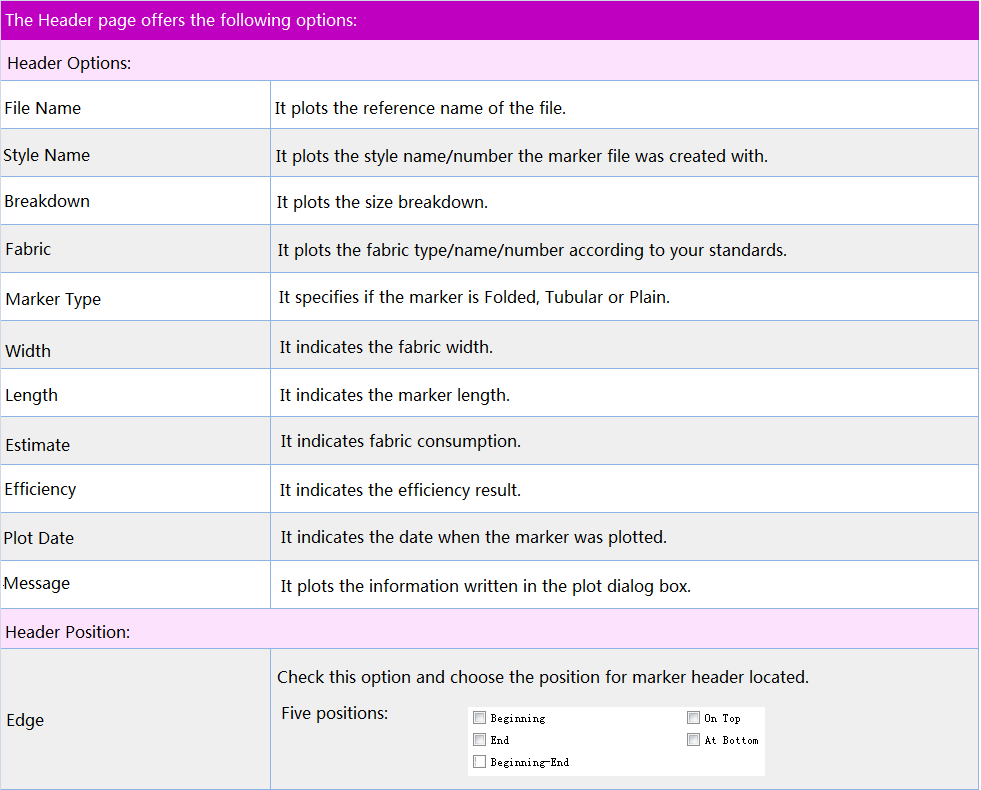
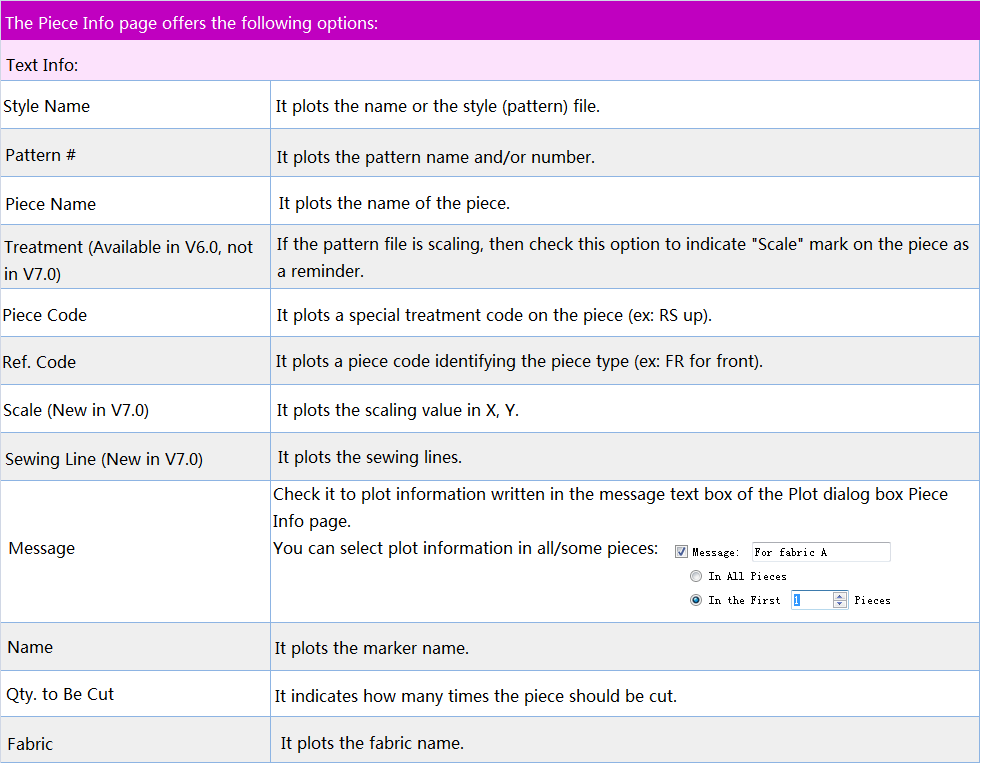
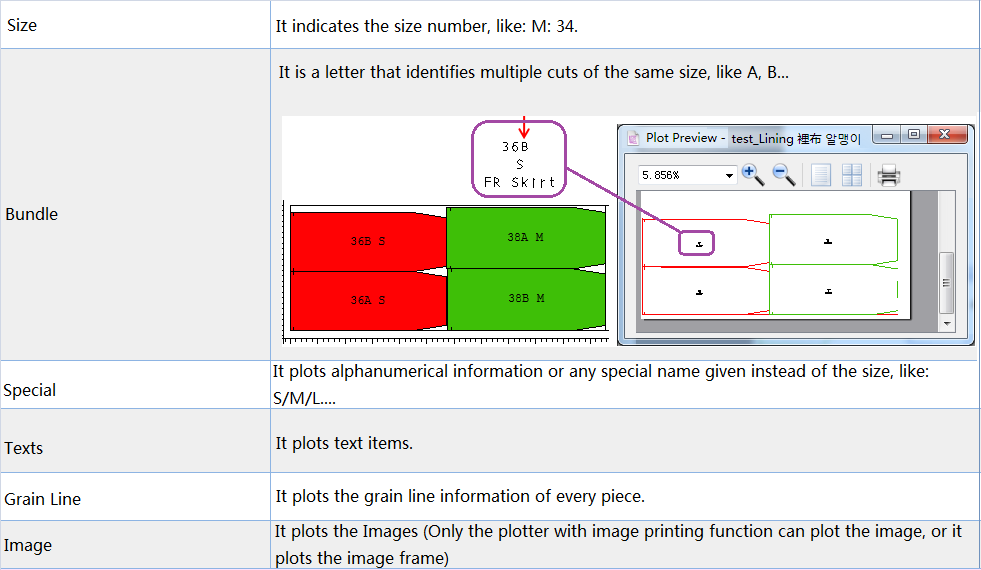
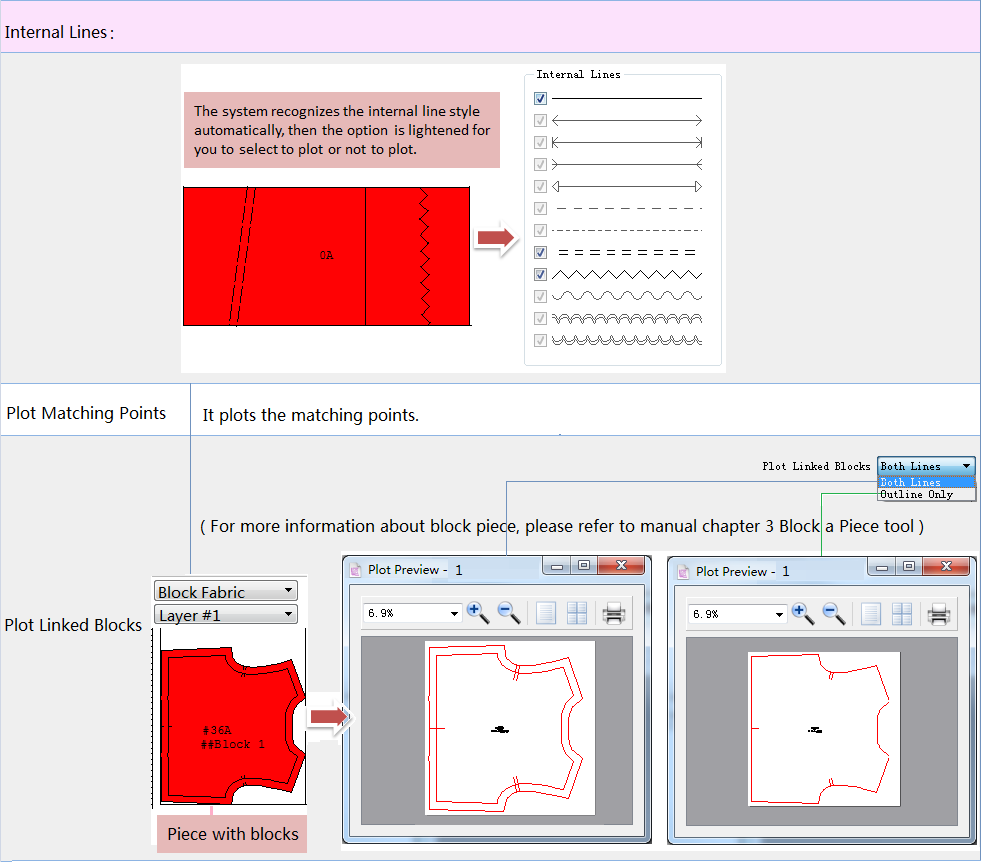
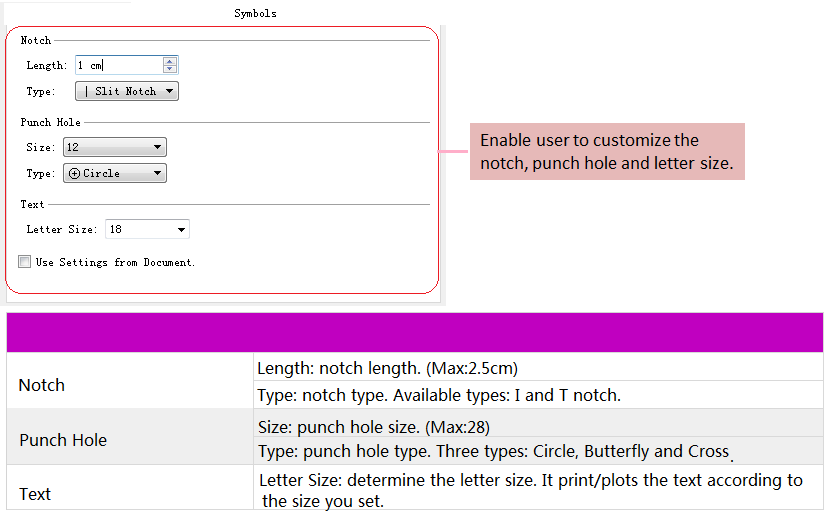
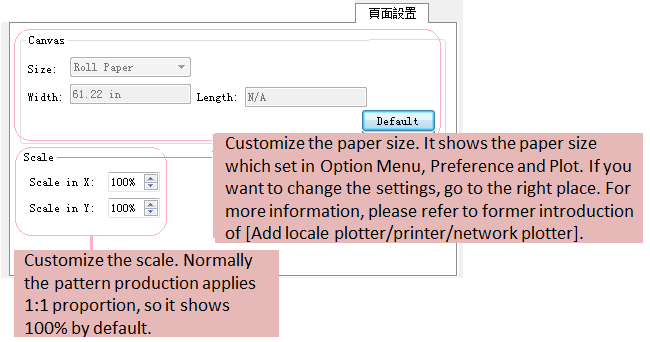
[Plot…]
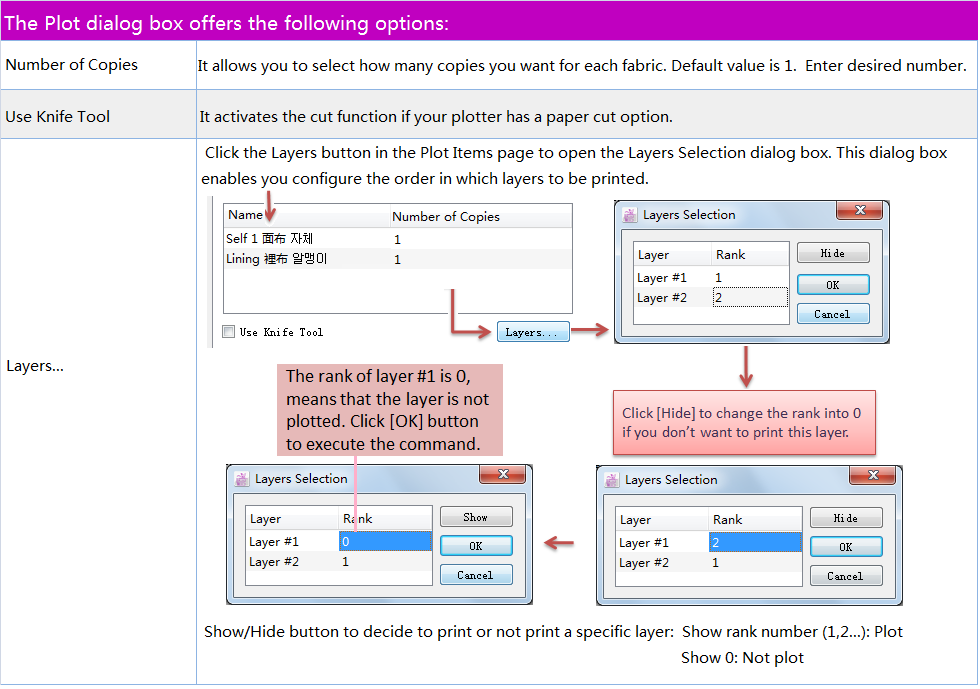
Allow user to plot the marker file for manufacturing. User can select the desired information for plotting the marker.
Add locale plotter/printer/network plotter
In V7.0, here is the new position of Add locale plotter/printer/network. The original position of the function is under Menu [Options] - [Preferences] - [Plot].
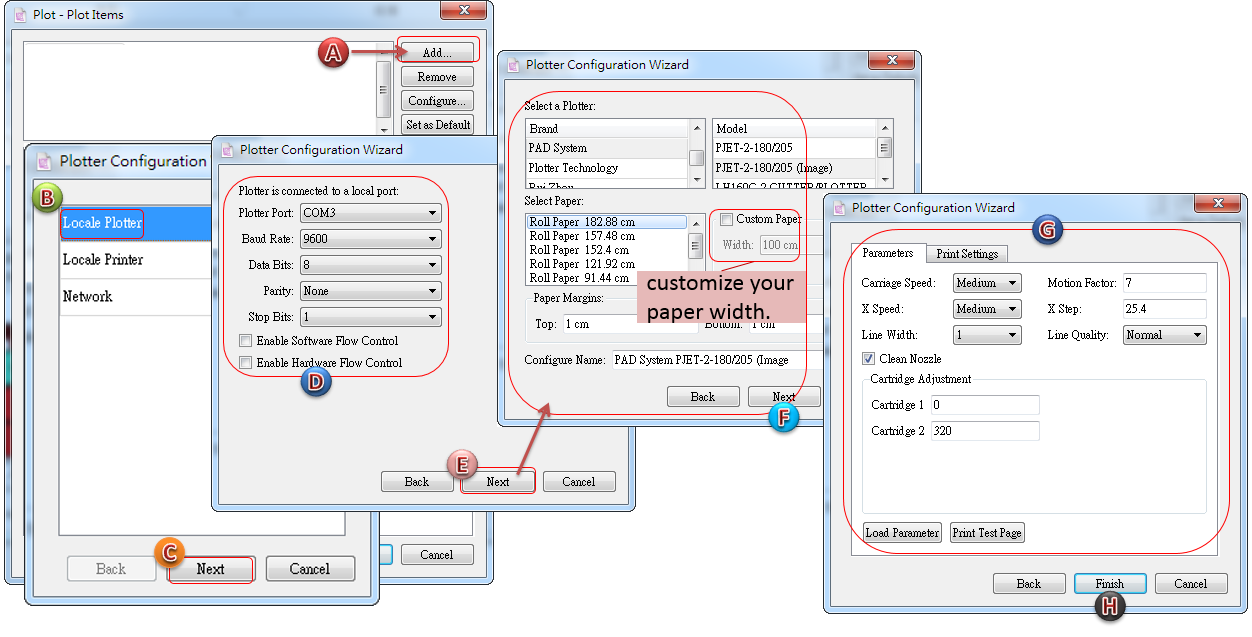
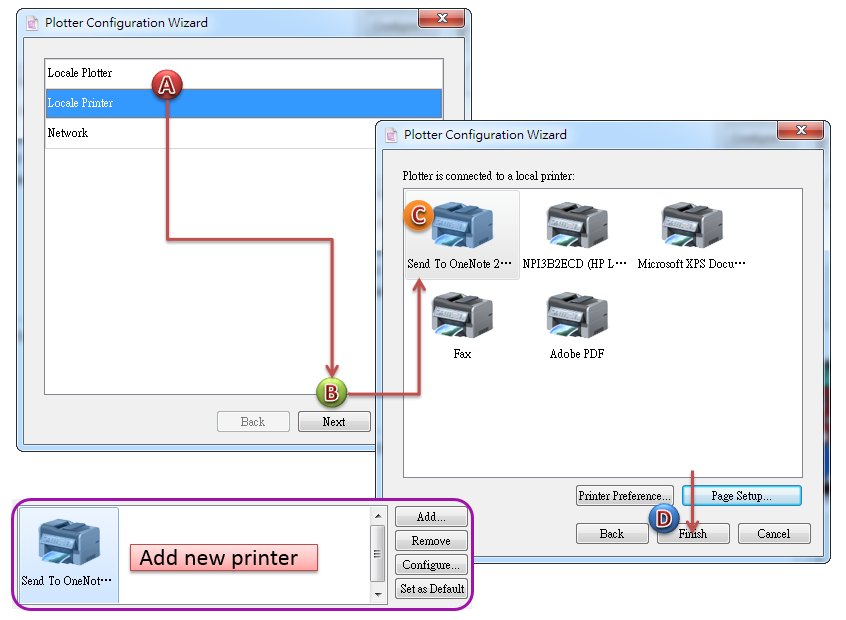
Click [Add] button, open the Plotter Configuration Wizard Dialog Box, and select the desried locale plotter/printer/network plotter.
For example:
To add PAD Plotter:
To add a printer:
To add a plotter found in the local area network, after connecting the plotter, user can send the pattern file to plot by network.
How to do:
Click [Add] - [Network];
Enter the IP address of the computer which be installed Plot Manager and connecting wiht the ploter;
Open Plot Manager and then click the [Start] button.
Click [Search] then the plotters are shown in the dialogbox, click the desired one, then click [OK] to finish.
Note
Pls start up the ploter before you send and print files.
If add more plotter, then:
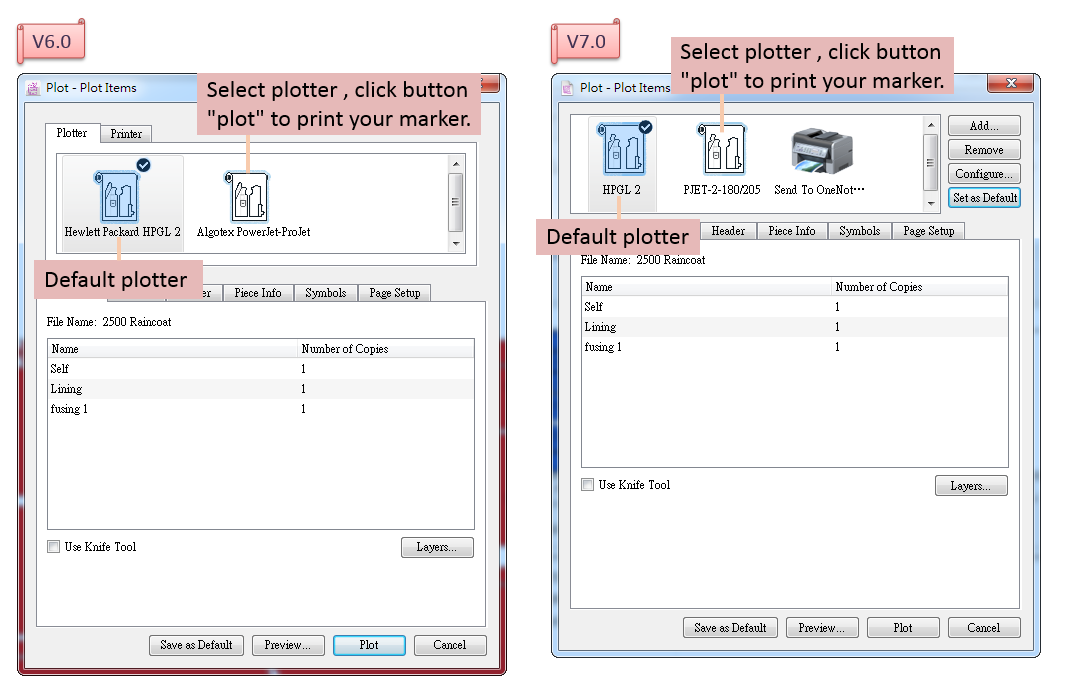
User can select the frequently-used plotter and click [Set as Default] to set it as default plotter, then the tasks will be sent to this plotter by default. As image shown, the tick √ on the top-right corner of the plotter icon means this plotter is already set as default;
If you don’t want to send the task to the default plotter, select the desired plotter on your own.
Note
In V6.0, the position of [Set as Default] is under Menu [Options] - [Preferences] - [Plot].

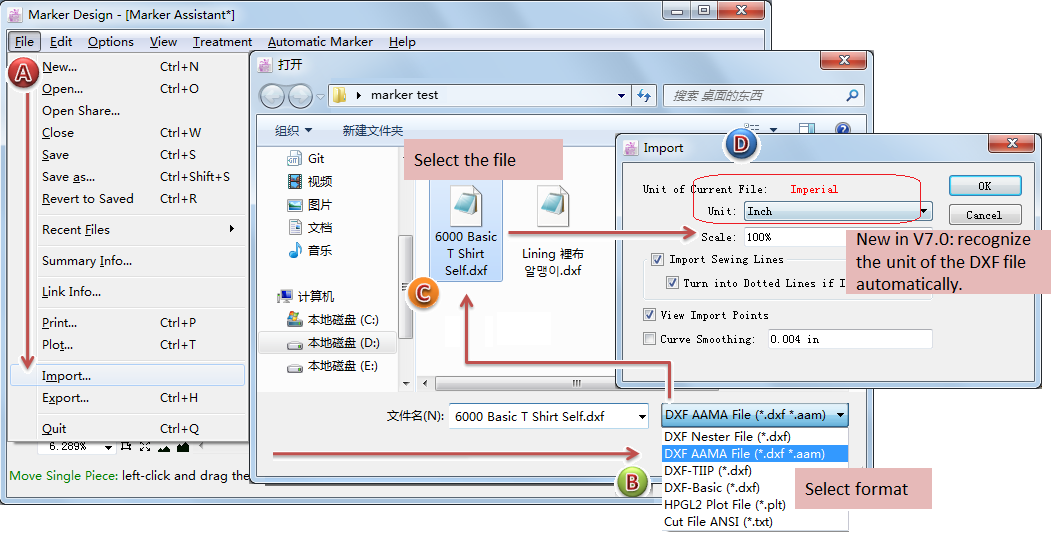
[Import…]
Import and open foreign files.
For example:
To import DXF-AAMA(.dxf) file:
To do so in V6.0:
Click [File]-[Import…];
Select file format in the dialog box (It will remember the last choice by default);
Select/Enter corresponding import items;
Select the desired file and click OK.

V7.0 makes corresponding menu position adjustment. Click [Import…] to open the dialog box, user can select the file format and the desired file in the same dialog box. And V7.0 readS the unit of imported DXF Files automatically, facilitates user to quickly open the file.
We are not going to show all the examples how to import the other file formats, the steps are almost the same as shown above: go to menu [File]-[Import…] - select format (It will remember the last choice by default) - select the desired file - the file is open or user need to select desired option before opening the file.


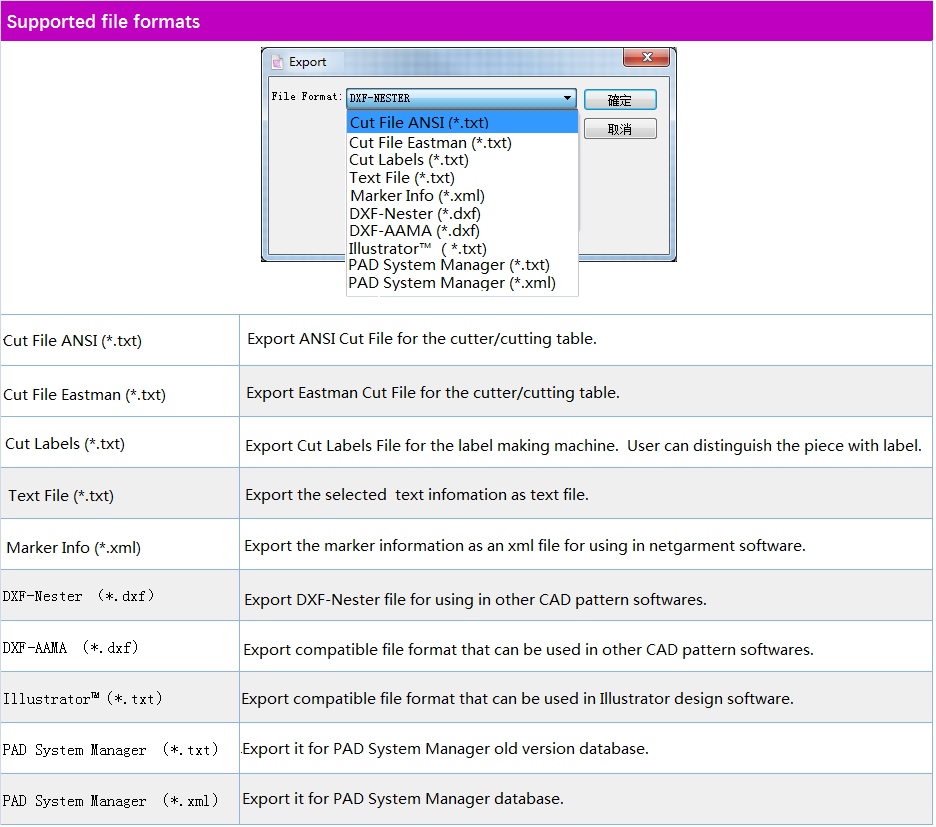
[Export…]
Allow user to export the desired file in corresponding formats for using in other compatible systems or applications.
How to export Cut File ANSI (.txt)
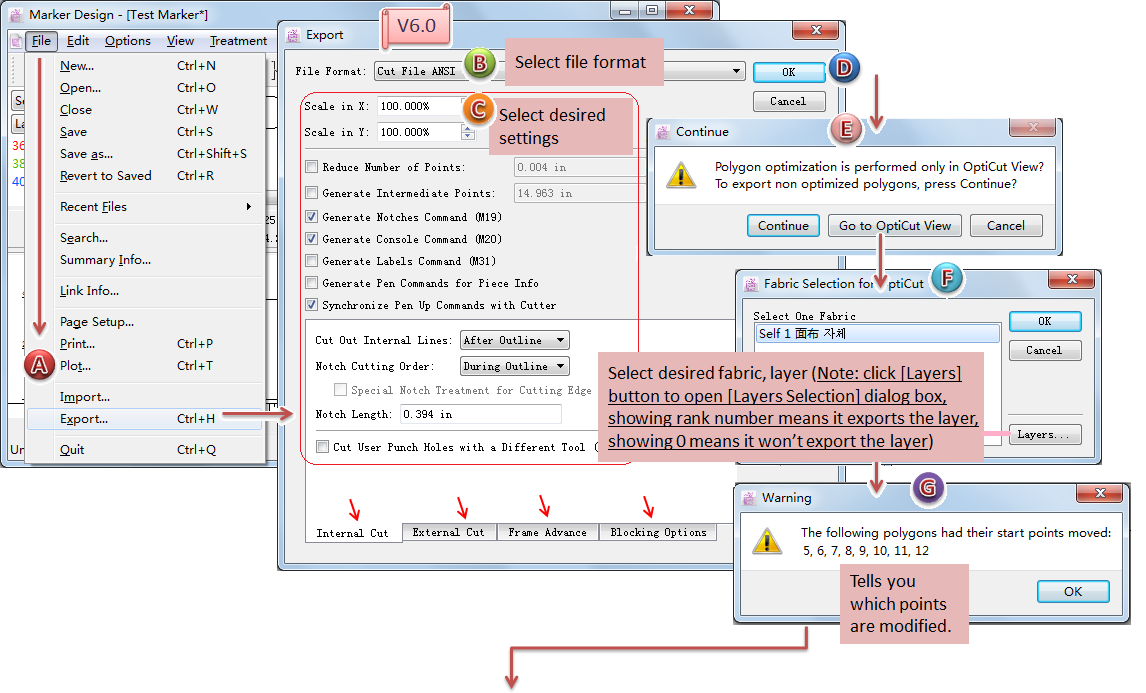
Steps in V6.0:
Open the desired marker file;
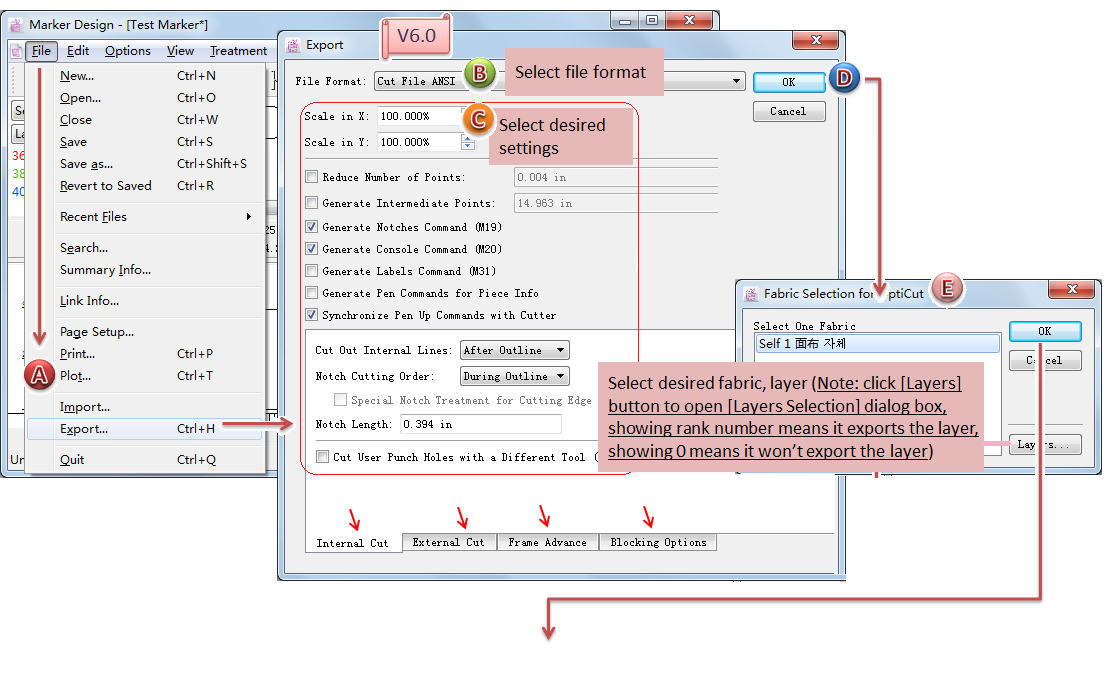
Click [File]-[Export…];
Select the desired format in the dialog box (it remembers the last choice);
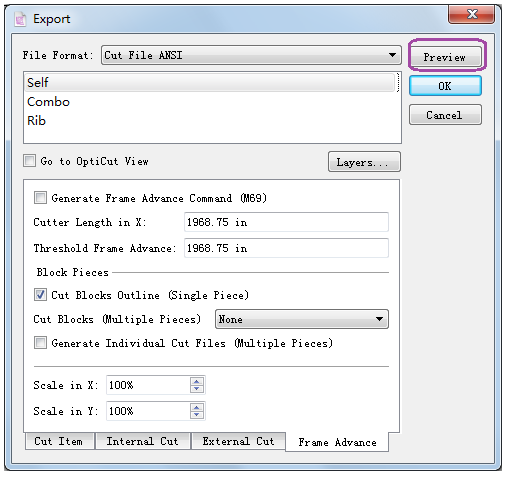
The the Cut File ANSI dialog box appears, select/enter desired option/content, click [OK] to execute;
There will be two situations:
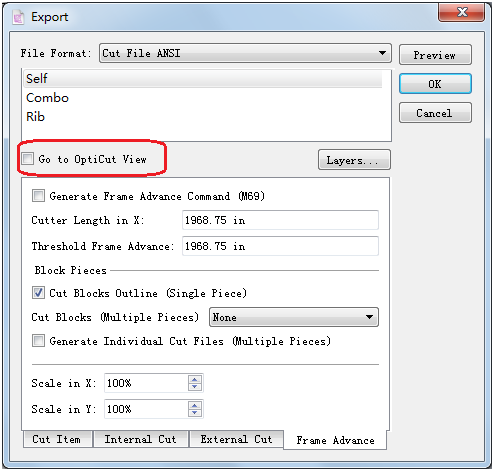
If select
under menu [Option]-[Preferences]-[Cutter], then:
(1). a dialog box appears to ask you if go to Opticut View, click
;
(2). Facbric Selection for Opticut dialog box appears, select desired fabric/layer, click [OK] button;
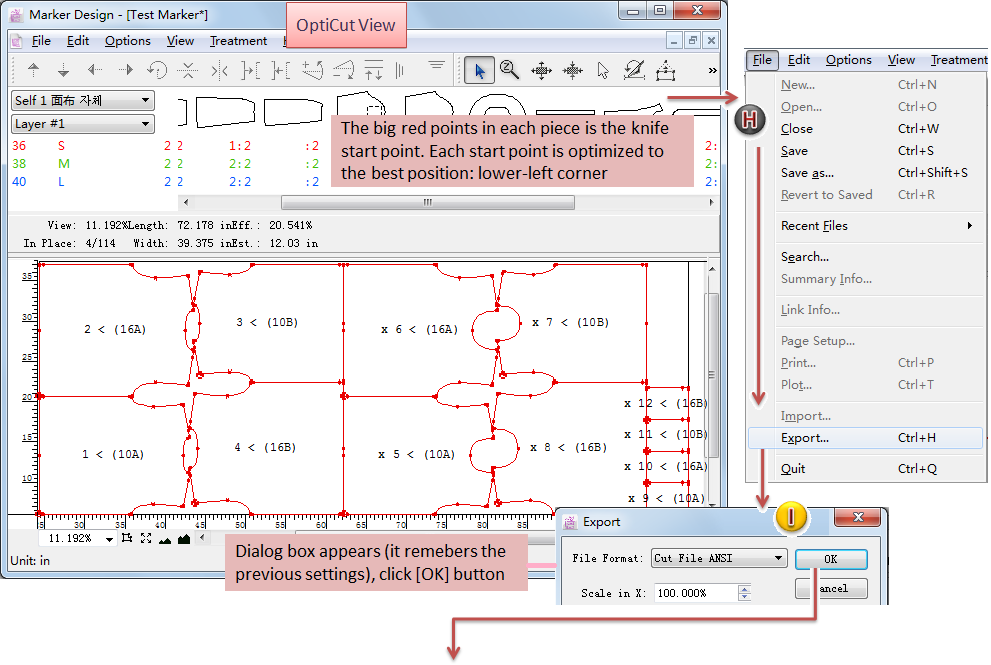
(3). Then the system performs optimiztion and optimize the cutting start point automatically, Warning dialog box appears to tell you which cutting start point of pieces (warn with sequence number) have been modified, click [OK] button and turns to Opticut View;
(4). Click [File]-[Export…], dialog appears and click the [OK] button;
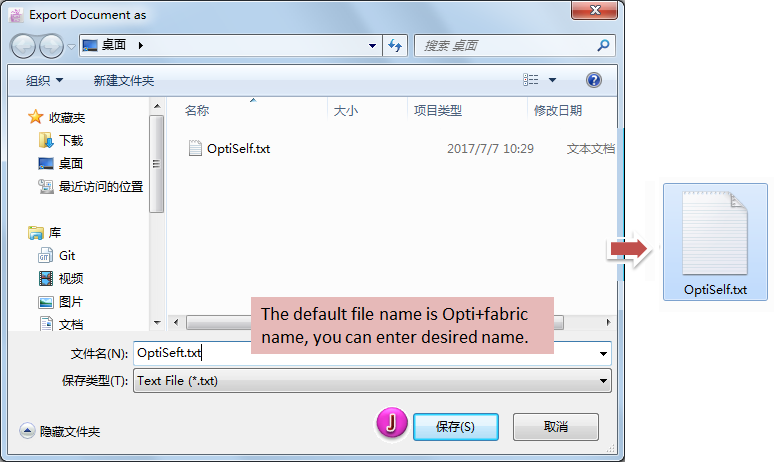
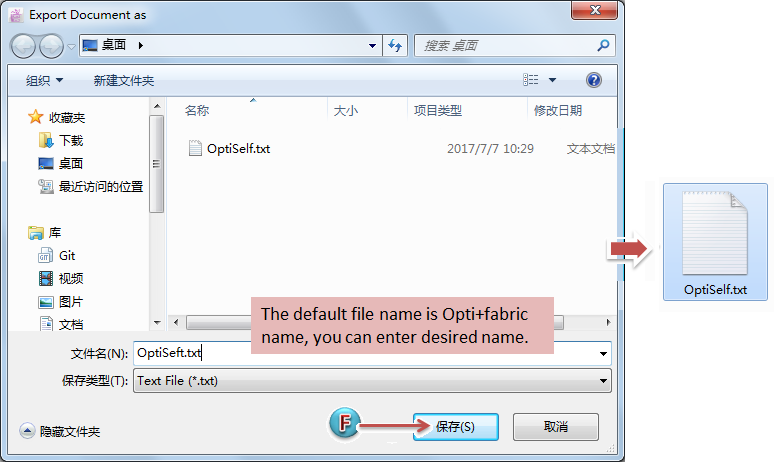
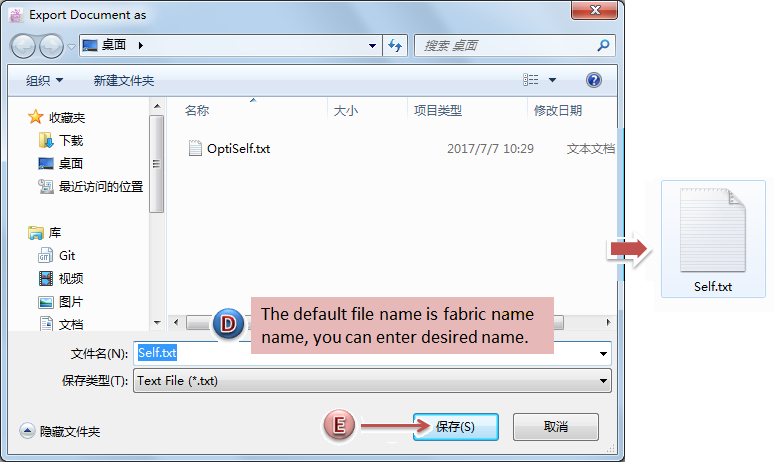
(5). Select the directory, the exported file will be named after the marker file name by default; user can name it as wish.
On the contrary, if user doesn’t select
(1). select fabric/layer in the dialog box then click [OK] button;
(2). Select the directory, the exported file will be named after the marker file name by default; user can name it as wish.
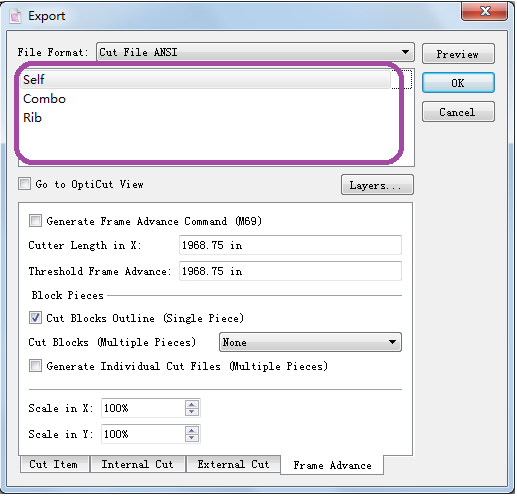
Cut File ANSI Export Dialog Box Introduction:
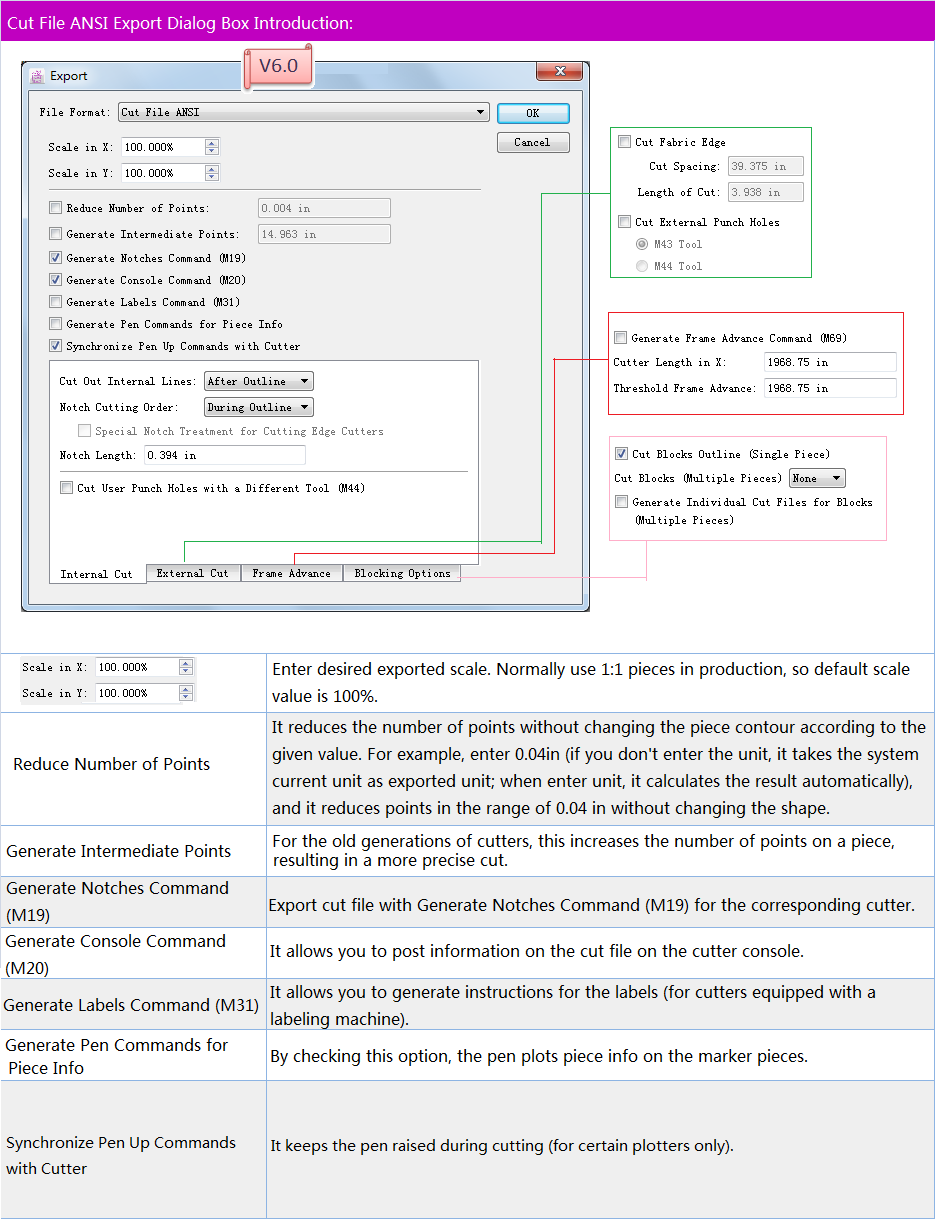
In V7.0, the dialog boxes for exporting Cut ANSI file are reduced, and add cutting preview function:
Delete Facbric Selection Dialog box, add Facbric Items and Layer Button in the Cut File ANSI Export Dialog Box;
Delete the dialog box asking if go to Opticut View, add Go to Opticut View option in the dialog box.
Add Cut Preview Button


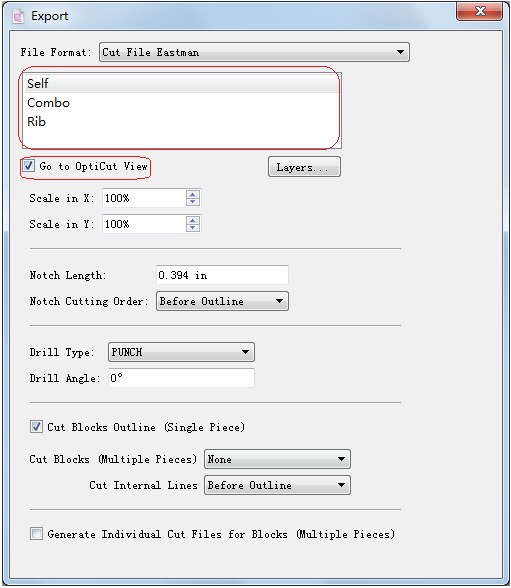
How to export Cut File Eastman (.txt)
The steps to export Cut File Eastman (.txt) are the same as exporting Cut File ANSI introduced above. Some options in the dialog box are different.
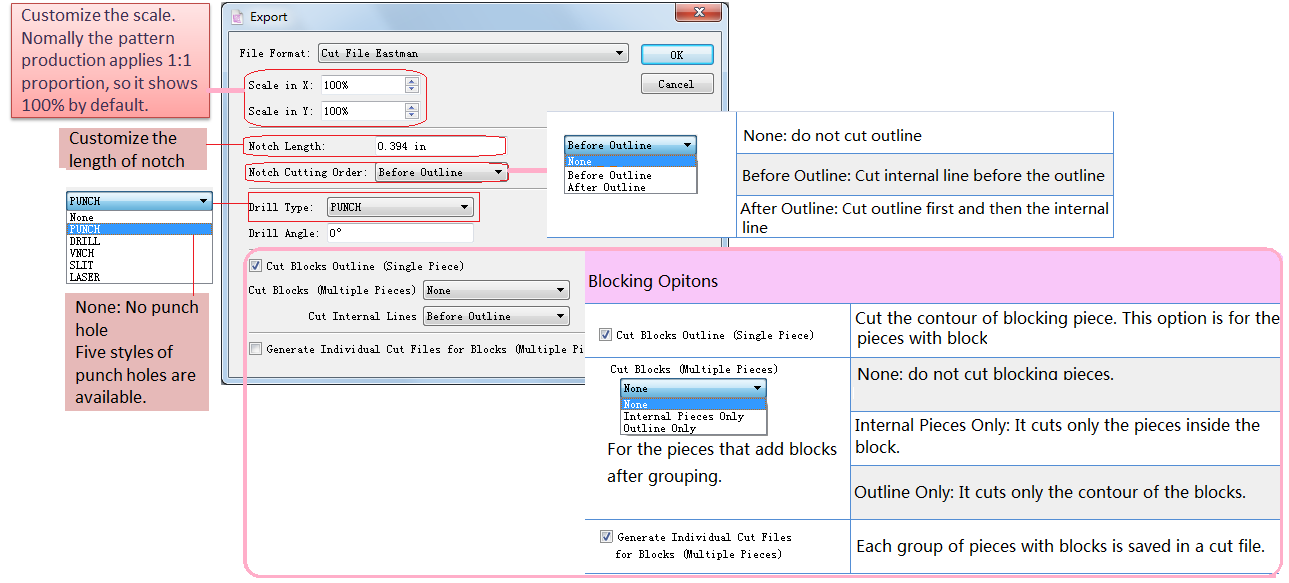
Options for exporting Cut File Eastman (.txt):
Optimization for exporting Cut File Eastman (.txt) in V7.0
Delete Facbric Selection Dialog box, add Facbric Items and Layer Button in the Cut File ANSI Export Dialog Box;
Delete the dialog box asking if go to Opticut View, add Go to Opticut View option in the dialog box (This option only appears when user select
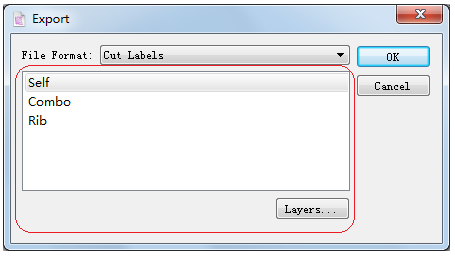
How to export Cut Labels (.txt)
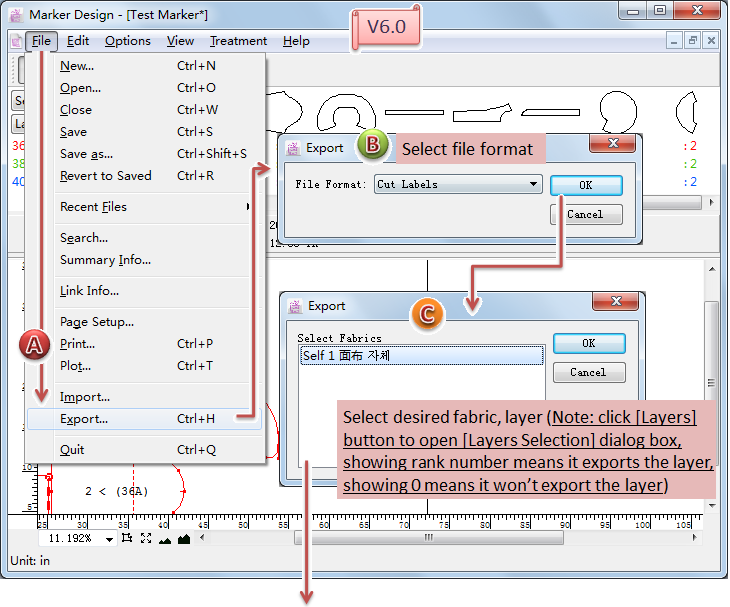
Optimization for exporting Cut Labels in V7.0:
Delete Facbric Selection Dialog box, add Facbric Items and Layer Button in the Cut File ANSI Export Dialog Box;
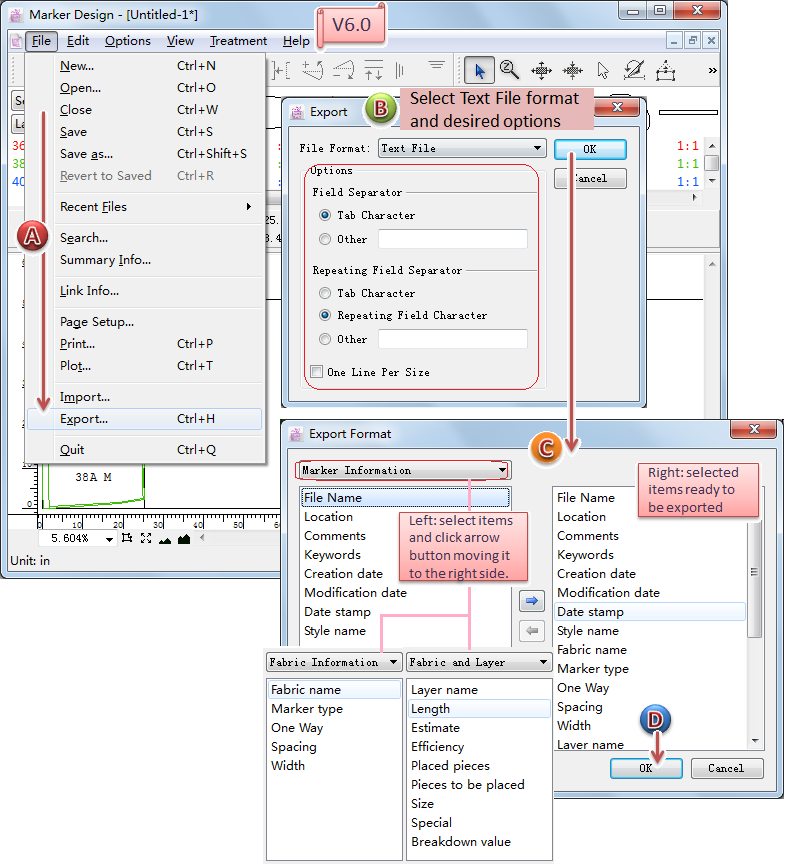
How to export Text File (.txt)
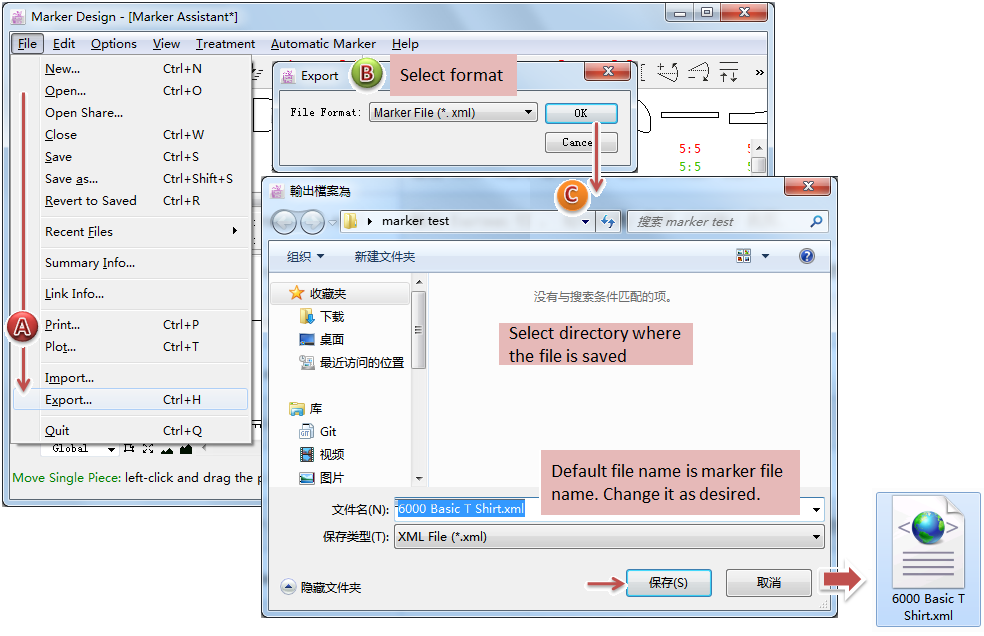
How to export Marker Info (.xml)
This is new exporting item in V7.0. Export Marker Info (.xml) for using in Netgarment grament management software.
How to export:
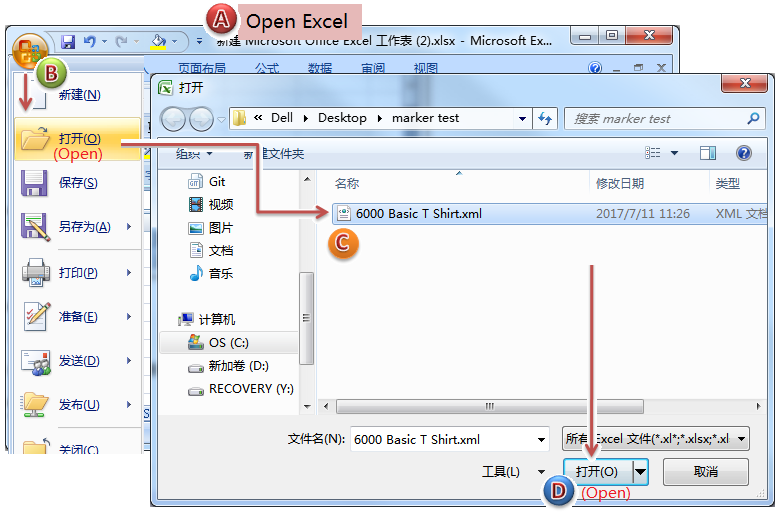
The Marker Info (.xml) can be open and read in Excel. It can be saved as Excel file as wish.
How to open and read it in Excel:
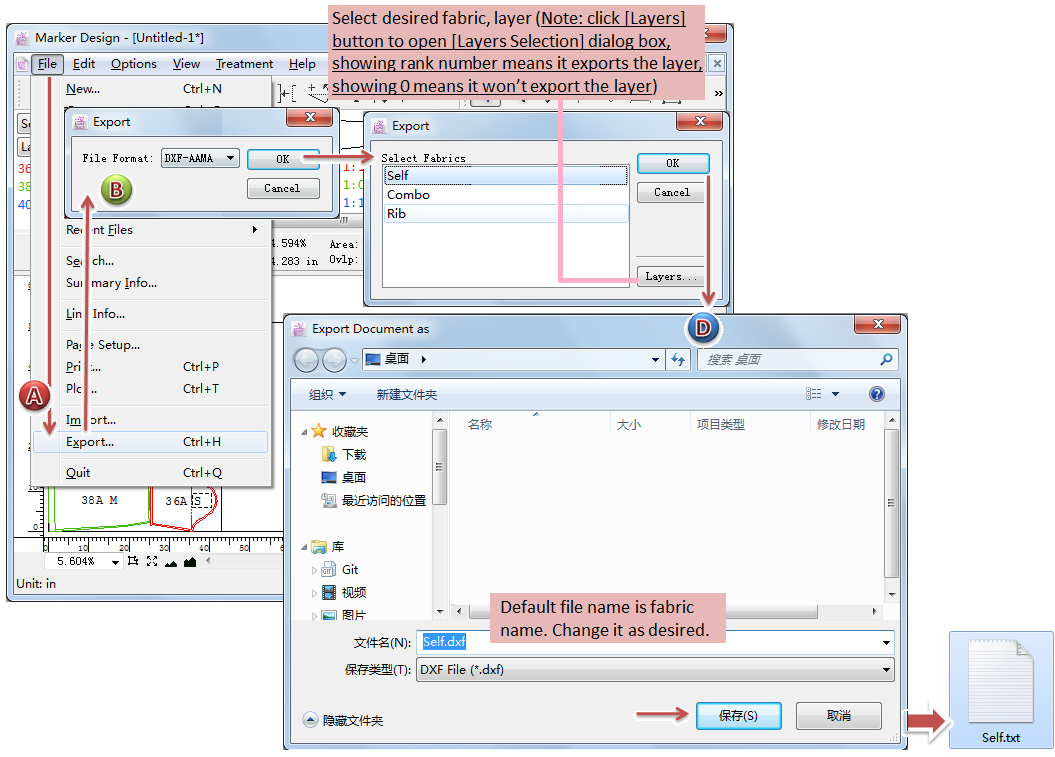
How to export DXF-Nester (.dxf)
DXF-Nester (.dxf) is exported for using in an old version auto nesting software Nester only. Export current fabric and layer only each time.
How to do:
Open the desired marker file;
Click [File]-[Export];
Select the desired format in the dialog box (it remembers the last choice);
Select the directory, the exported file will be named after the marker file name by default; user can name it as wish.

How to export DXF-AAMA (.dxf)
Open the desired marker file;
Click [File]-[Export];
Select the desired format in the dialog box (it remembers the last choice);
Select desired fabric and layer;
Select the directory, the exported file will be named after the marker file name by default; user can name it as wish.
Optimization for exporting DXF-AAMA (.dxf) in V7.0:
Delete Facbric Selection Dialog box, add Facbric Items and Layer Button in the Cut File ANSI Export Dialog Box;
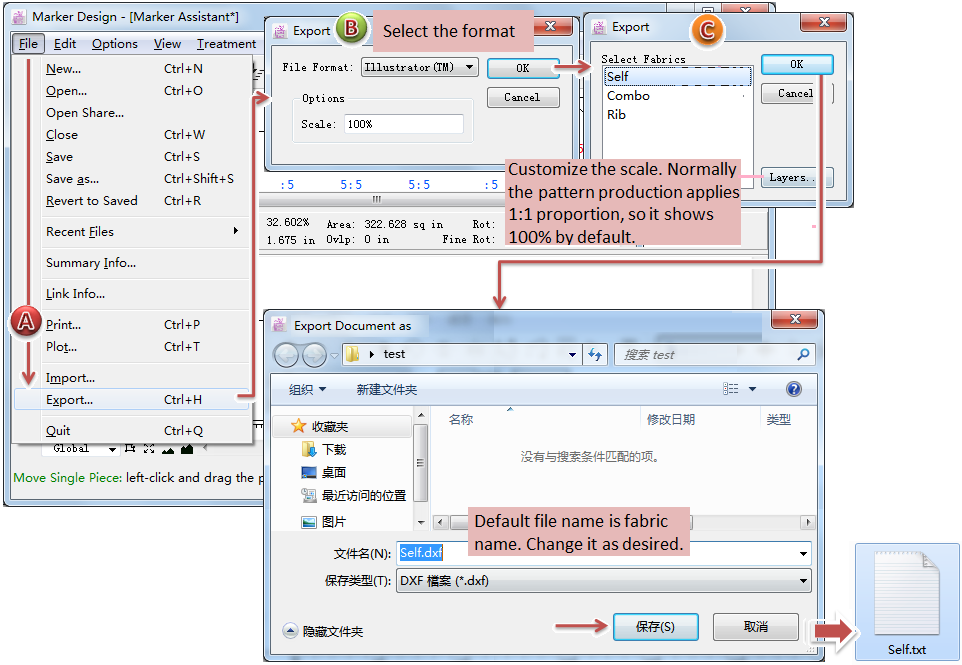
How to export Illustrator™(.txt)
Optimization for exporting Illustrator™(.txt) in V7.0:
Delete Facbric Selection Dialog box, add Facbric Items and Layer Button in the Cut File ANSI Export Dialog Box;
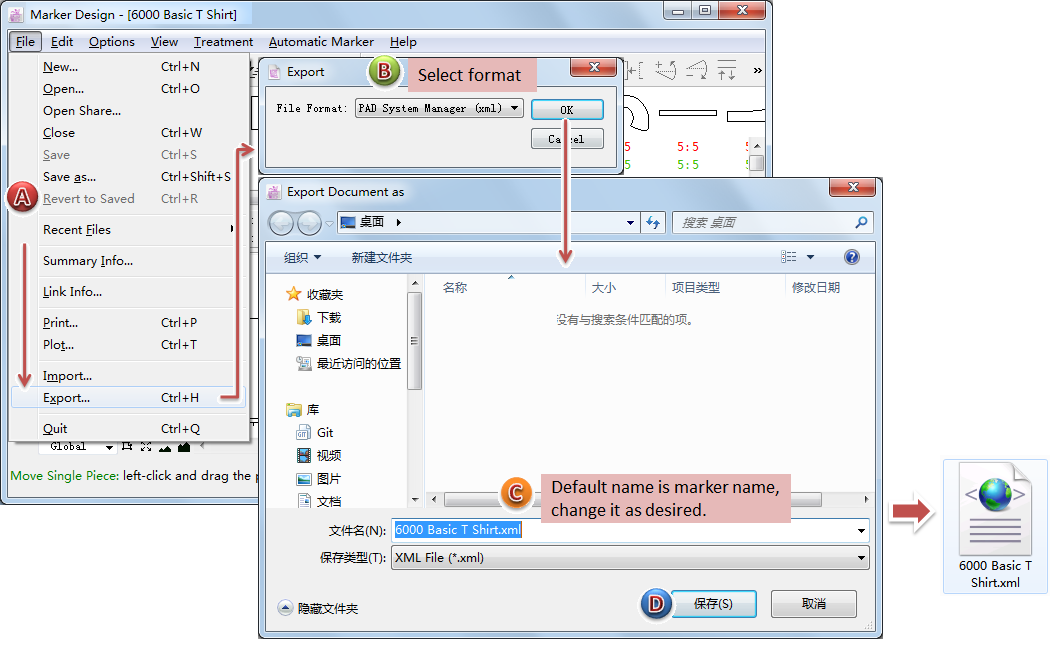
How to export PAD System Manager (.txt) / PAD System Manager (.xml)
The way export PAD System Manager (.txt) and PAD System Manager (.xml) are the same. Take PAD System Manager (.txt) as an example:
[Quit]
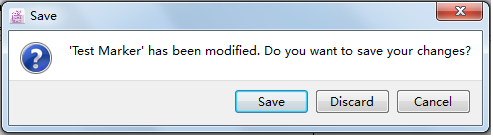
Close the application window. Window is closed directly if no modification is made.
If there is any unsaved modification, the dialog appears to ask you like:
Save: Save modification and close the window.
Discard: Close the window without saving the modification.
Cancle: Return to the window.