[Treatment] Menu
[Treatment] Menu includes functions as following:

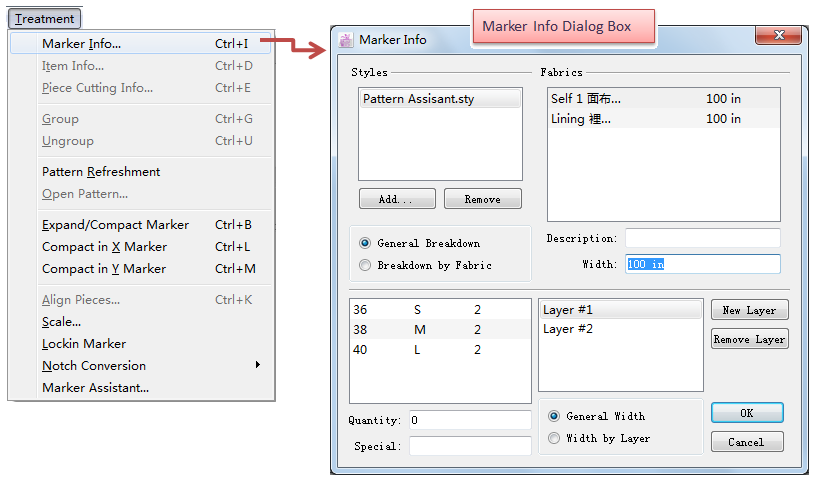
Marker Info
This option enables user to check or modify marker file in the dialog box:
Note
For more information about Marker Info Dialog Box, please refer to [File] Menu section.
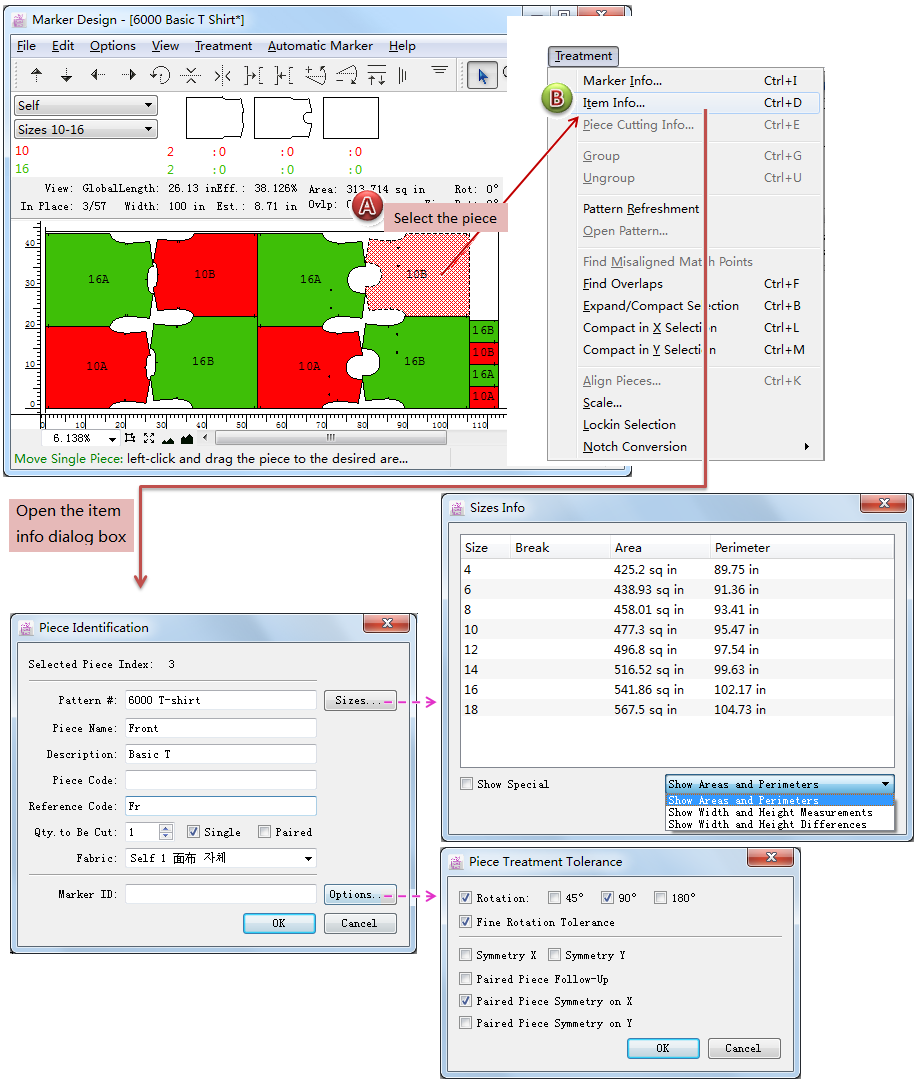
Item Info…
This option enables user to check or modify specific item information in the dialog box.
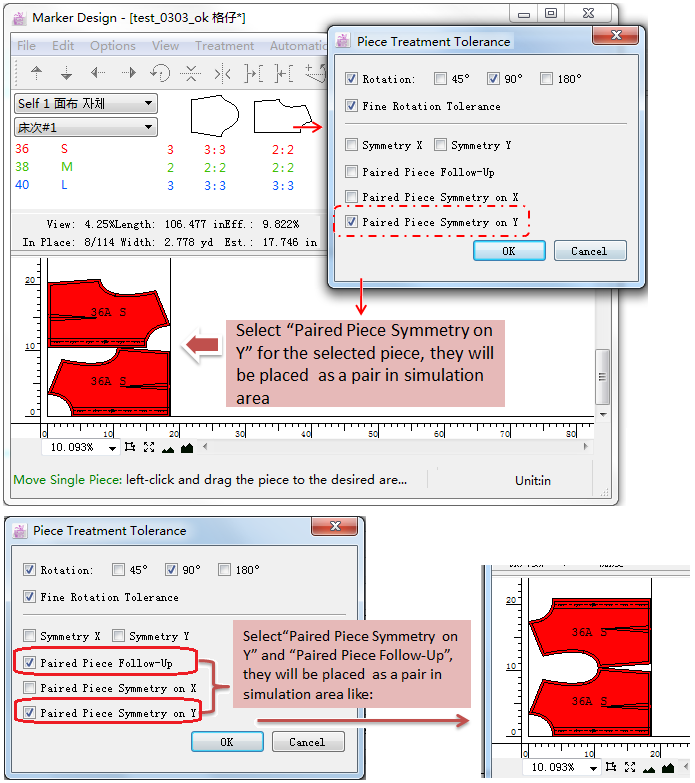
Check/Modify Piece Info
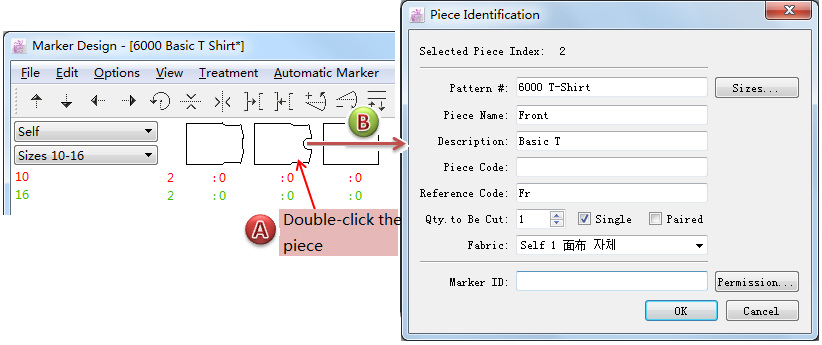
Select the piece and click [Treatment]-[Item Info], the dialog box appears to show you the piece information, you can modify it as desired.
Note
you can also double-click the desired piece to open the Info dialog:
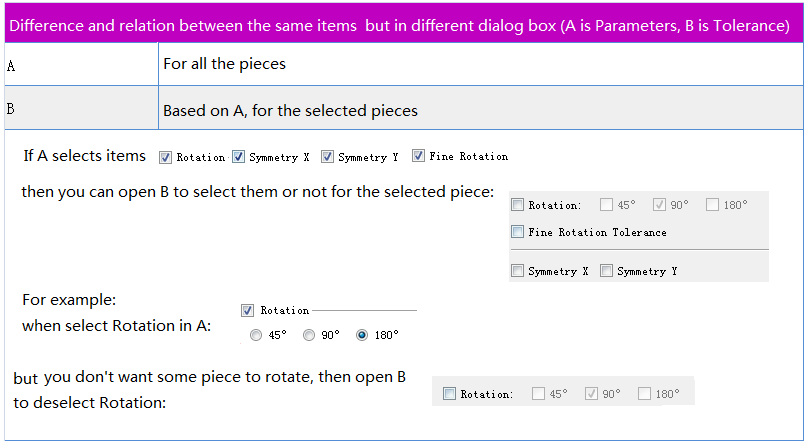
The options in [Piece Treatment Tolerance] dialog box are the same as those under Parameters in Preferences Dialog box:
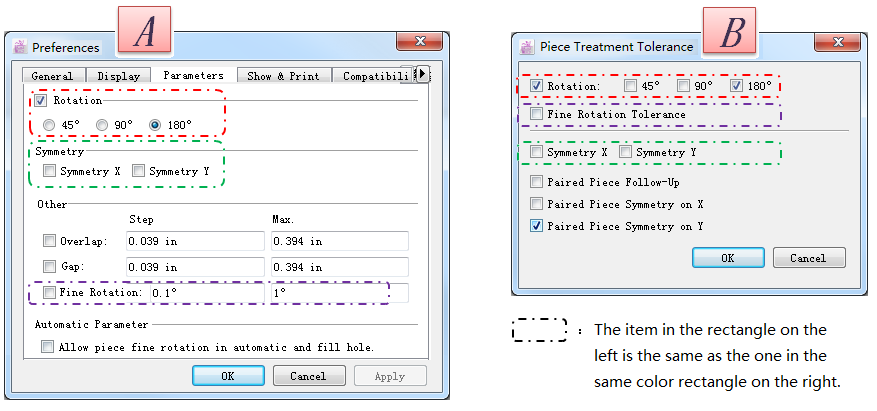
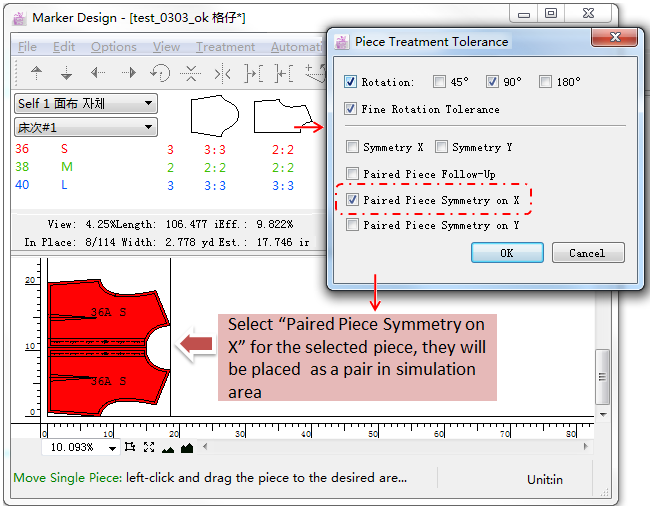
Examples of Symmetry X, Symmetry Y, Paired Piece Follow-Up options:

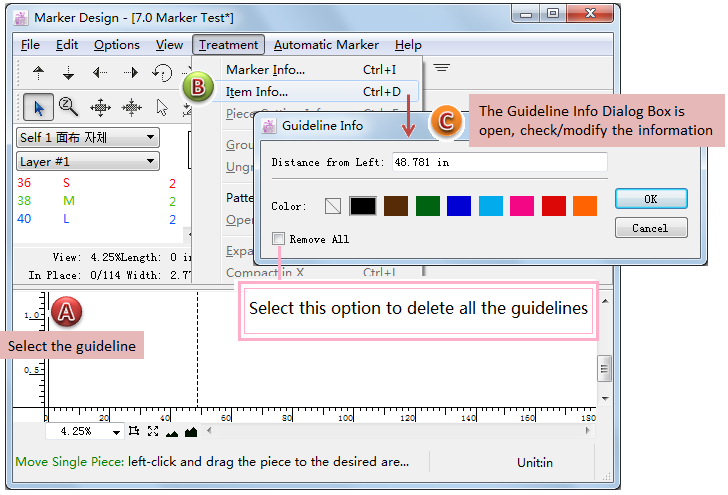
Check/Modify Guideline Info
Select the guideline, click [Treatment]-[Item Info], the dialog box appears to show you the guideline information, you can modify distance or color as desired.
Check/Modify Text Info
Select the text, click [Treatment]-[Item Info], the dialog box appears to show you the text information:

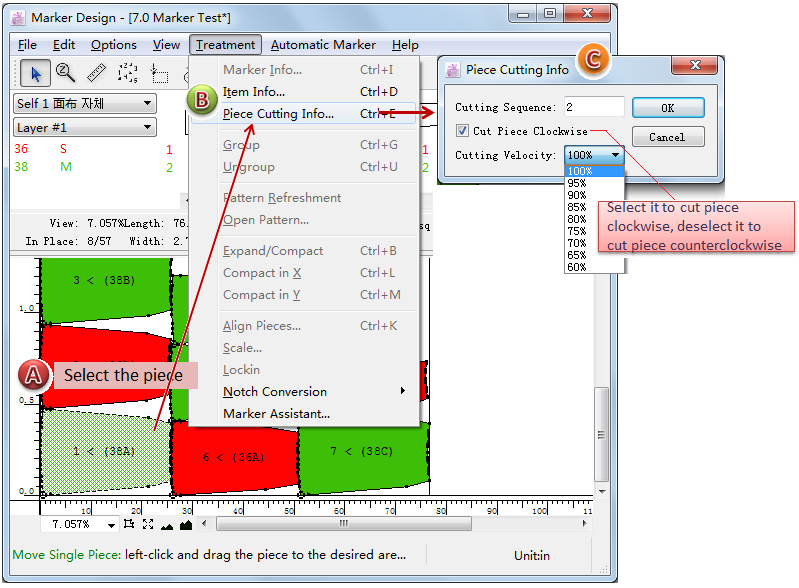
Piece Cutting Info
Allow user to check/modify the cutting parameters (cutting sequence, cutting direction, cutting velocity). To check/modify the parameters, user needs to open the cut view.
Go to menu [View]-[Cut View], open the cut view interface, and then select the desired piece, click [Treatment]-[Piece Cutting Info], to open the dialog for checking and modifying information.
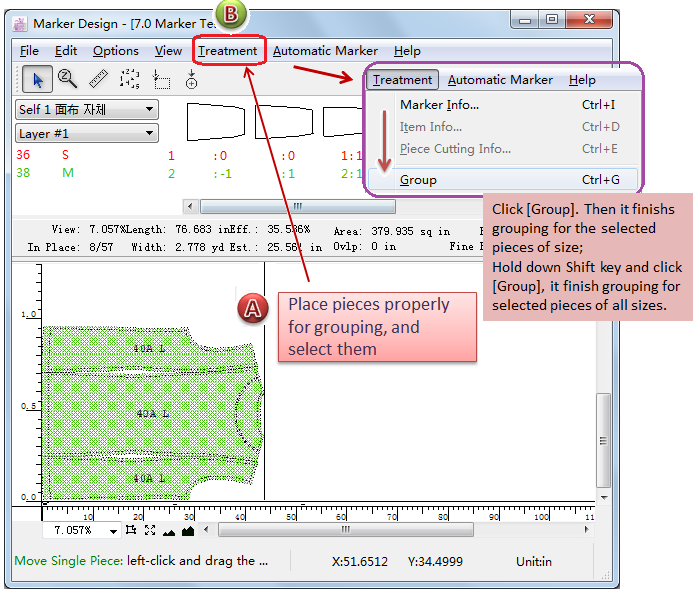
Group
Group the selected pieces, and they can be moved together.
According to practical situation, user needs group pieces of one garment or the pieces sewing together before nesting to avoid color difference.
How to do:
Place N pieces on the simulation area;
Select the desireds pieces;
Click Menu [Treatment]-[Group], group the selected pieces as a whole;
The steps above are for Current Selected Sizes grouping. Hold down Shift key in the 3rd step for All Sizes grouping.
Ungroup
To ungroup the pieces that have been grouped.
How to do:
Select the grouped pieces;
a: for single-size grouped pieces: click menu [Treatment]-[Ungroup]; b: for all-size grouped pieces: hold down Shift key, and click menu [Treatment]-[Ungroup].
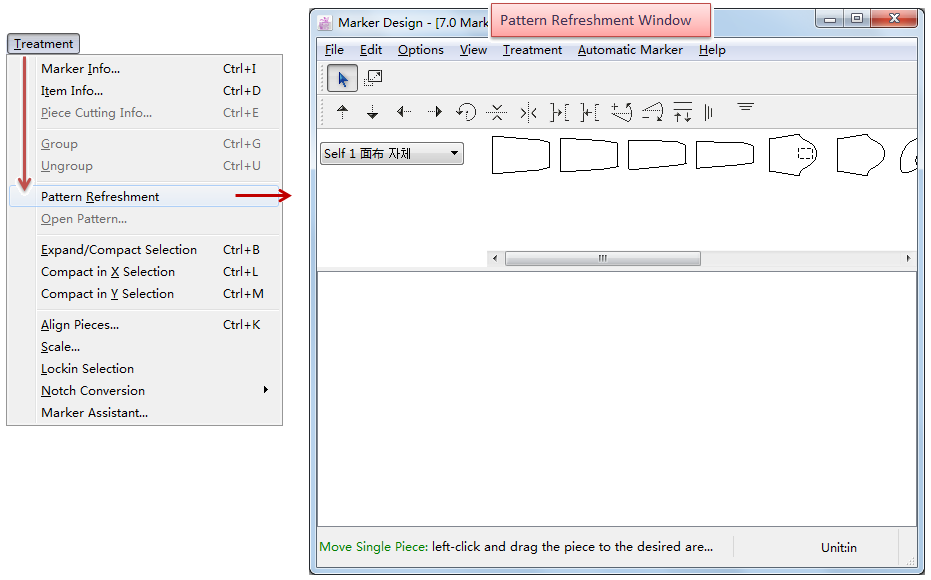
Pattern Refreshment and Open Pattern
Pattern Refreshment opens a working environment that enables user to add, edit, remove and/or replace pattern pieces in the marker.
Note
User must be in Pattern Refreshment mode to use [Open Pattern] option
Click [Treatment]-[Pattern Refreshment], open the working environment:
Tools under Pattern Refreshment working environment
Pointer
To select one or more pieces.
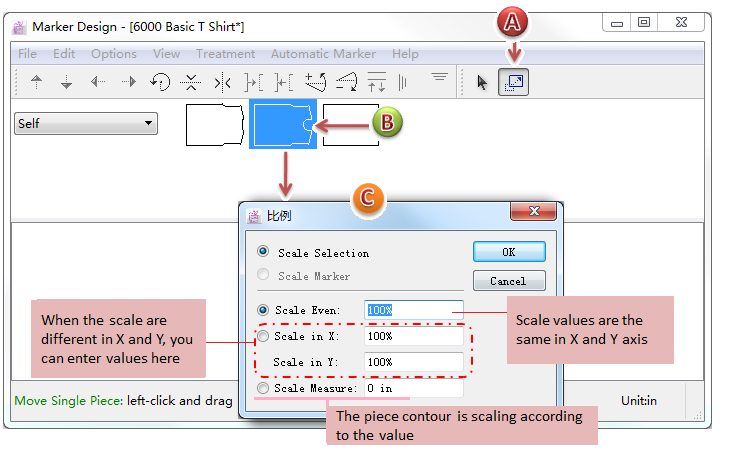
Scale
To scale all the sizes for a pattern piece.
How to do:
Select
Click the desired piece;
Enter scale value in the dialog box.
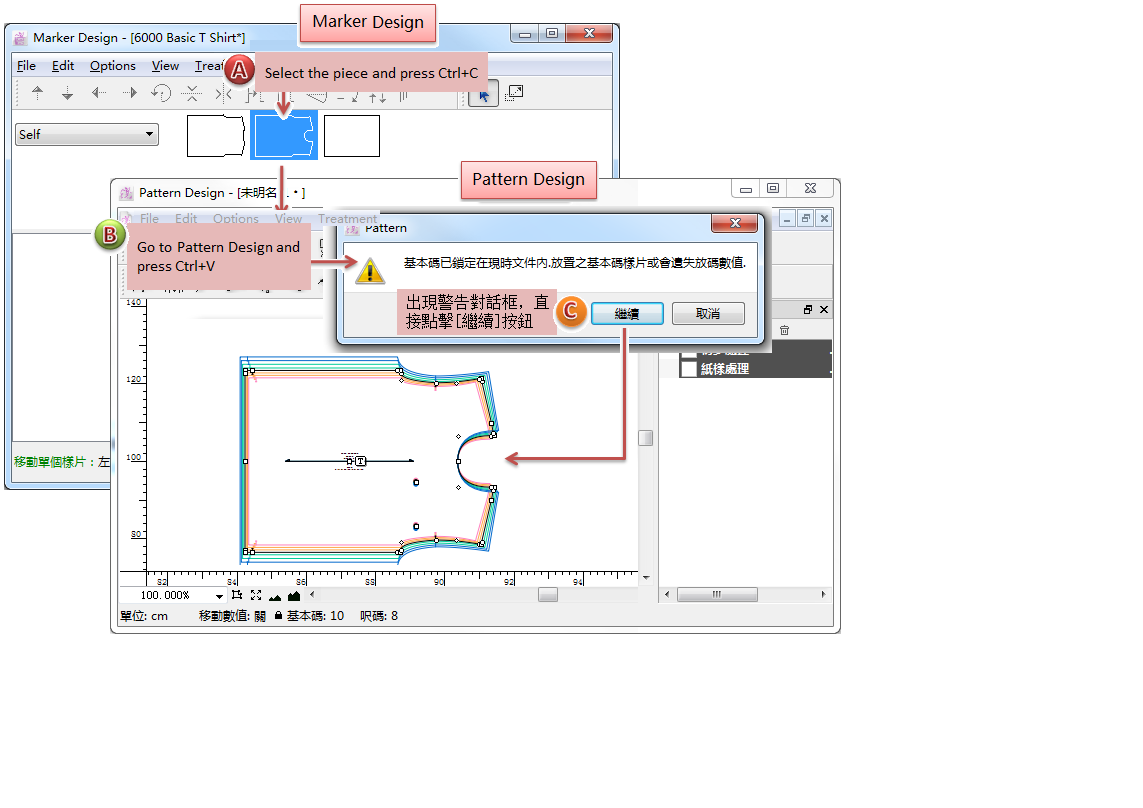
How to copy and paste the piece to pattern file
If the pattern file used for marker misses some pieces, or the pattern file is lost, user can copy the pattern pieces from the marker file and paste them to a new pattern file.
How to do:
Open Pattern Design and create a new pattern file, and set the sizes according to the marker file;
Click menu [Treatment]-[Pattern Refreshment] in Marker Design, enter the Refreshment working environment;
Select the desired pieces, click menu [Edit]-[Copy] (or press Ctrl and C keys on the keyborad to copy)
Go to Patter Design, click menu [Edit]-[Paste] (or press Ctrl and V keys) to paste the piece, and click [Continue] button in the dialog box.
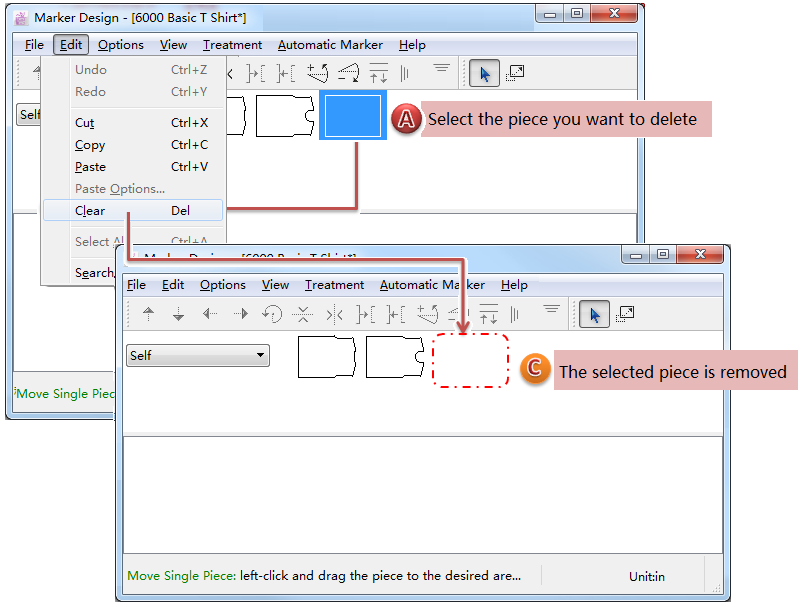
How to delete pieces in the Marker
Select desired piece by
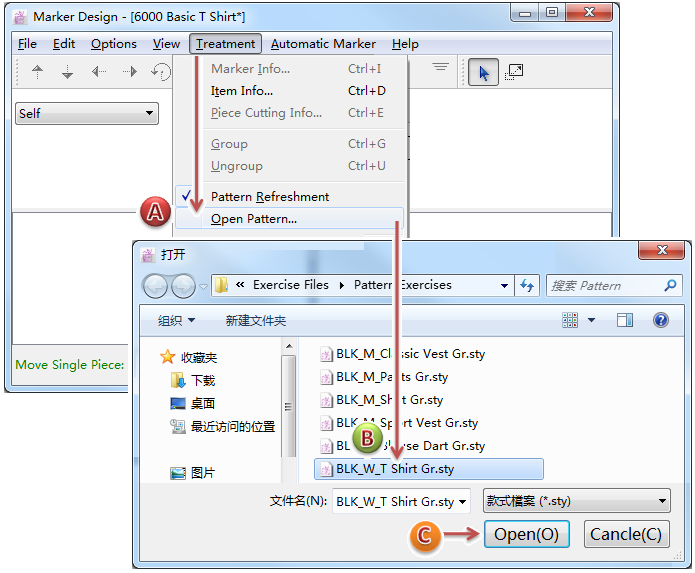
How to replace or add piece
Before replacing or adding piece, click [Open Pattern] option first:
Under Patter Refreshment working environment, click [Treatment] - [Open Pattern];
Go to the corresponding directory to select the pattern file, click [OK] button in the dialog box;
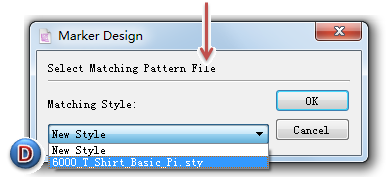
A dialog box appears, select option as required:
if the sizes of pattern file are the same as marker file, then select the same name as marker file from the Matching Style Pull-Down Menu;
if the sizes of pattern file are not the same, then select “New Style” (If select “New Style”, user needs to go to [Treatment]-[Marker Info] to enter quantity value per size for the replaced/added pieces).
Click [OK], open the desired pattern file.
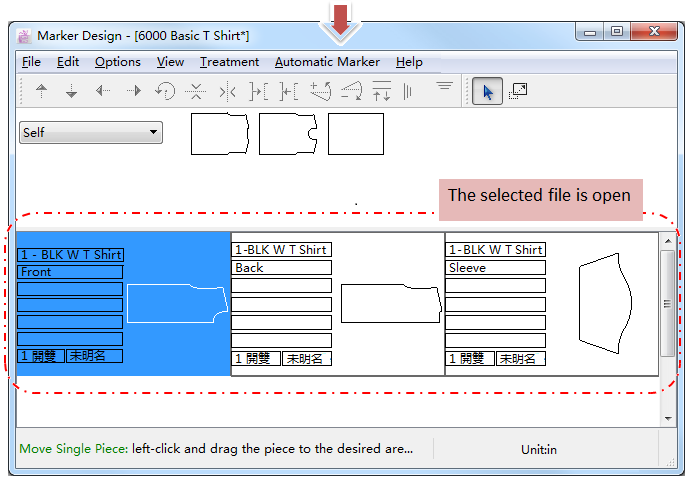
After opening the desired pattern file, user can start to replace or add pieces.
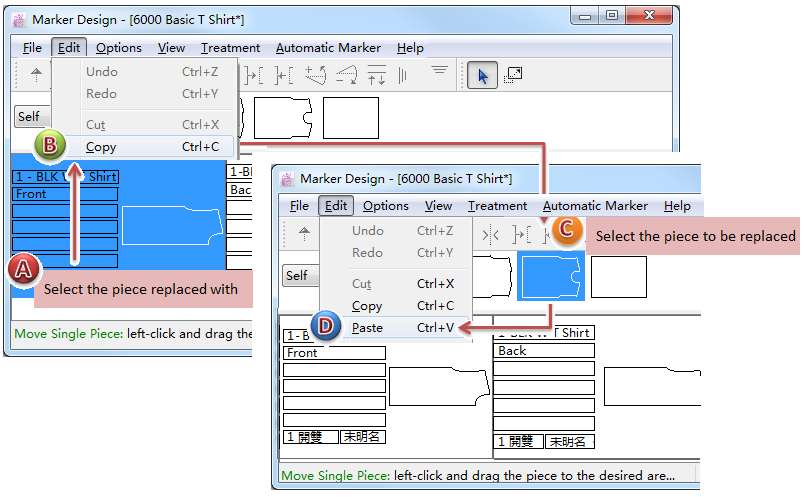
How to replace piece:
Select the desired pattern from the pattern file, click menu [Edit]-[Copy](or press Ctrl + C keys) to copy it;
Select the pattern piece to be replaced in the Chart, click menu [Edit]-[Paste] (or press Ctrl + V keys) to paste the copied piece. The piece that is copied replaces the selected piece in the chart.
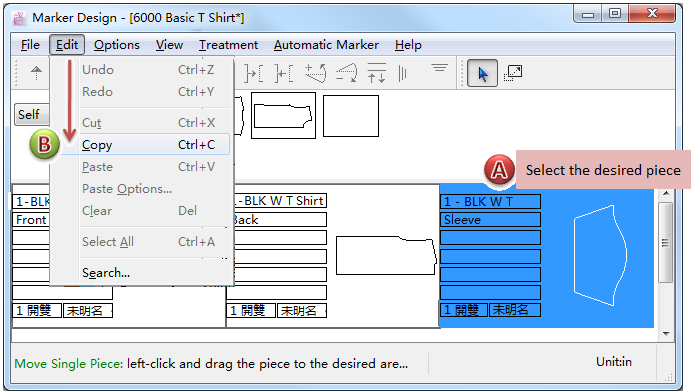
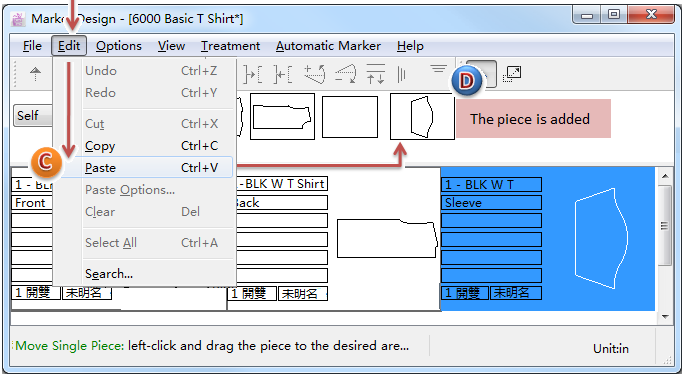
How to add a piece:
Select the desired pattern from the pattern file, click menu [Edit]-[Copy](or press Ctrl + C keys) to copy it;
Click menu [Edit]-[Paste] (or press Ctrl + V keys). The copied piece appears in the chart.
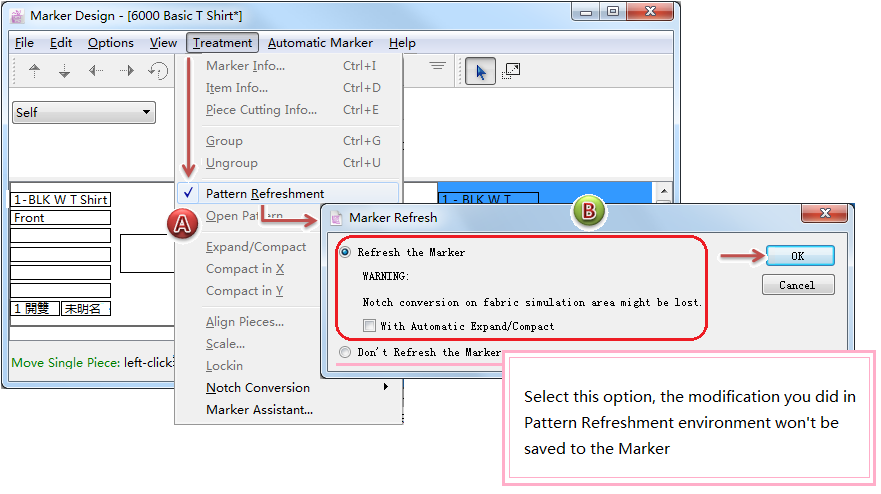
How to refresh the modification to the marker:
Click menu [Treatment]-[Pattern Refreshment], The Marker Refresh dialog box appears, select [Refresh Marker], and select option “With Automatic Expand/Compact” as desired, and click [OK] to start refreshment:

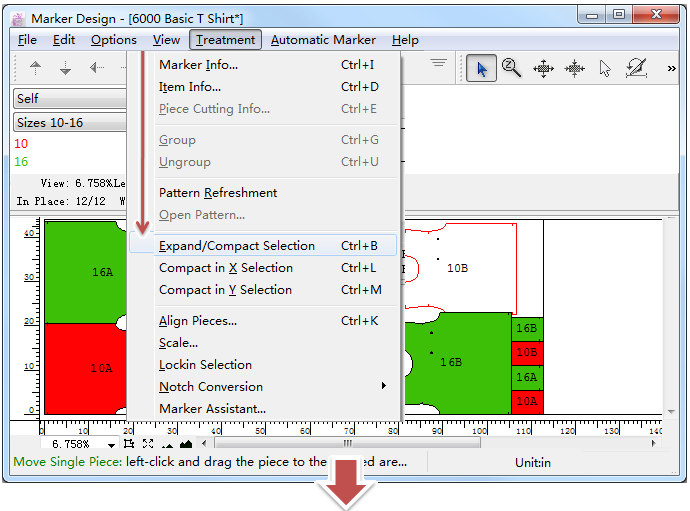
Expand/Compact Marker
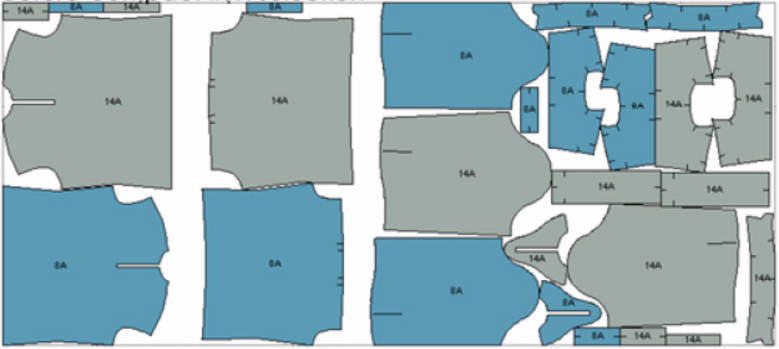
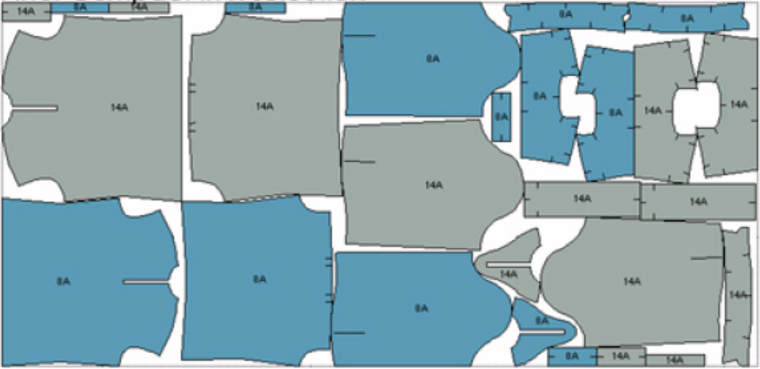
If the marker contains overlaps/spaces, click this item to adjust the overlaps or fill the spaces.
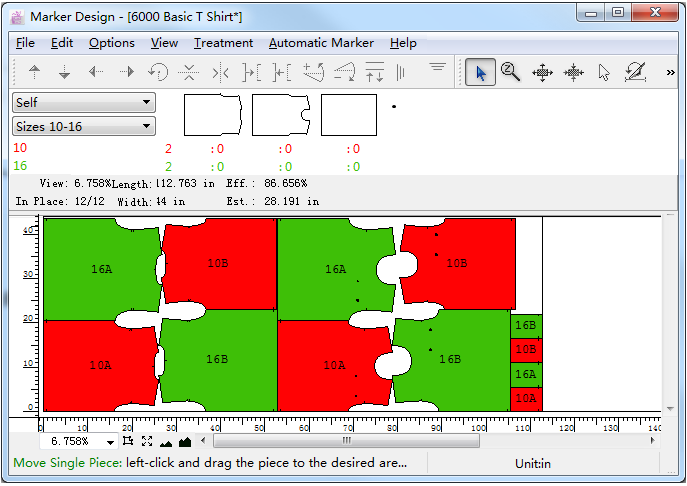
Expand Marker:
Following image shows the overlapping pieces:
Click menu [Treatment]-[Expand/Compact Marker], the overlap will be adjusted:
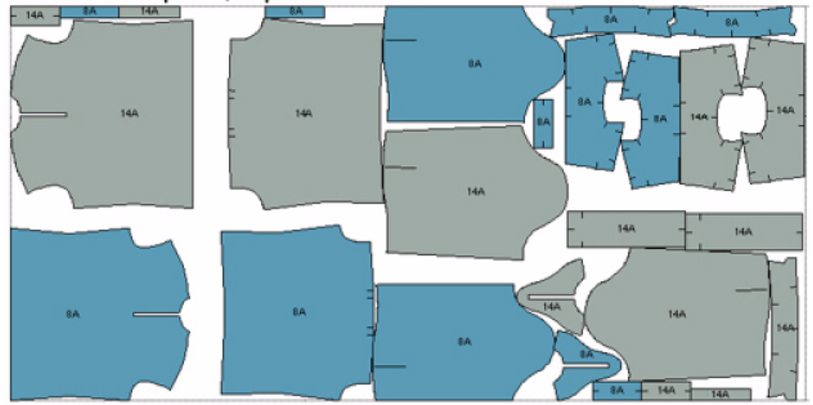
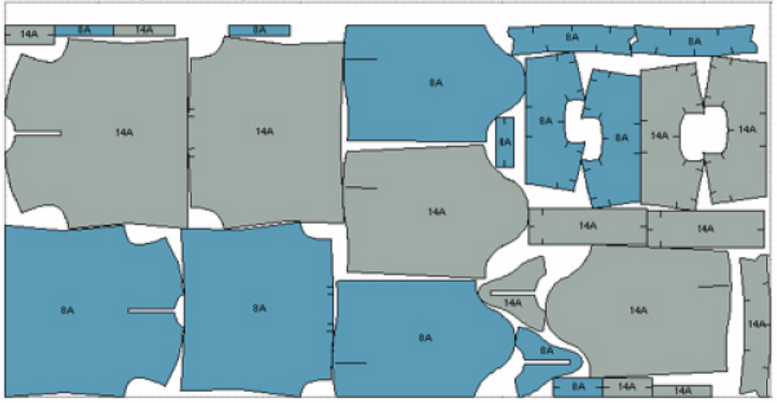
Compact Marker:
Following image shows the spaces between pieces:
Click menu [Treatment]-[Expand/Compact Marker], the spaces will be filled or adjusted:
Note
If you select a piece and then click [Expand/Compact Marker], then this function works for the selected piece only; if select no piece, this function works for the entire marker.

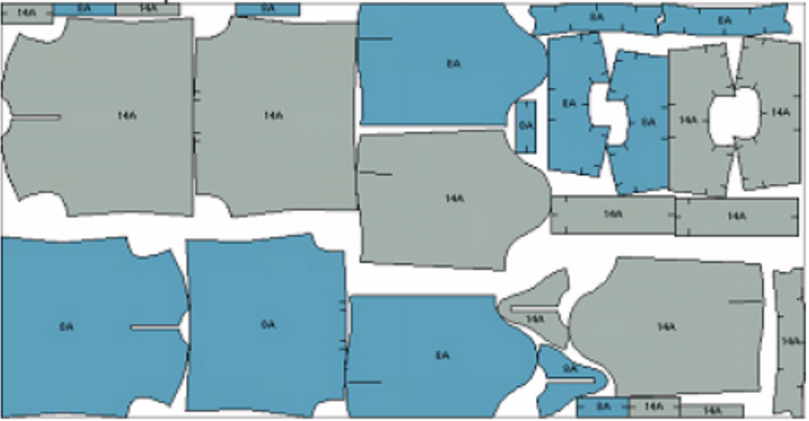
Compact in X Selection
Fills in or adjusts spaces between all or selected pieces according to the X axis.
Note
If you select a piece and then click [Compact in X Selection], then this function works for the selected piece only; if select no piece, this function works for the entire marker.
Before Compact in X Selection:
After Compact in X Selection:
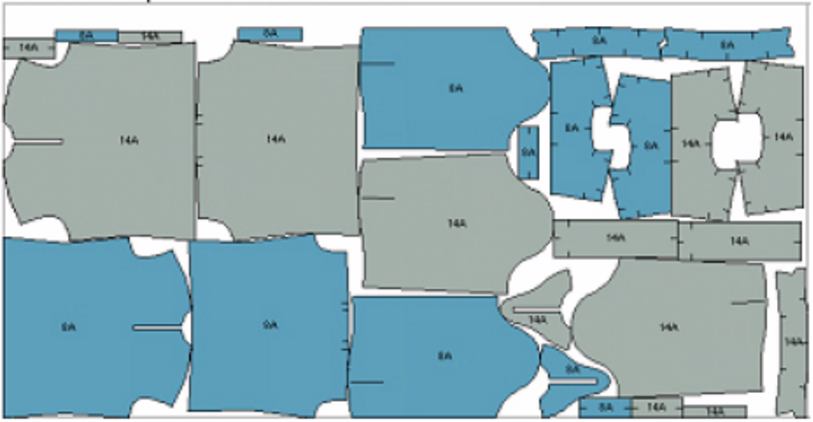
Compact in Y Selection
Fills in or adjusts spaces between all or selected pieces according to the Y axis.
Note
If you select a piece and then click [Compact in Y Selection], then this function works for the selected piece only; if select no piece, this function works for the entire marker.
Before Compact in Y Selection:
After Compact in Y Selection:
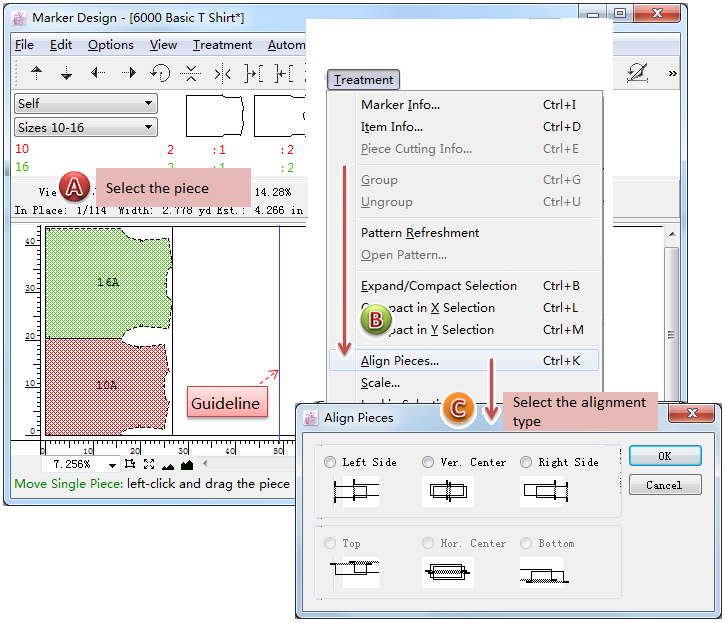
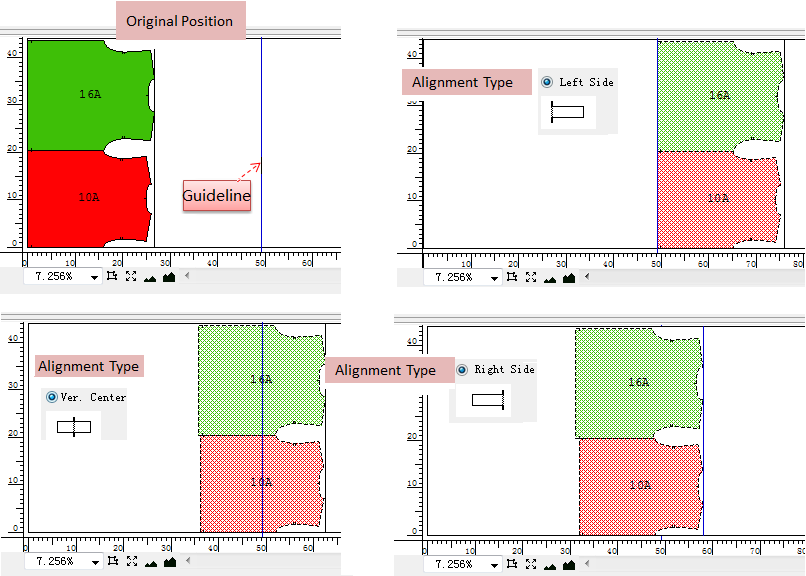
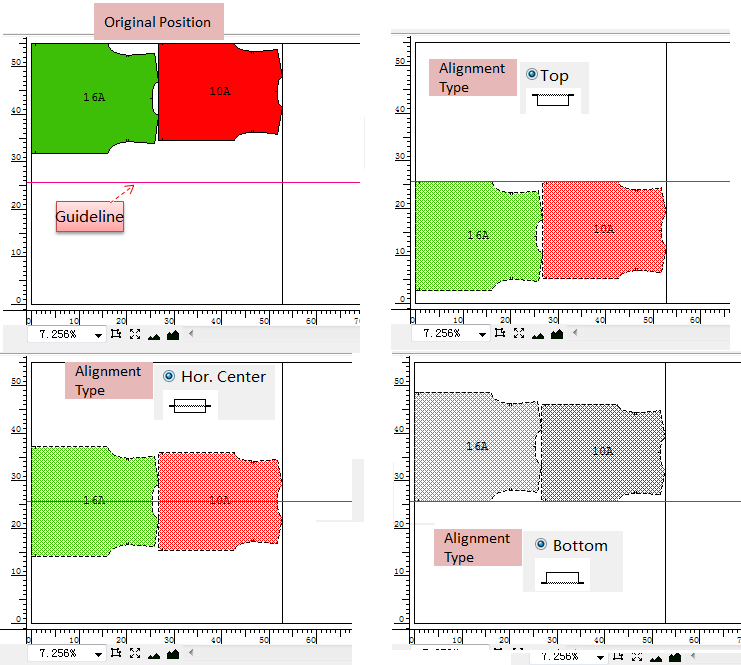
Align Pieces
Allow user to align pieces with guidelines on the Fabric Simulation Area.
Before aligning pieces, you need to create a guideline.
Note
For more information about how to create a guideline, please refer to Chapter 1 Guideline.
How to align pieces with guideline
Select the desired pieces, click menu [Treatment]-[Align Pieces]. Select the alignment by selecting the appropriate radio button, click [OK] button.
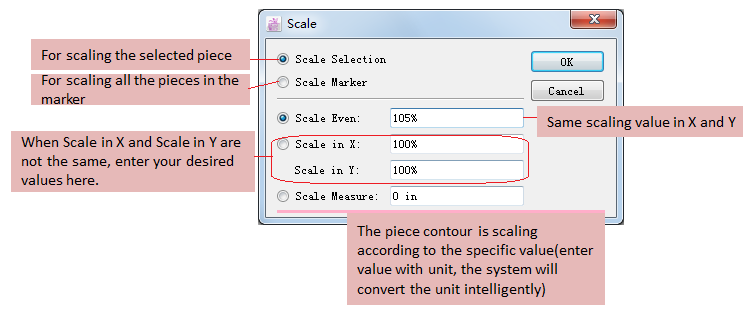
Scale…
To scale the selected pattern pieces or the entire marker.
To scale the entire marker, click [Scale] button;
To scale the selected pattern piece(s), select them first and then click [Scale] button.
When you click [Scale], the dialog box appears:
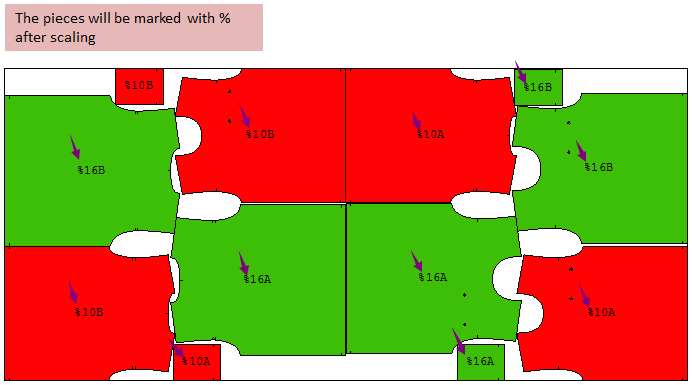
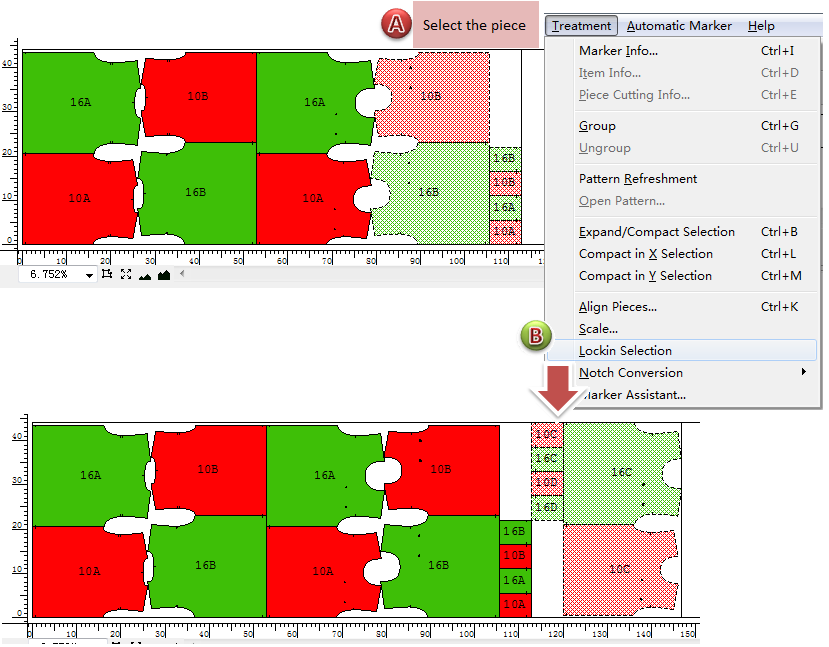
Lockin Selection
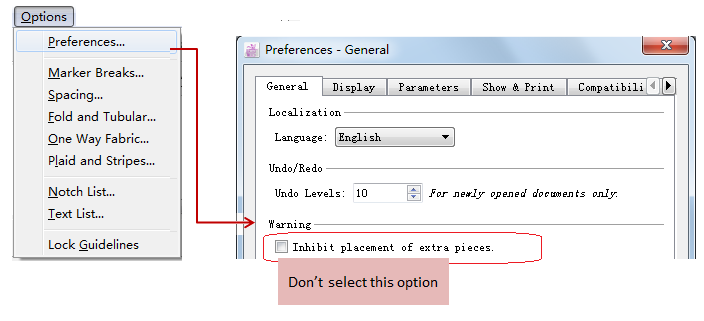
Lockin Selection enables user to duplicate the current marker with a 180° rotation and add it to the end of the marker.
Note
To enable Lockin Selection, you must ensure that Inhibit placement of extra pieces check box is unchecked:
How to do:
Select the desired pattern piece in the simulation area;
Click menu [Treatment]-[Lockin Selection];
The selected piece is added to the end of the marker with a 180° rotation.
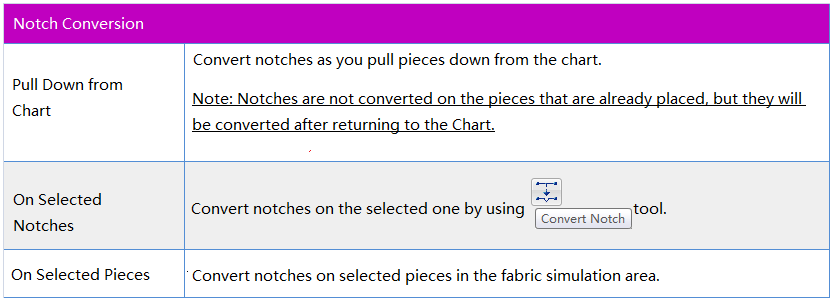
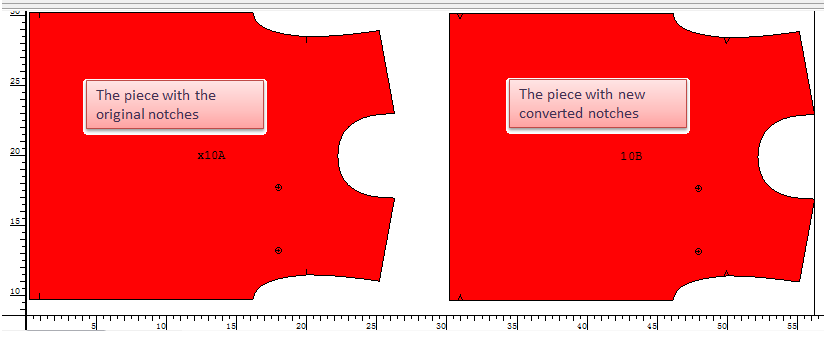
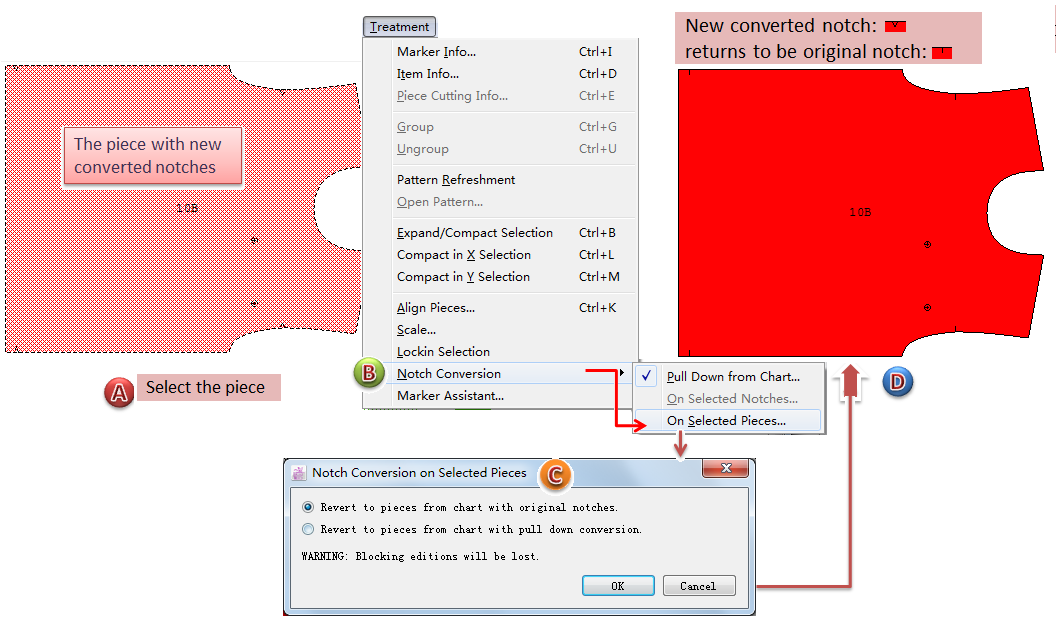
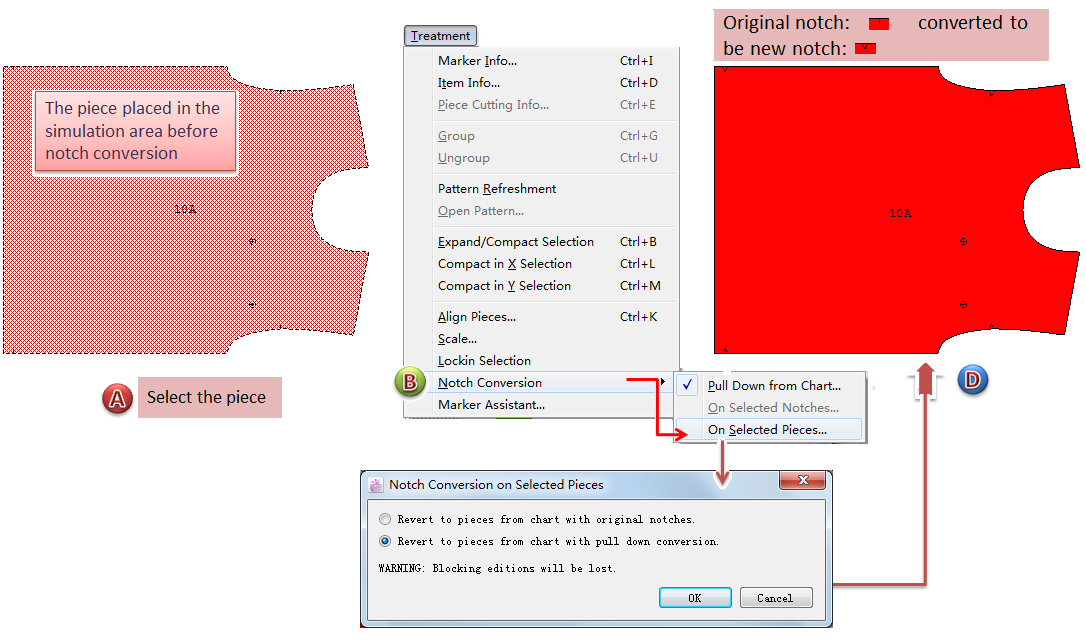
Notch Conversion
Convert several notches at once on the pieces in the Chart or fabric simulation area. You don’t have to return to Pattern Design for coverting the notch on the corresponding pattern piece. It simplifies the operation.
Notch Conversion offers three options:
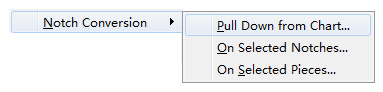
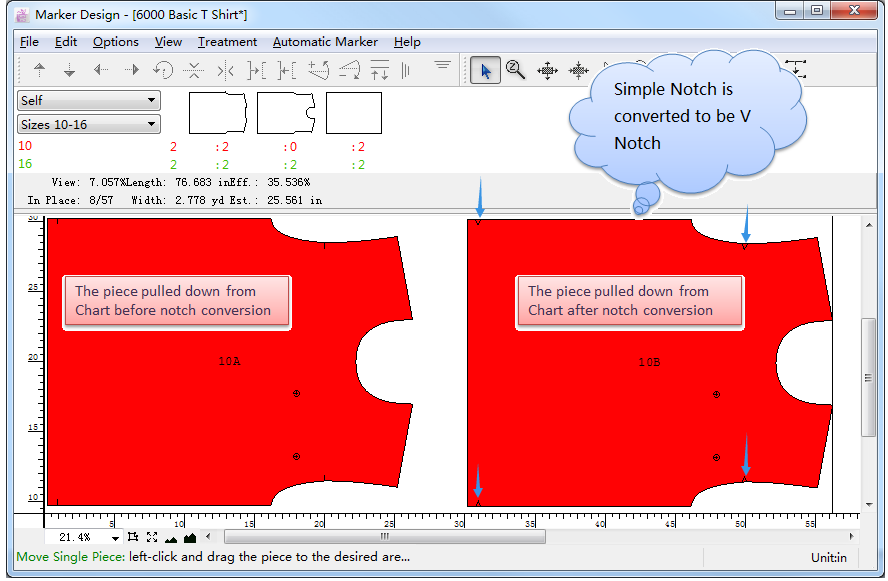
Convert notches on the pieces in the Chart
How to do:
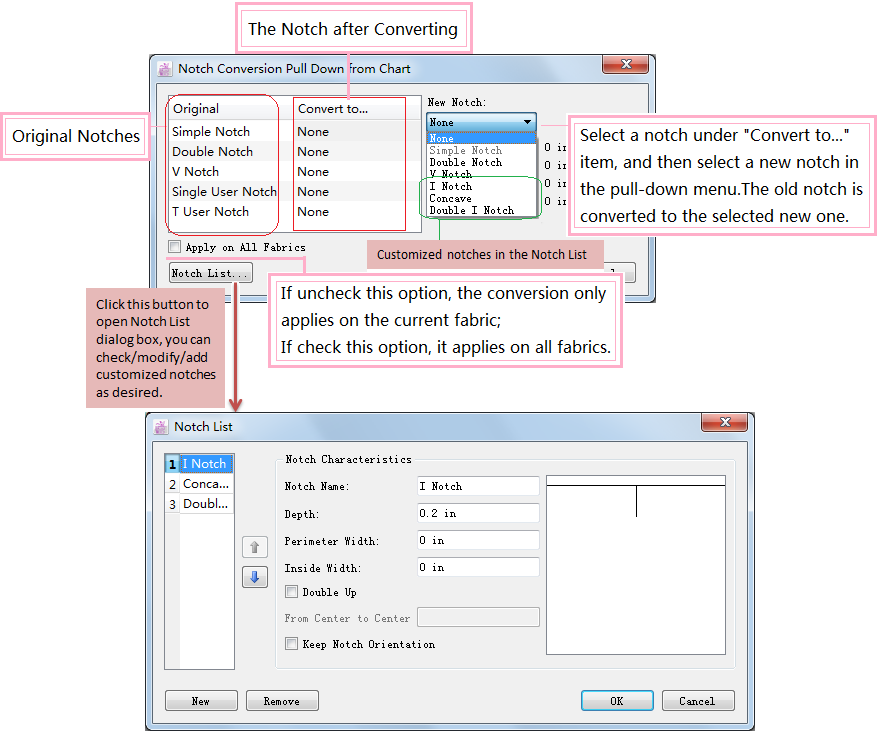
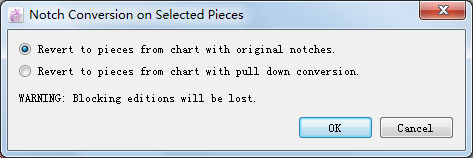
Click menu [Treatment]-[Notch Conversion]-[Pull Down from Chart], the dialog box appears, then convert notches as required:
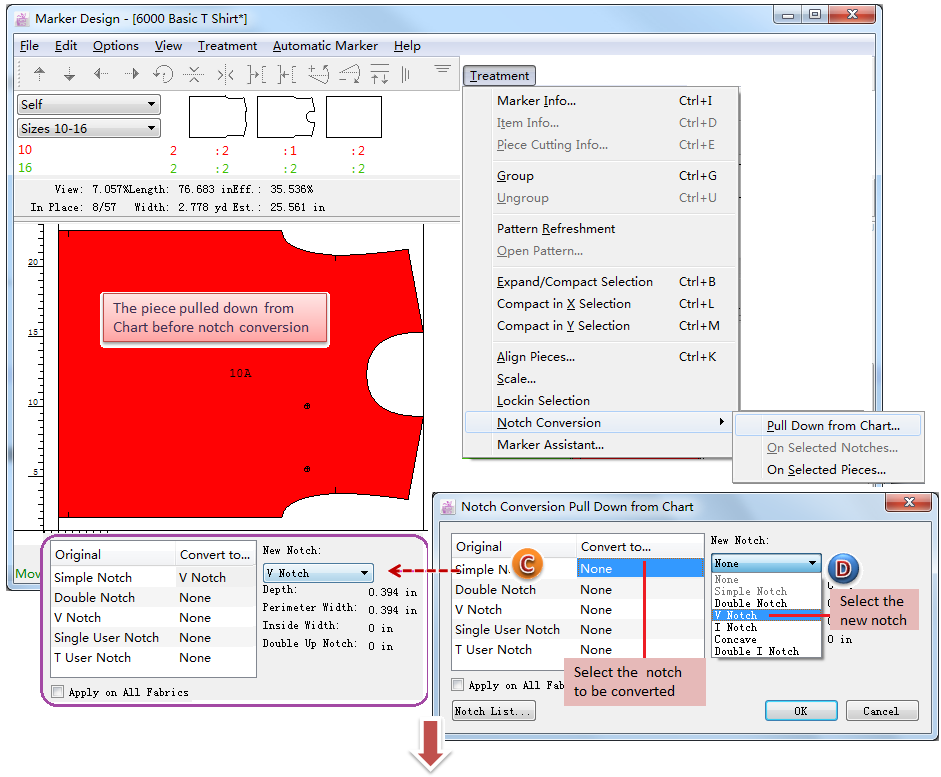
Note
When you convert notches on the pieces in the chart area, the notches on the pieces that have been placed in the simulation area won’t be changed. However, if the piece is returned to the Chart, then its notches will be changed.
Notch Conversion Pull Down from Chart Dialog Box:
Convert notch on the selected notch
Apply this function with the
tool. For more information about the fool, please refer to Chapter 3
Convert notches on selected pieces
This function is based on the two previous functions that have been applied, for facilitating user to return original notch, or replace the original notches on the pieces placed in the simulation area with new notches converted in Chart area.
Note
Only after selecting the desired piece in the simulation area can this function be chosen.
Options in the dialog box:
Example for “Convert notches on selected pieces”:
- a:
- b:
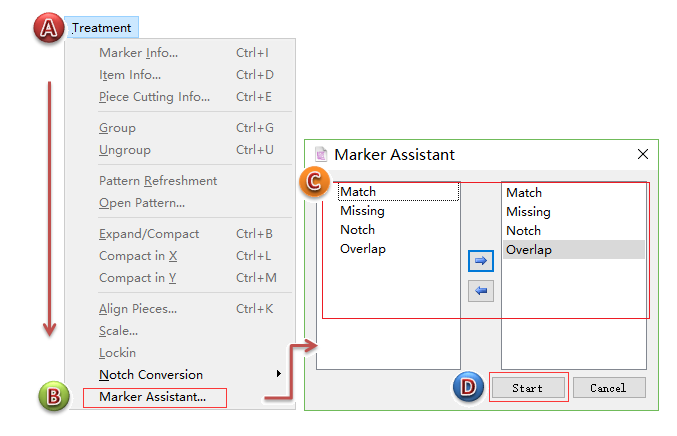
Marker Assistant
Marker Assistant helps users check over the marker and find out the error, which improve the efficiency and accuracy of the marker planning.
Check Marker
Marker Assistant will check four aspects as follows:
Match: match point which isn’t aligned;
Missing: miss piece(s) or put extra piece(s) when marker planning;
Notch: the cutting point is on the notch;
Overlap: some pieces get overlapped on the simulation area.
You can use Marker Assistant to check your marker before sending the marker file out to production.
How to do:
Click Treatment - Marker Assistant - Marker Assistant Dialog Box - Start:
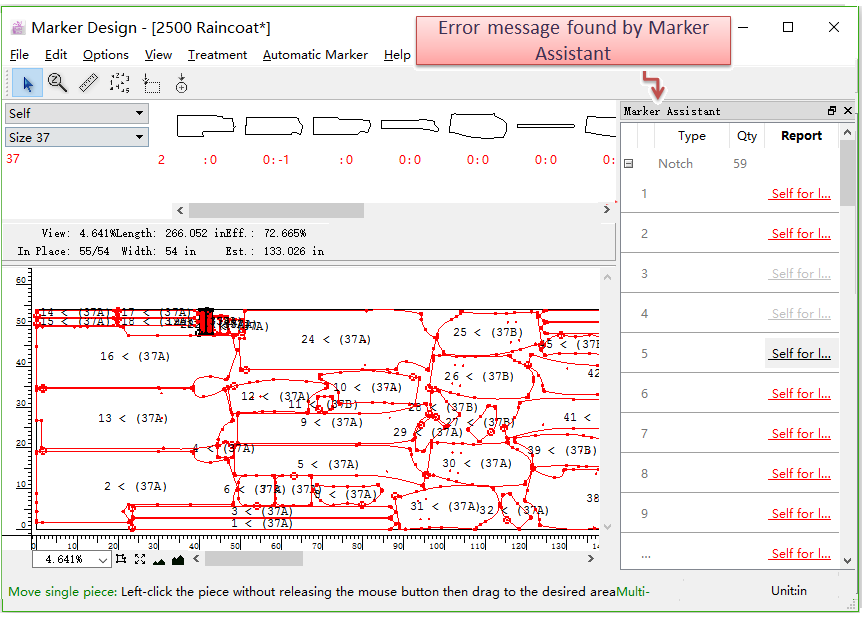
Then the system will show you error message about Match, Missing, Notch or Overlap on the right side of the window:
When you click the error message, it will jump to the corresponding layer.