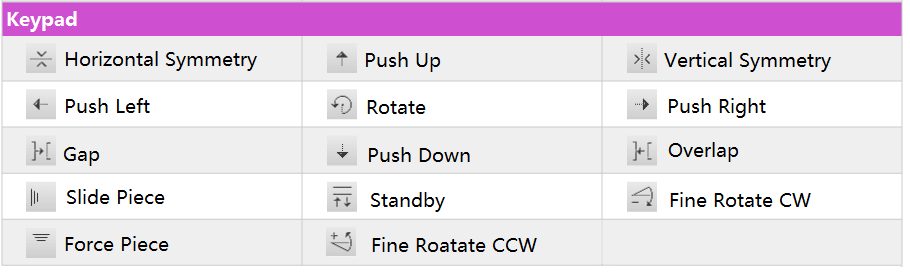
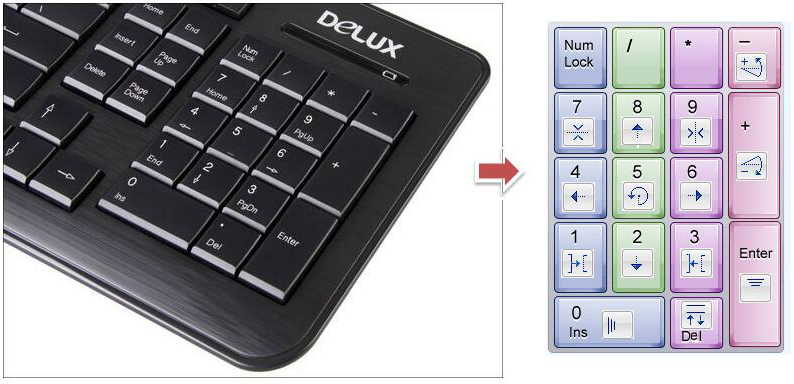
Keypad
The tools in the keypad are shown in the following image:
The toolbox/toolbar layout corresponds to the numeric keys on the right hand side of the keyboard:
 Push Up
The Push Up key pushes the selected piece vertically toward the top of the Fabric Simulation Area. The piece stops when it touches another piece or the fabric edge.
Or press 8 key directly.
 Push Down
The Push Down key pushes a piece (or a group of pieces) vertically toward the bottom of the Fabric Simulation Area. The piece stops when it touches another piece or the fabric edge.
Or press 2 key directly.
 Push Left
The Push Left key pushes a piece (or a group of pieces) horizontally toward the end of the Fabric Simulation Area. The piece stops if it touches another piece or the fabric edge.
Or press 4 key directly.
 Push Right
The Push Right key pushes a piece (or a group of pieces) horizontally toward the end of the Fabric Simulation Area. The piece stops when it touches another piece or the window’s end.
Or press 6 key directly.
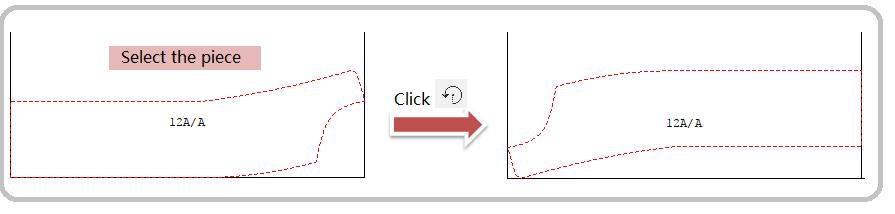
 Rotate
The Rotate key rotates counter-clockwise one or more selected piece(s).
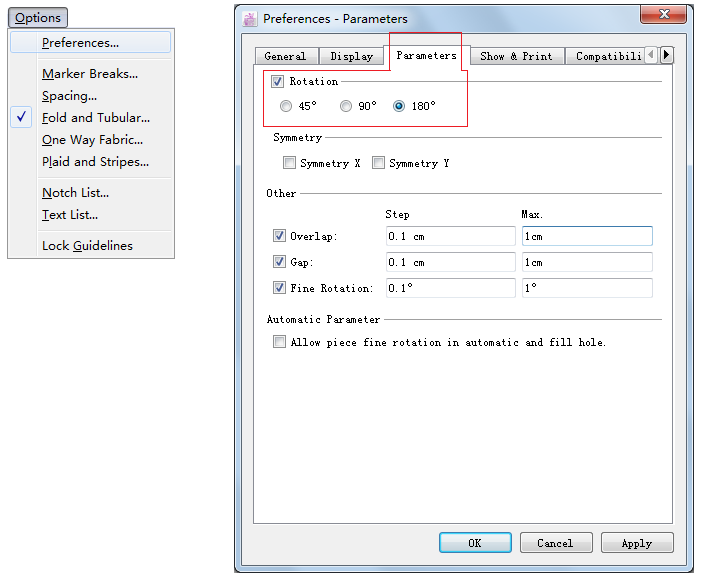
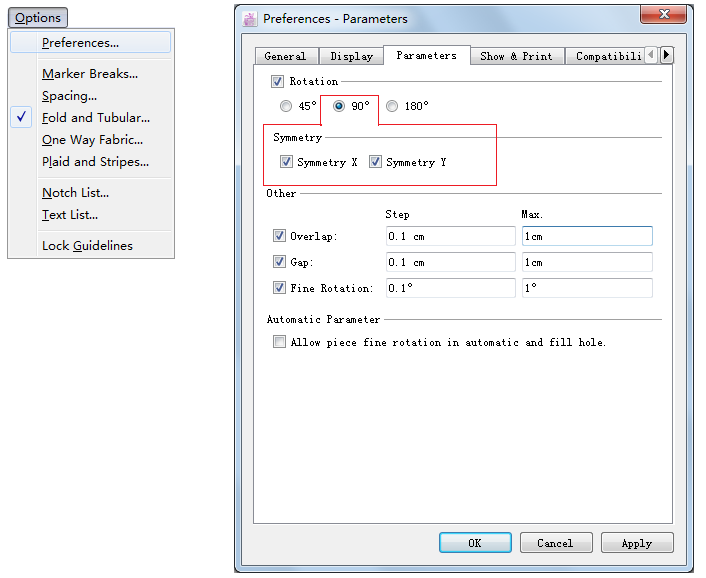
Set the rotation angle
Click the menu [Options]-[Preferences]-[Parameters] and select the angle, like 180 degrees.
Rotate the selected piece
Select the desired piece with Pointer tool, and then select the
Note
After selecting the desired piece, hold down Shift key and click
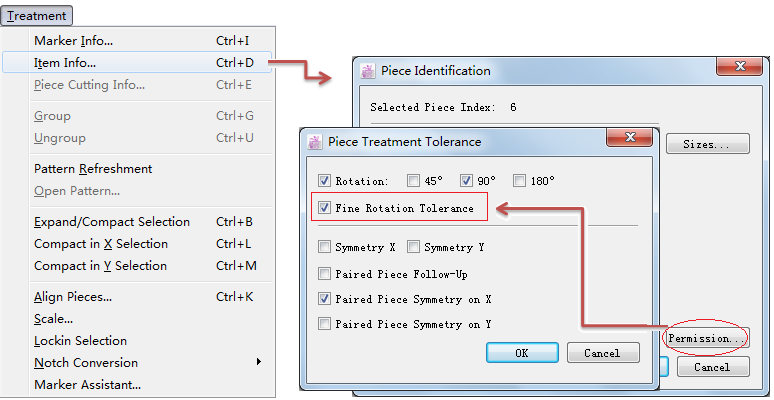
If the specific piece can’t be rotated or not rotated at the right angle even after setting the angle in the menu [Options]-[Preferences]-[Parameters], then you need to double-click the piece in the chart area, or select the piece and click menu [Treatment]-[Item Info], to open the Piece Info Dialog box. Click [Permission] button in the dialog box to open the Piece Treatment Tolerance Dialog Box, you can check/modify the parameters.
For more information about Piece Treatment Tolerance, please refer to Chapter 2 Treatment Menu in this manual.
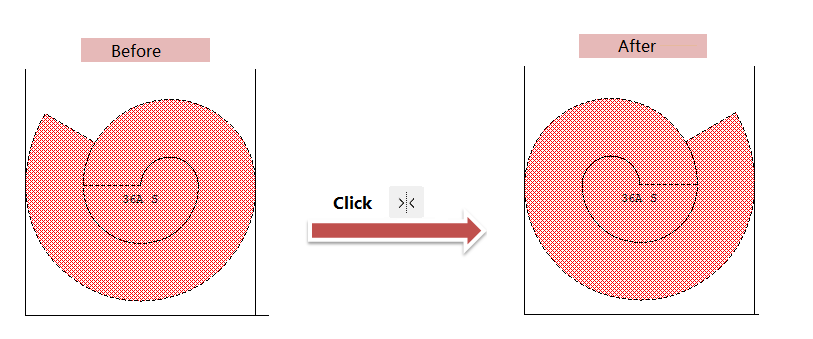
 Horizontal Symmetry
The Horizontal Symmetry key flips a piece on the marker on a horizontal axis.
Note
Before applying horizontal symmetry, please go to menu [Options]-[Preferences]-[Parameters] to select the [Symmetry X] option.
Or press 7 key directly to apply this function.
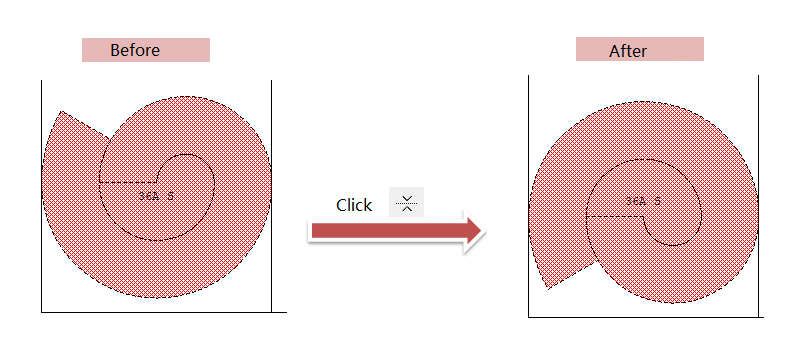
 Vertical Symmetry
The Vertical Symmetry key flips a piece on the marker on a vertical axis.
Note
Before applying vertical symmetry, please go to menu [Options]-[Preferences]-[Parameters] to select the [Symmetry Y] option.
Or press 9 key directly to apply this function.
Note
If it doesn’t apply the function on the piece even after finishing setting in the menu [Options]-[Preferences]-[Parameters], then you need to double-click the piece in the chart area, or select the piece and click menu [Treatment]-[Item Info], to open the Piece Info Dialog box. Click [Permission] button in the dialog box to open the Piece Treatment Tolerance Dialog Box, you can check/modify the parameters.
For more information about Piece Treatment Tolerance, please refer to Chapter 2 Treatment Menu in this manual.
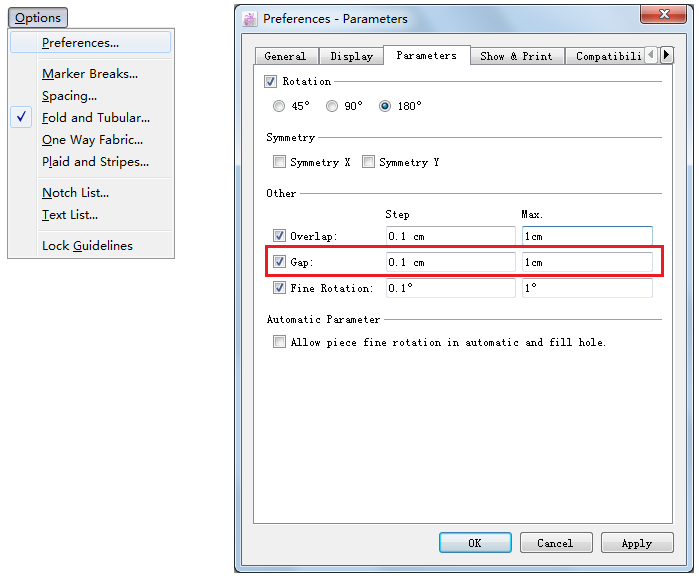
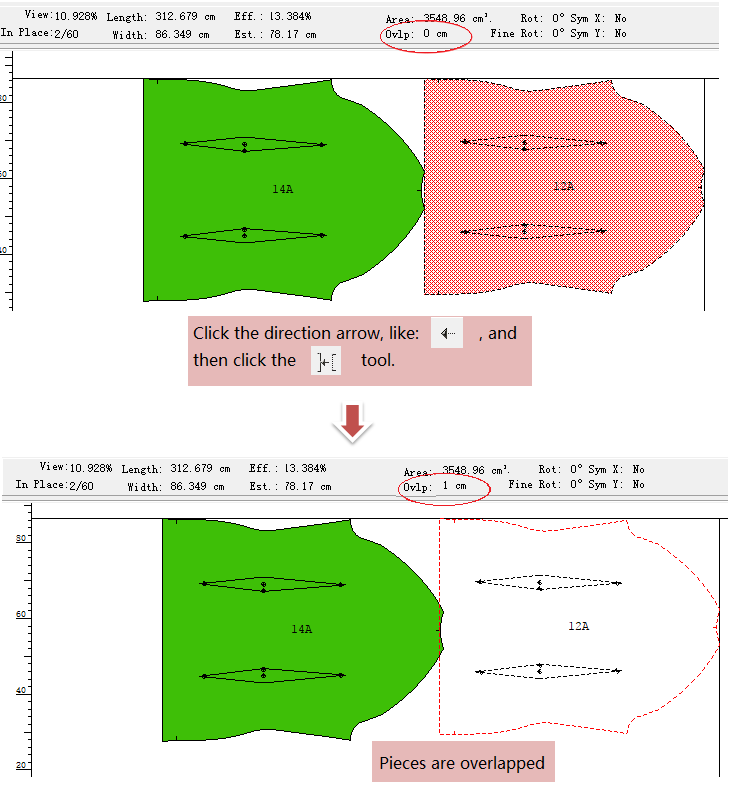
 Gap
Gap
The Gap key creates a gap (space) between two pieces.
Before applying this function, please go to menu [Options]-[Preferences]-[Parameters] to set the related parameters (Step&Max):
How to do:
Select the desired piece;
Click the one of the direction arrows to determine the direction;
Click
Note
Key 1 is the shortcut key for Gap tool, so you can press it directly.

 Overlap
The Overlap key overlaps two pieces.
Before applying this function, please go to menu [Options]-[Preferences]-[Parameters] to set the related parameters (Step&Max):
How to do:
Select the desired piece;
Click the one of the direction arrows to determine the direction;
Click
Note
Key 3 is the shortcut key for

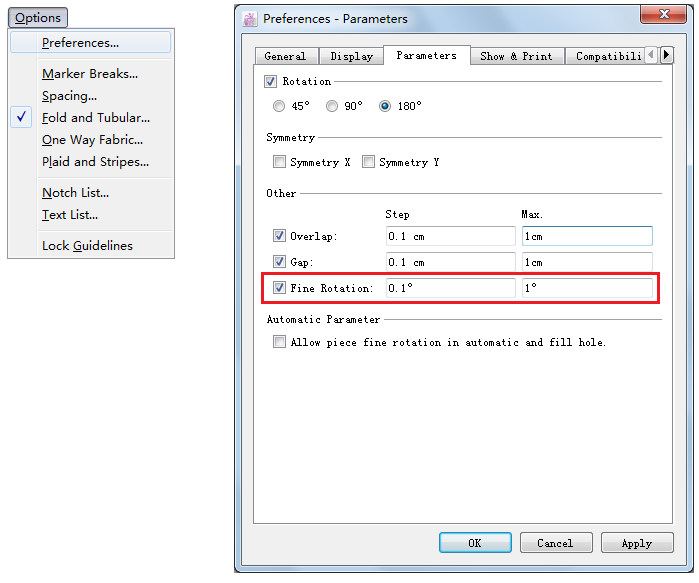
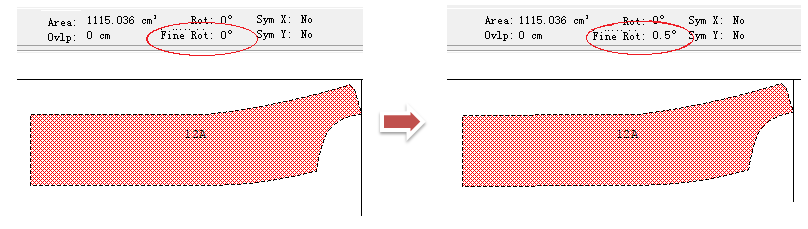
 Fine Rotate CCW
The Fine Rotate CCW key makes a fine rotation counter-clockwise on a selected piece.
Before applying this function, please go to menu [Options]-[Preferences]-[Parameters] to set the related parameters (Step&Max):
or select the piece, and open its item info dialog box to ensure if the option Fine Rotation Tolerance is selected.
How to do:
Select the desired piece;
Click the one of the direction arrows to determine the direction;
Click
Note
Key “-” is the shortcut key for
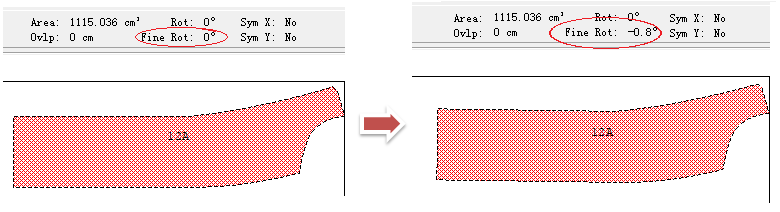
 Fine Rotate CW
The Fine Rotate CW key makes a fine rotation clockwise on a selected piece.
Before applying this function, please go to menu [Options]-[Preferences]-[Parameters] to set the related parameters (Step&Max):
or select the piece, and open its item info dialog box to ensure if the option Fine Rotation Tolerance is selected.
How to do:
Select the desired piece;
Click the one of the direction arrows to determine the direction;
Click
Note
The Key “+” is the shortcut key for
 Standby
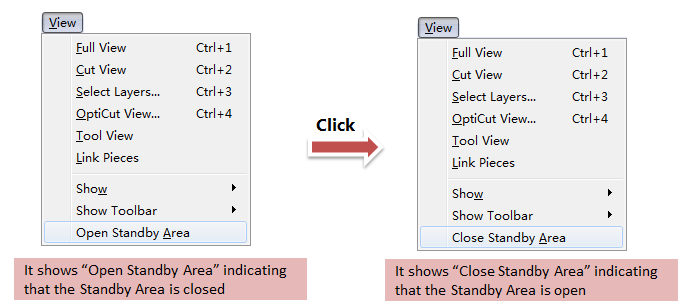
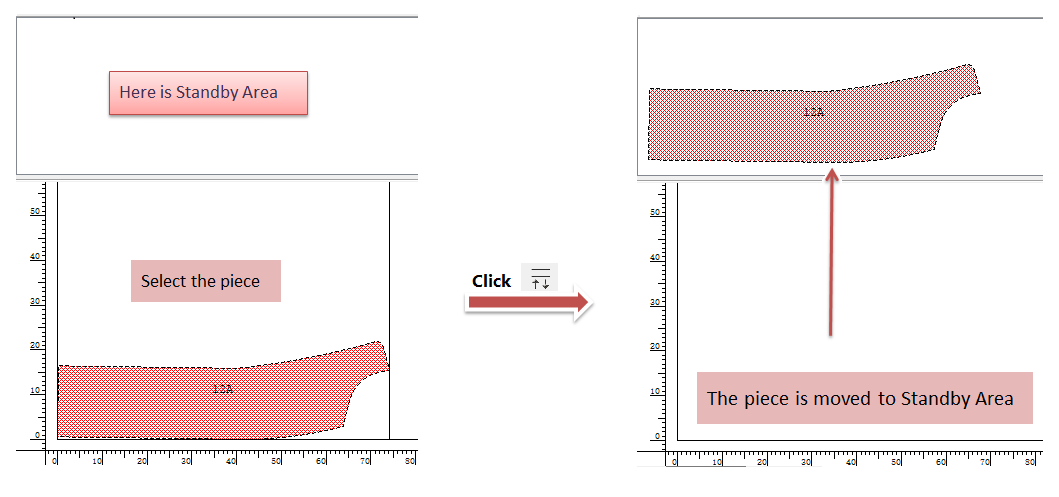
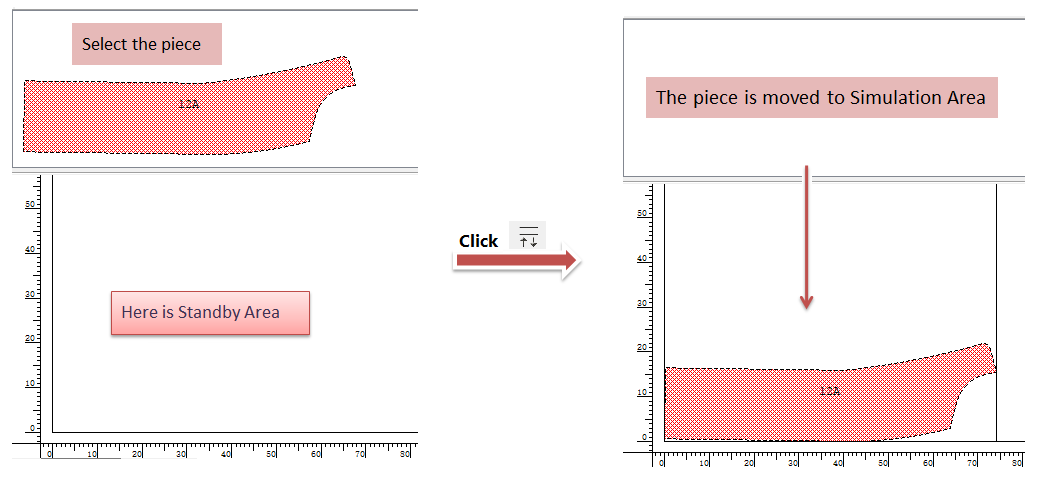
This Standby key sends or retrieves a piece or a group of pieces from the Standby Area to the Fabric Simulation Area or vice-versa.
Before applying this function, please go to [Treatment] menu to ensure if the standby area is open:
Note
For more information about Standby Area, please refer to Chapter 2 [View] Menu in this manual.
Move the piece to Standby area:
or press “.” key directly.
Move the piece to Simulation Area from Standby area:
Note
Use Standby Area with Automatic Nesting: when you use automatic nesting but you don’t want to place some pieces, then you can move those pieces to standby area, and deselect the option “Pieces in Standby Area” in menu [Options]-[Preferences]-[Automatic Engine]. Start automatic nesting after finishing the setting.
The pieces remains the original order in the simulation after moving them to the standby area.
 Slide Piece
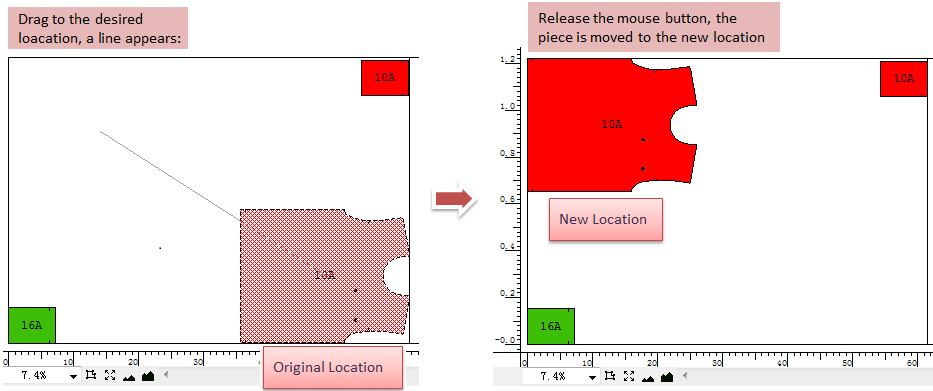
The Slide Piece key slides a piece (or a group of pieces) in a desired direction on the Fabric Simulation Area.
Method one: use 0 key to slide a piece (0 key is the shortcut key for
select the piece;
hold down 0 key;
left-click the piece without releasing the mouse button, drag it and a line appears;
drag the line to desired location and release the mouse button, the piece is moved to the new direction. When it touches the other piece, or the edge of the marker, it will stop.
Method two:
double-click the piece without releasing the mouse button, the line appears;
drag the line to desired location and release the mouse button, the piece is moved to the new direction. When it touches the other piece, or the edge of the marker, it will stop.
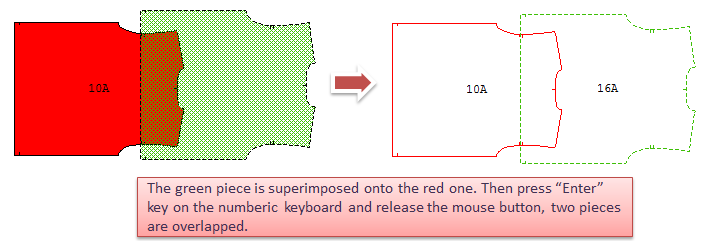
 Force Piece
The Force Piece key allows you to temporarily superimpose pieces on one another.
Apply this function with “Enter” key in the numeric keyboard (this is the shortcut key for this function):
select
Pointer tool;
left-click the piece without releasing the mouse button, move the piece to superimpose the another piece as desired (you can determine how to superimpose or how much it superimposes)
Press “Enter” key on the numeric keyboard, and then release the mouse button.