Chapter 4: Grading
The PAD System Pattern Design offers tools and options for user to grade pieces, facilitate user to adjust piece sizes.
Size Setting
Before grading the pieces, user needs to set sizes.
How to set sizes
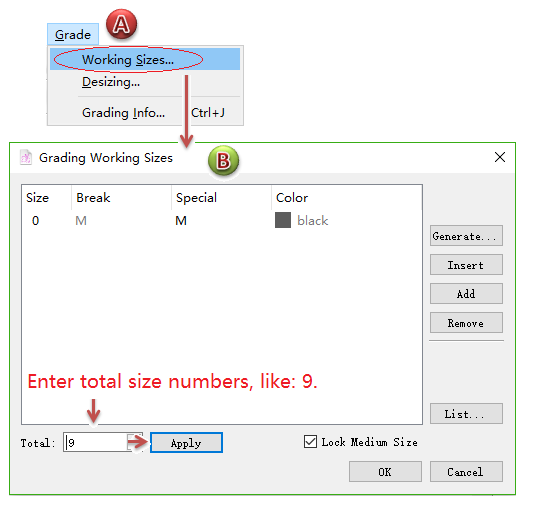
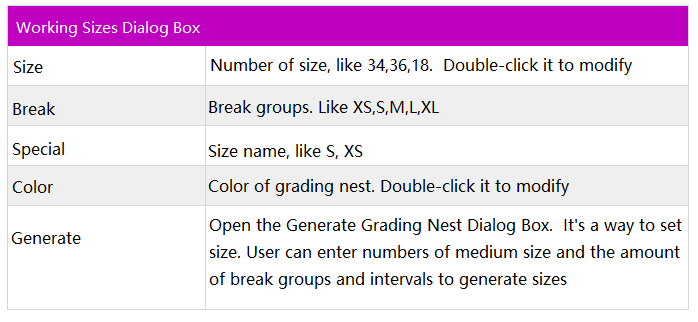
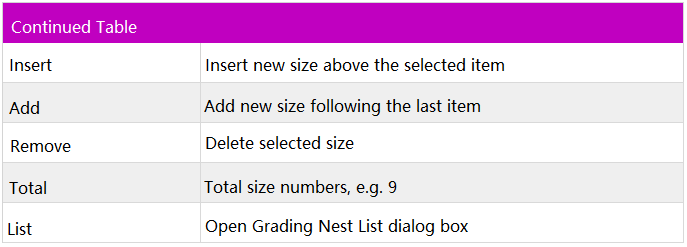
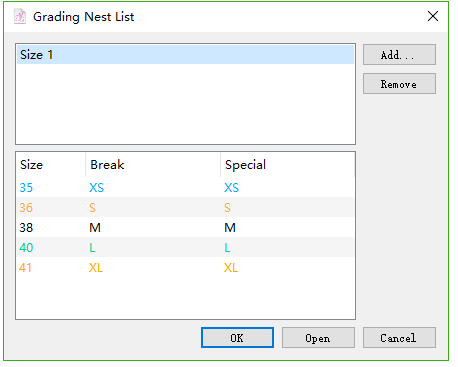
Select Menu [Grade] - [Working Sizes…];
The dialog box appears, enter total sizes and click [Apply] button, system will generate the sizes and take the middle size as Medium automatically.
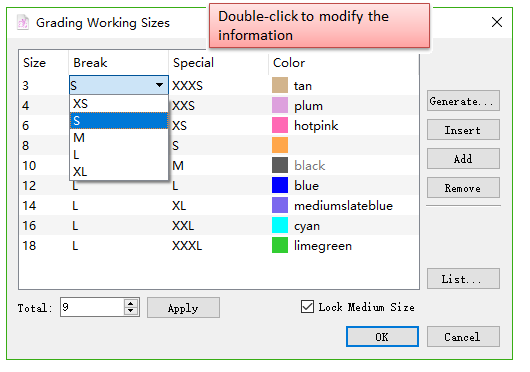
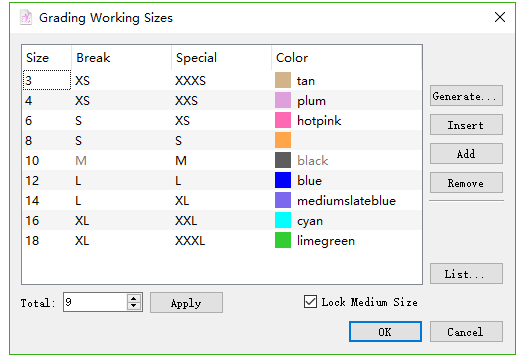
User can set Medium size, or modify the size number/special/break(XS,S,M,L,XL). User can set maximum of 5 break groups.
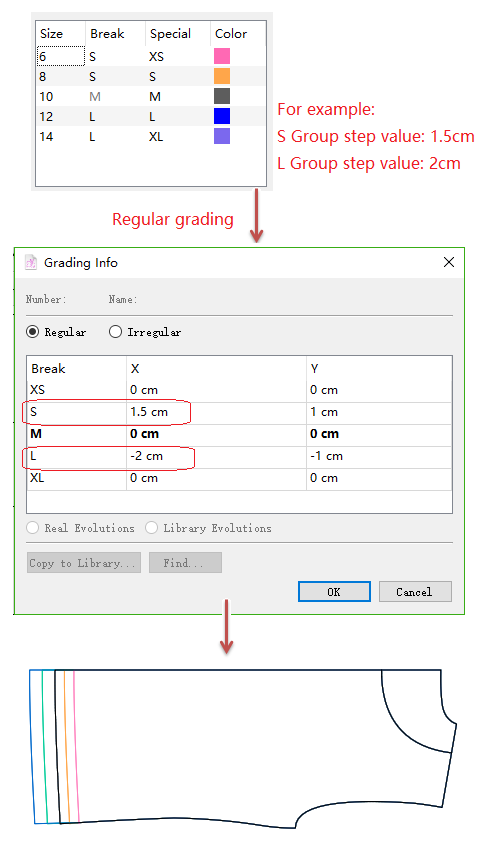
For example:

Ways to grade
The PAD System Pattern Design offers three ways to grade pieces.
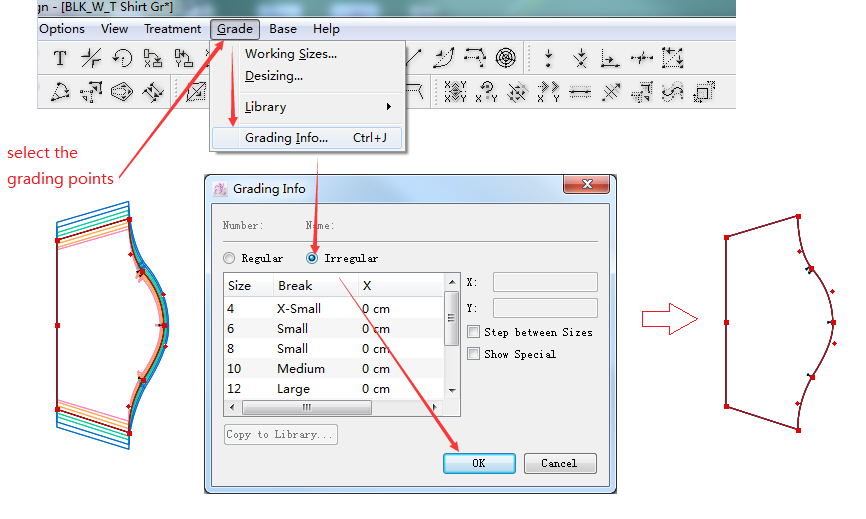
Grade in X,Y
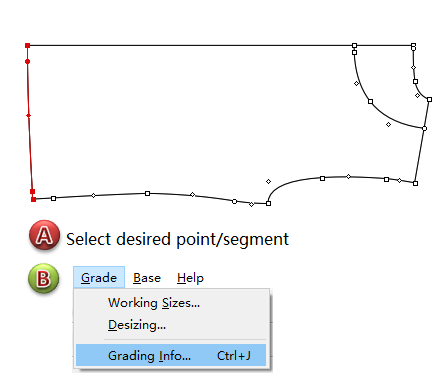
Select the desired segment/point(or more points to be graded in the same values);
Select Menu [Grade]-[Grade Info](or press hot key Ctrl+J), to open the Grade Info Dialog Box;
User can use regular grading list for regular grading (step value between each size group is the same):
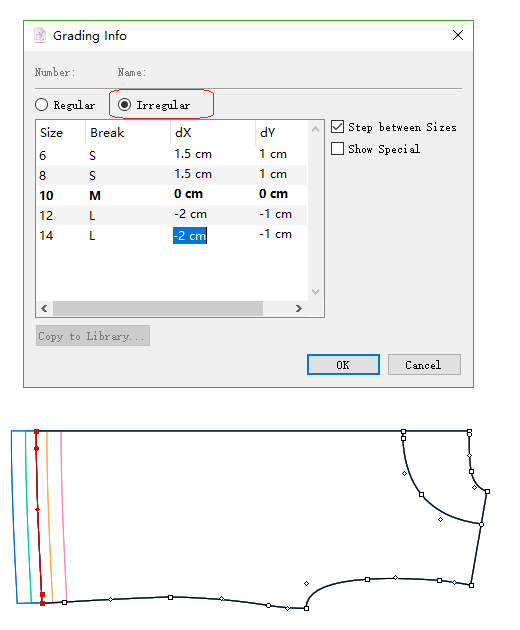
User can use irregular grading list for irregular grading (steps between each size is different):
Note
The irregular grading list also can be used for regular grading. However, irregular grading can be performed in irregular grading list only.
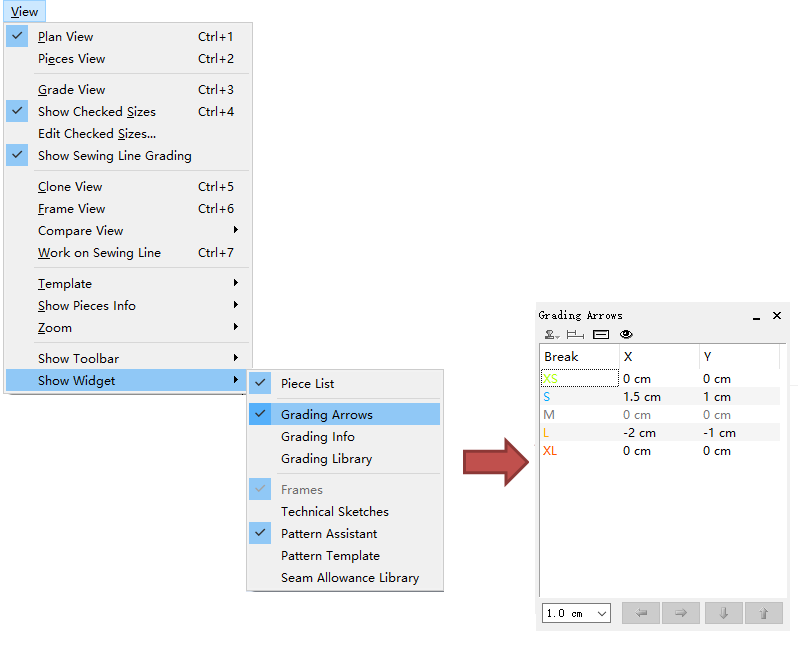
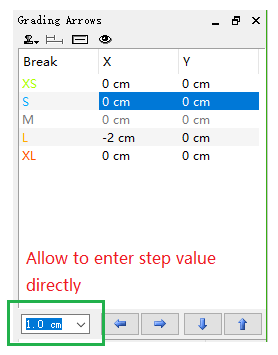
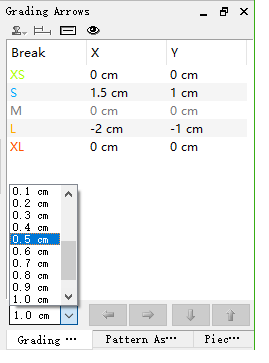
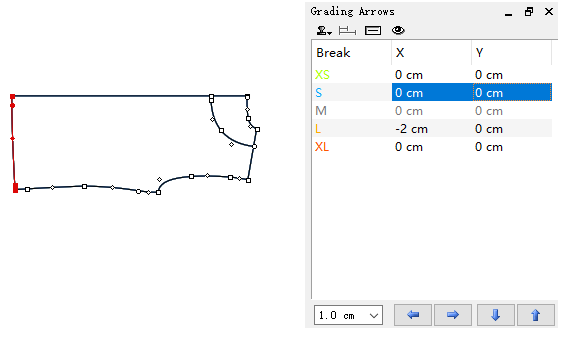
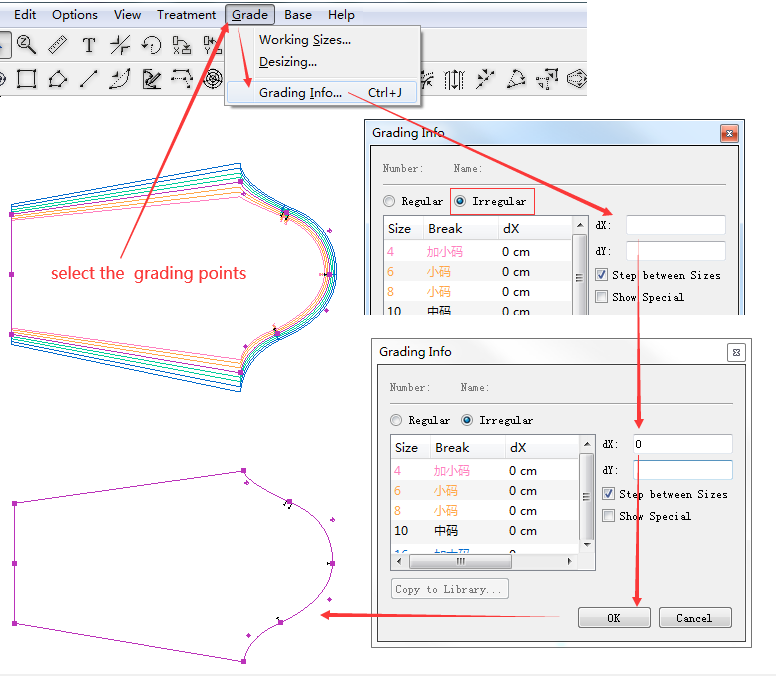
Grading Arrows
By using Grading Arrows, user doesn’t have to recognize the grading direction depending on the negative or positve value. User can select desired step value(positive), and click the arrow button to control the grading direction.
Open the window
Before using Grading Arrows, user needs to open the window:
Click Menu [View] - [Show Widget] - [Grading Arrows]
Perform grading by Grading Arrows
Select the point(s)/segment;
Select step value;
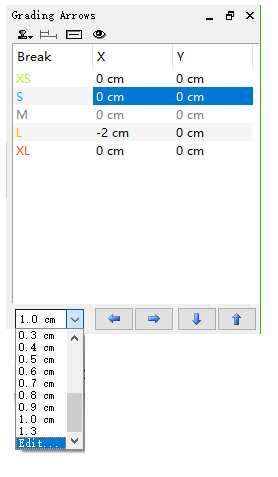
Note
Allow user to enter step value as requried.
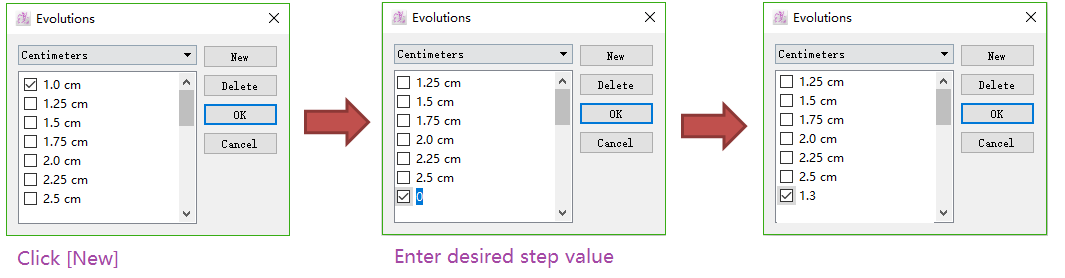
Pull the menu bar to bottom;
Select [Edit], open the [Evolution] Dialog Box;
Select unit, and then click [New]. Enter deisred step value and click [OK].
In V7.0, user can enter desired step value directly.
Select the desired size to be graded;
Click the arrow button to perform grading;
Note
It increases according to the current step value each time you click the arrow button
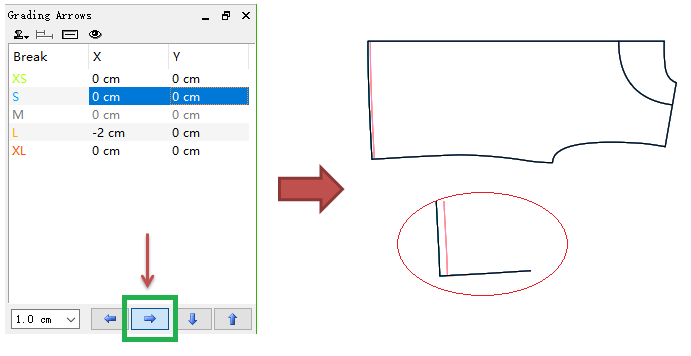
For example:
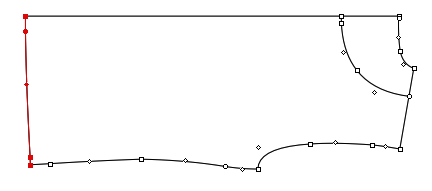
to grade the hem of the T-shirt:
Select the desired hem line:
Select desired step vale (enter it directly in V7.0)
Select the size to be graded
Click the arrow button to perform grading:
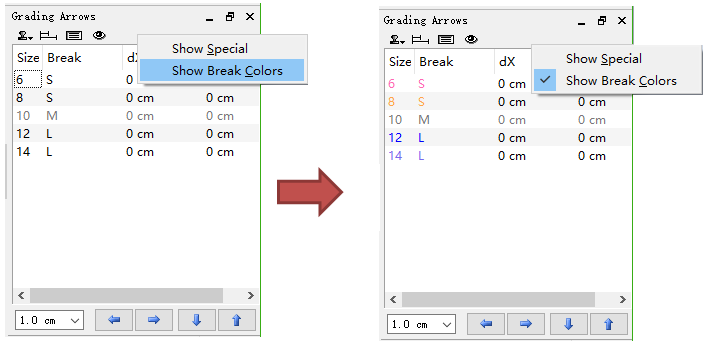
Introduction of Grading Arrows Menu
Show:
Right-click the list to select [Show Special] or [Show Size Color].
Show Special: displays the customized name that user may have assigned to each size in the Grade Working Sizes dialog box:
Show Size Color: to show the size colr set by user
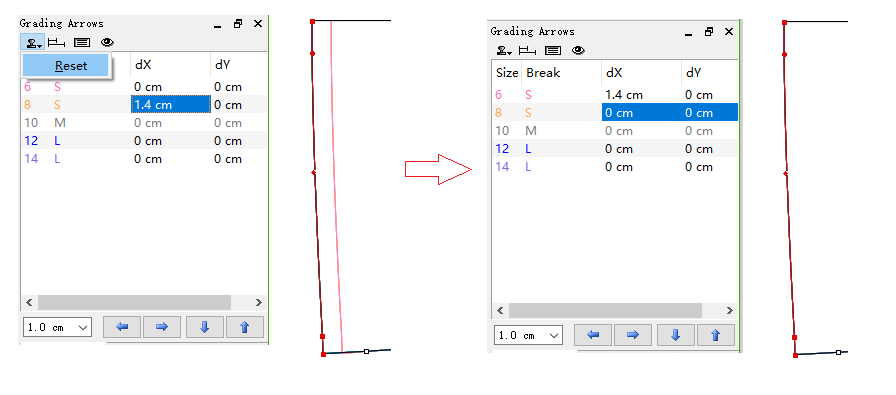
Modify Grading: Reset
Restore the grading of the selected size(s) to zero.
How to do:
select the desired size
click
Distance/Step
: the difference between Medium and other sizes;
: the difference between two neighbouring sizes
Regular/Irregular
: Regular Grading
: Irrgular Grading
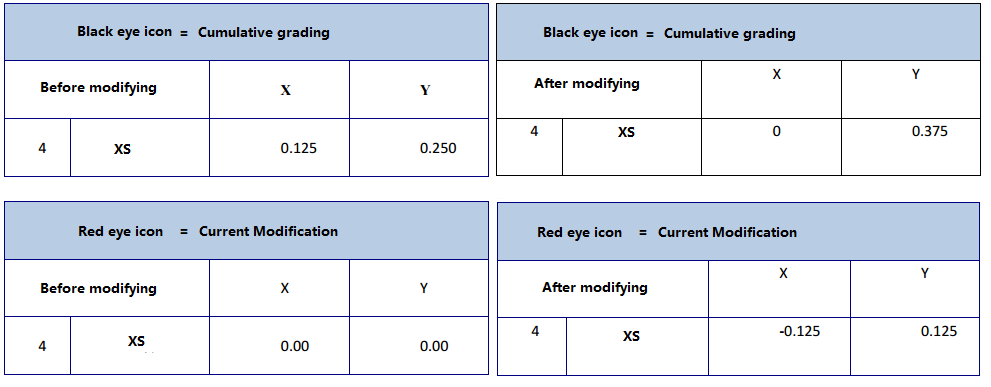
Grade/Modification
Black eye icon: Cumulative of the grading.
Add value to existing grading, you don’t have to delete the former value.
Red eye icon: Current modification.
Temporarily hide the graded value, the new-entered value is added to the graded value.

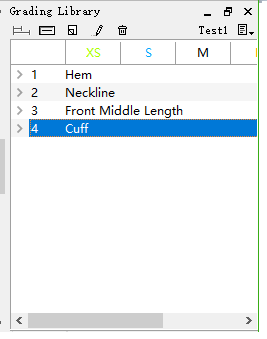
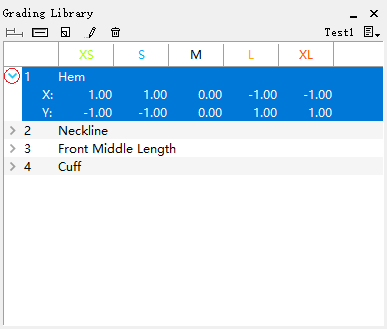
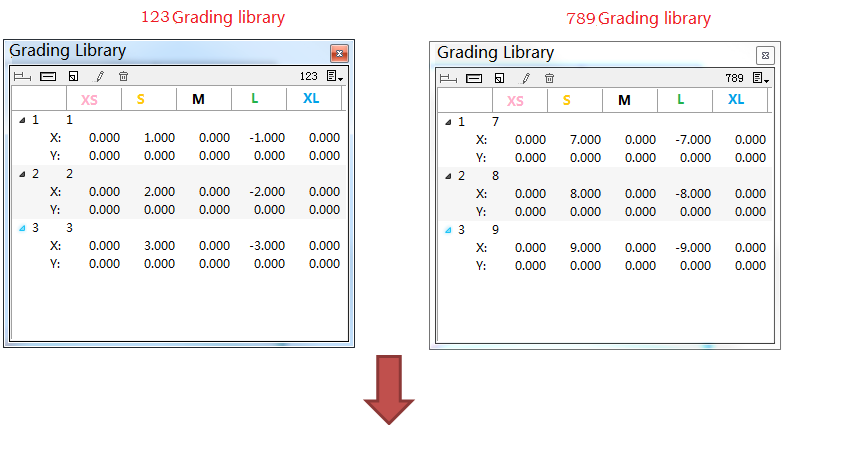
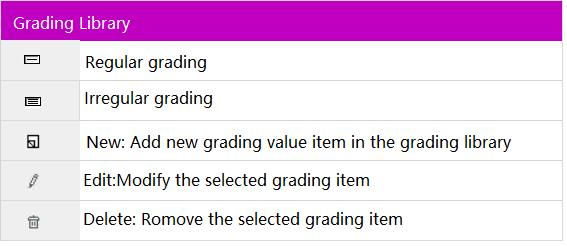
Grading Library
Allow user to create a grading library with the frequently-used grading evolutions. User can use it directly.
For example:
Click the small arrow in front of the preset grading item, user can see the specific values.
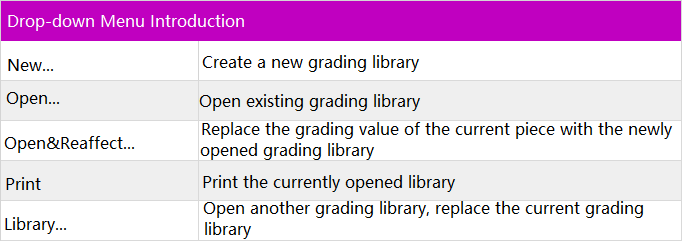
Drop-down menu
Note
Examples:
Introduction of the content in Grading Library
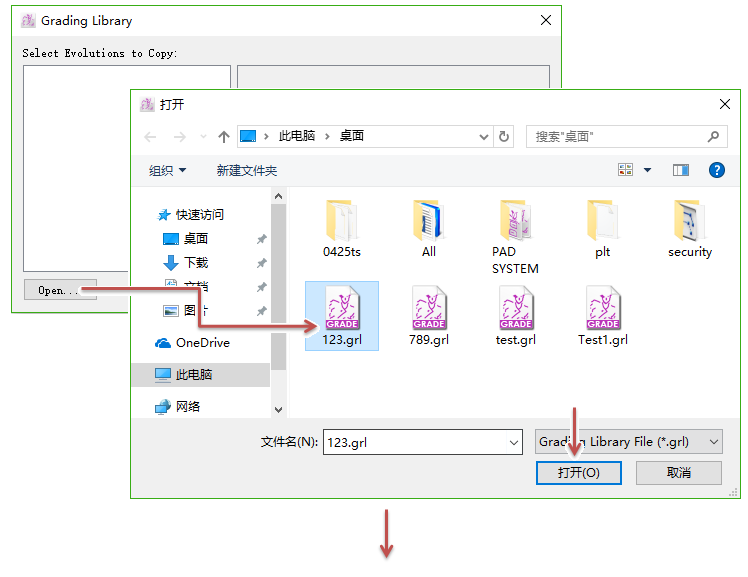
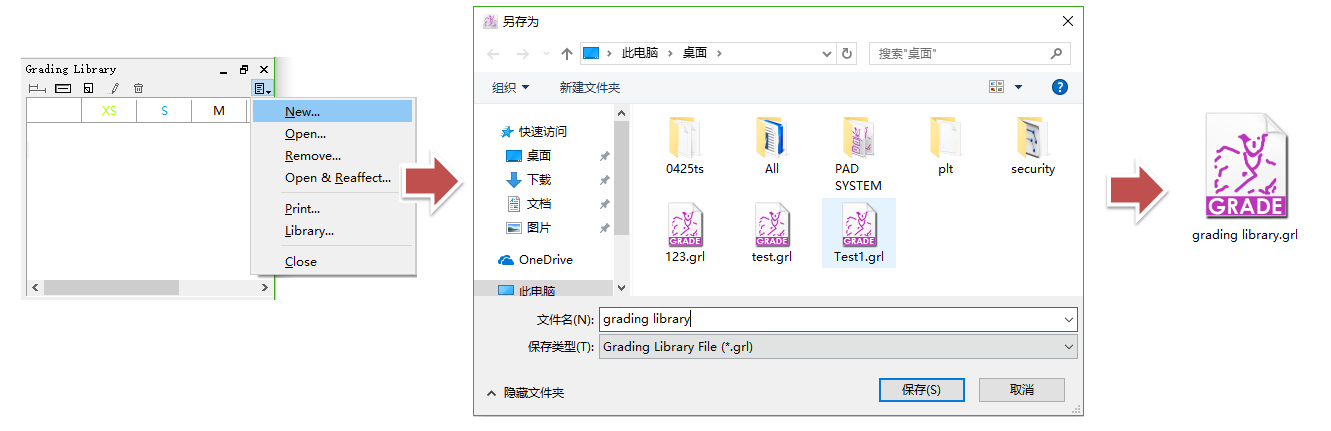
Create a grading library
Click drop-down menu [New…], open the Save Dialog Box
Enter file name and click [OK] to save the file
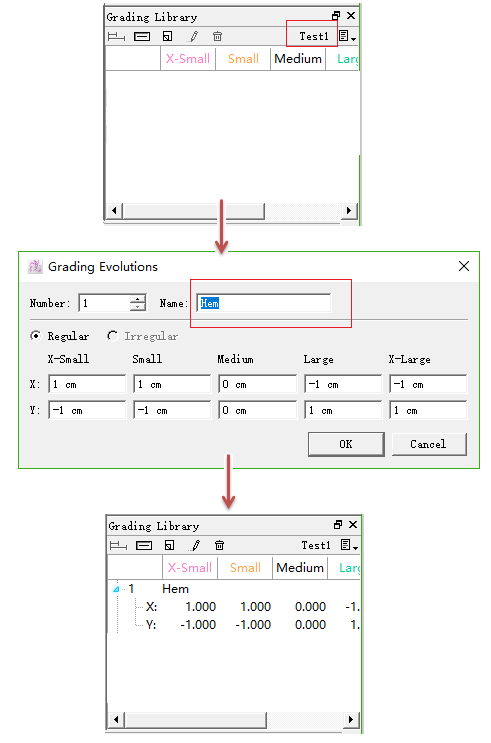
Click the Grading Library Menu
New, then enter the name and desired grading value, click [OK];
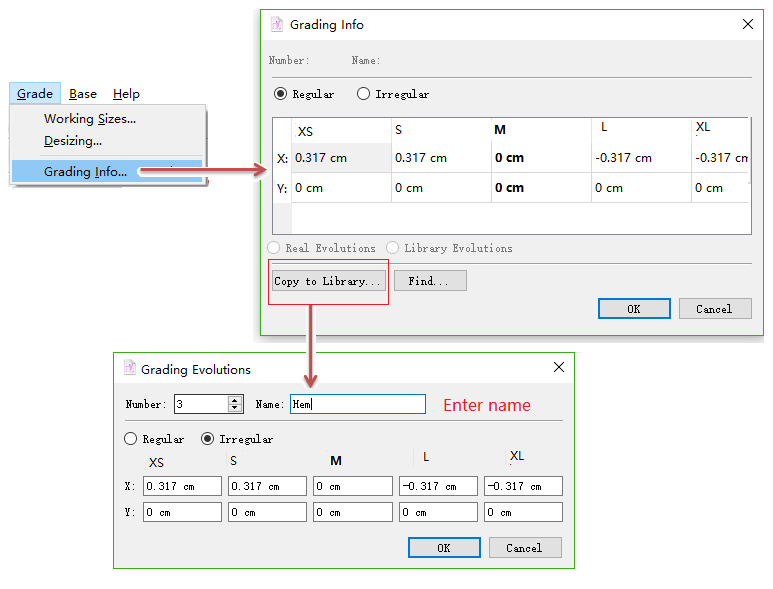
or open the graded piece, copy its grading value to the library
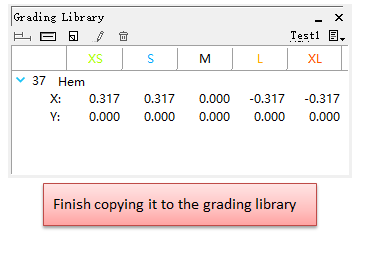
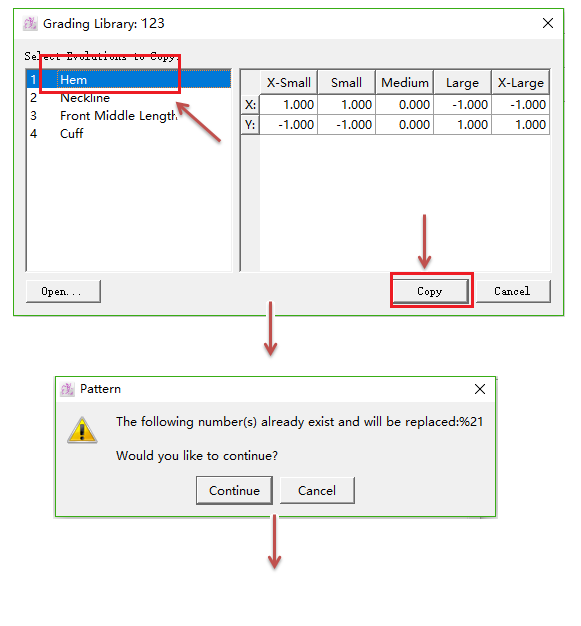
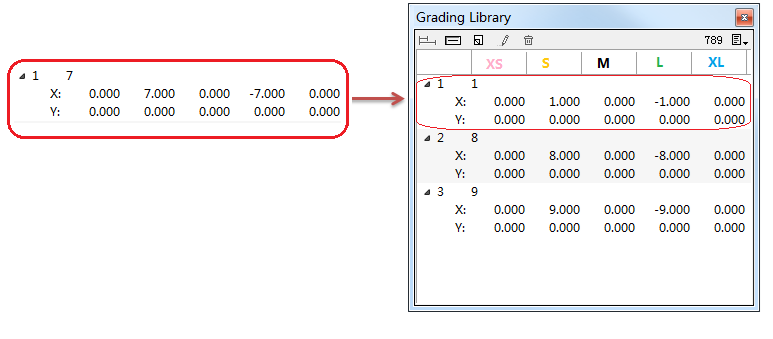
Grade piece by applying grading library
After building a grading library, user can use the grading library to grade piece direcly, which increases the efficiency of pattern-making.
How to do:
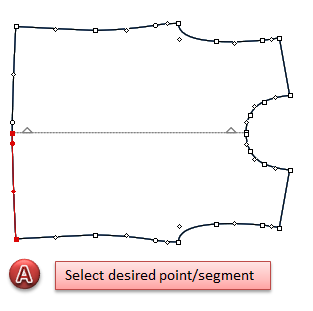
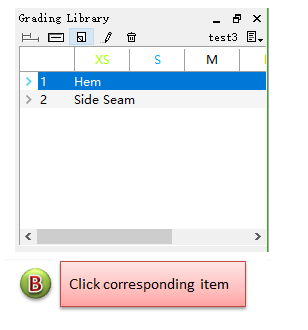
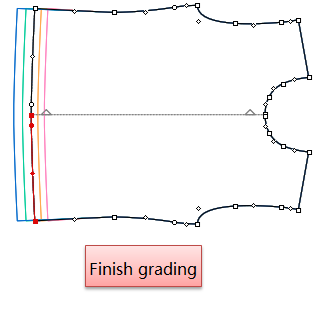
Select the desired point or segment;
Click the corresponding grading item in the library, like: Hem
Repeat the former step to grade other point or segment
Grading Tools
PAD System provides 9 grading tools for user to modify the grading nest.
To view the grading tools and the grading nest, user needs to select the [Grade View] in [View] Menu.

 Symmetry Grading
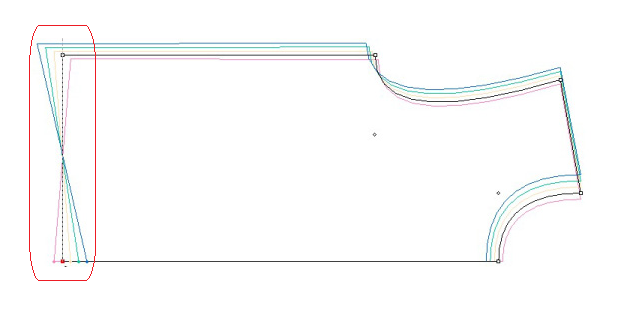
As following picture shown, the middle point on the front hem is graded wrongly and needs to be modified. User can use this tool to modify it:
To symmetrize the grading
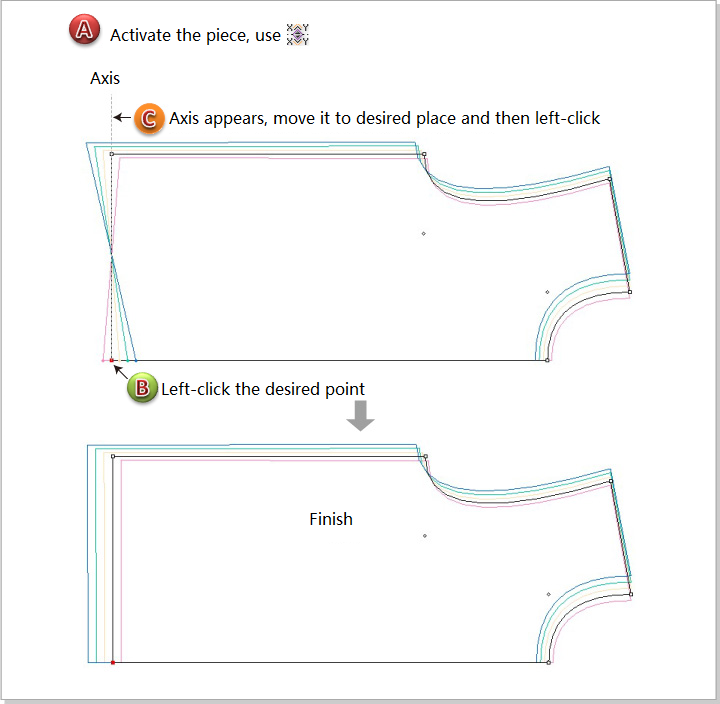
Activate the piece;
Select
Click the desired point;
A line representing the axis of symmetry appears. Drag this line to the desired position, left-click.
To symmetrize the grading with precise value
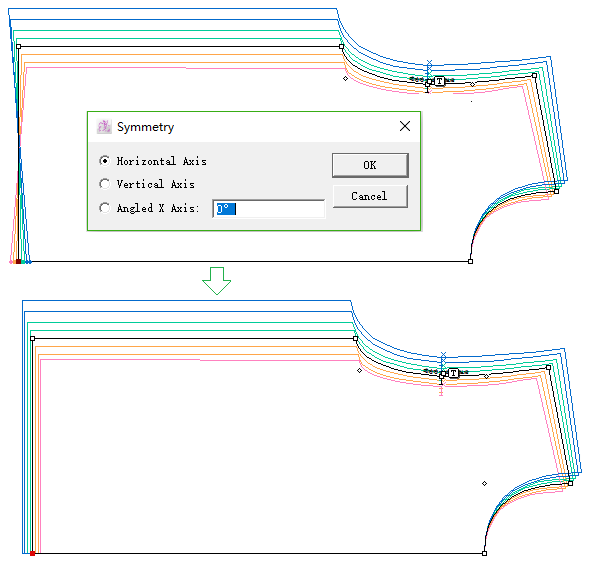
V6.0 :
Activate the piece;
Select
Hold down Alt (Windows) or Option (Mac) key, click the desired point;
The Grading Symmetry dialog box appears, select the appropriate radio button or enter the value of the desired angle in the text box:
 Rotate Grading
Allows user to modify the grading nest by freehand rotation of the grading around the medium point.
Rotate grading
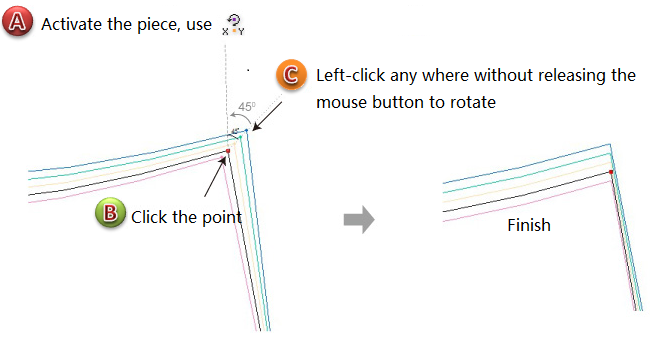
Activate the piece;
Select
Click the desired point, click somewhere in the working area and hold down the left mouse button. A line appears. Move this line to the desired position.
Rotate grading by precise value
V6.0 :
Activate the piece;
Select
Hold down Alt (Windows) or Option (Mac) key, left-click the desired point;
The Grading Rotation dialog box opens, select the appropriate radio button or enter the value of the desired angle in the text box, and click [OK].

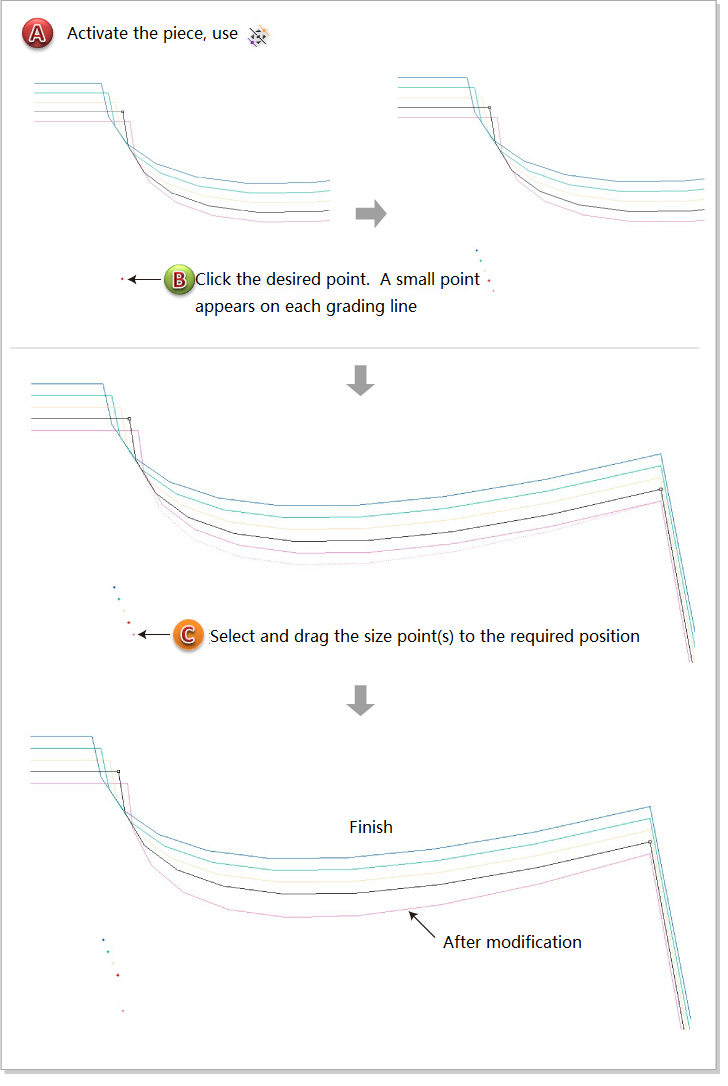
 Manipulate Grading
Allows user to adjust the grading nest by freehand.
Activate the piece;
Select
Click the desired point. A small point appears on each grading line;
Select and drag the size point(s) to the required position.
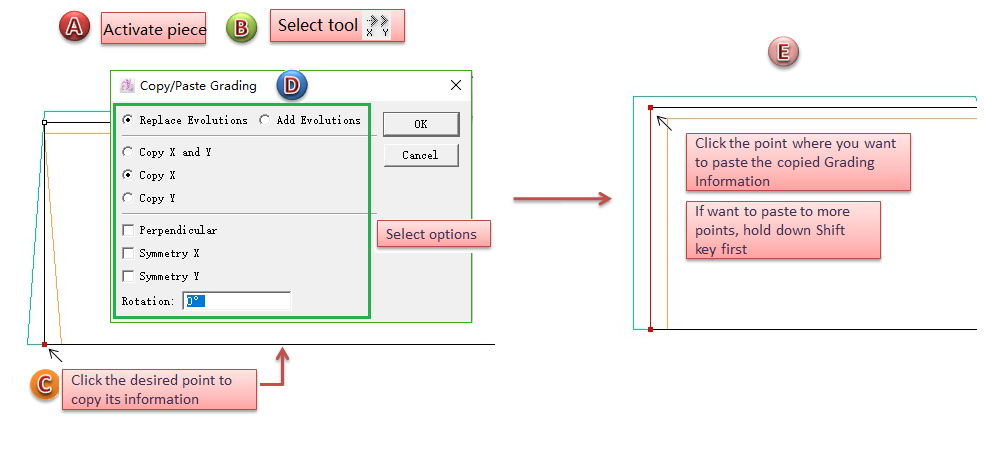
 Copy/Paste Grading
Allow user to copy grading evolutions from one point to another (or other points).
Activate the piece;
Select
Click the desired point to copy its information;
Select the appropriate radio buttons and/or edit the dialog box, and click [OK];
Click the point where you want to paste the copied Grading Information; hold down the Shift key to apply these coordinates on more than one point and on other shapes.
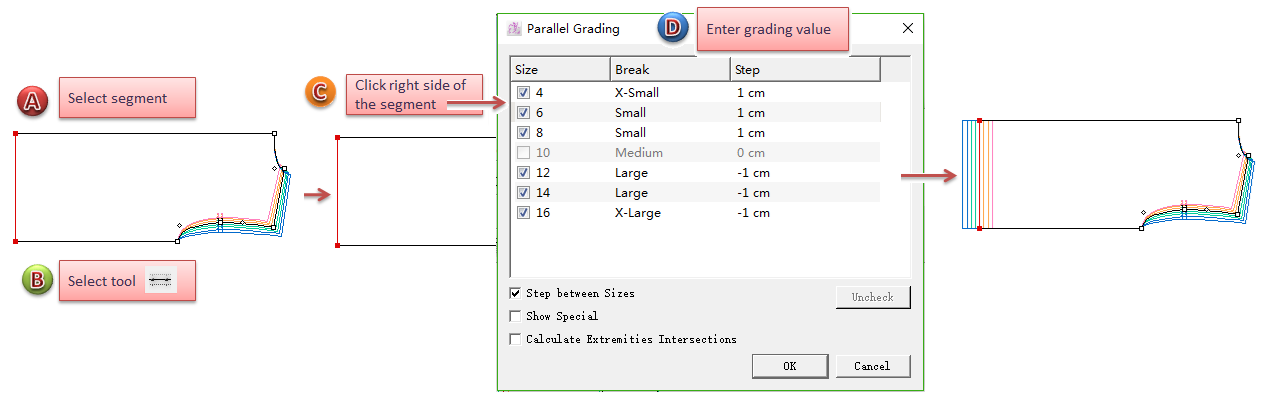
 Parallel Grading
Allows user to assign a Parallel Grading to selected elements.
Select the segment;
Select
- Click one side of the segment
Note
the side is where positive values need to be assigned.
The Parallel Grading dialog box opens, enter grading value;
Parallel Grading Dialog Box:
Size: iApply if select them
Distance: Double-click the number to edit it
Break: Select to display the step value between neighbouring sizes; if deselect, it won’t display the step value
Show Special: Select to display special name; if deselectit, it will show break
Check / Uncheck: Select or deselect sizes on which the Parallel Grading should or should not be applied
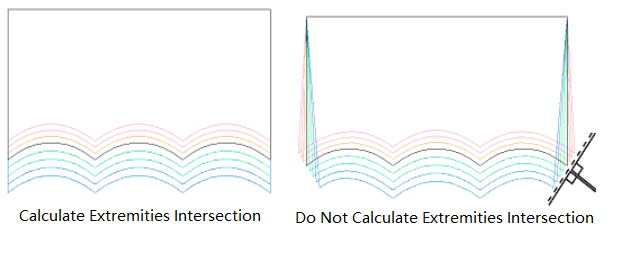
Calculate Extremities Intersection: Select it to calculate extremities intersection, otherwise it won’t calculate extrmities intersection.
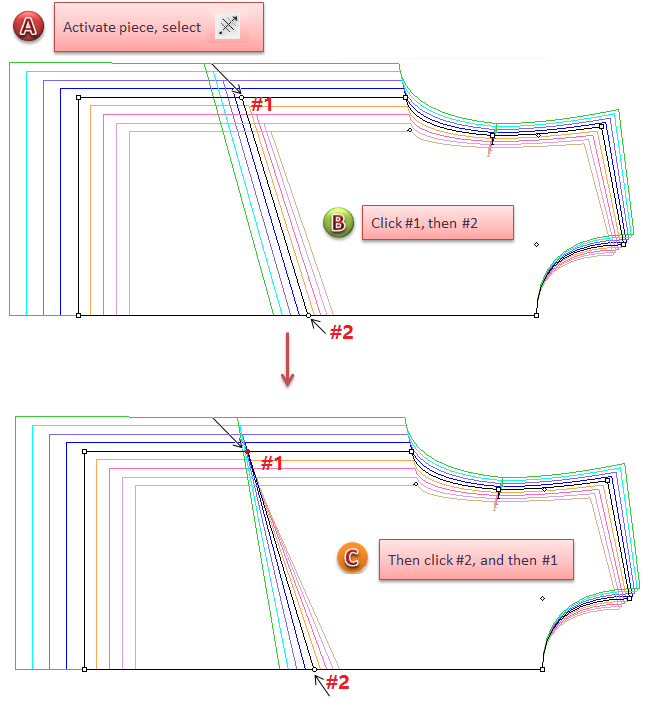
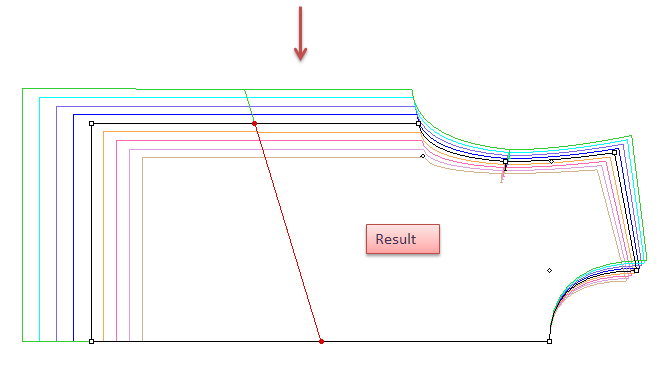
 Align Grading
Allows user to change the alignment of a grading evolution.
Example:
Activate the piece;
Select
Click the point (#1) you wish to adjust, then click another point (#2) as reference point;
Click point #2 and then point #1
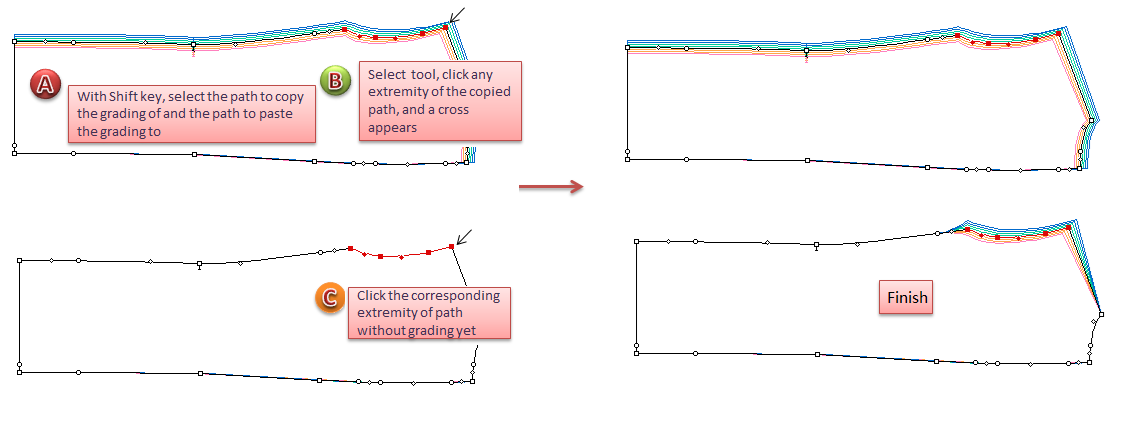
 Copy/Paste Path Grading
Allow user to copy the grading evolution of one path and pastes it to another path.
Note
The path of points you want to copy the grading of and the path of points you want to paste the copied grading to must have same regular points.
Select the path you want to copy the grading of and the path you want to paste the grading to;
Select
Click any extremity of the copied path, and a cross appears;
Click the corresponding extremity of another path.
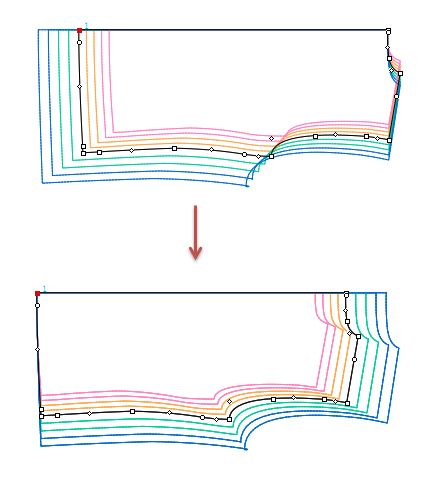
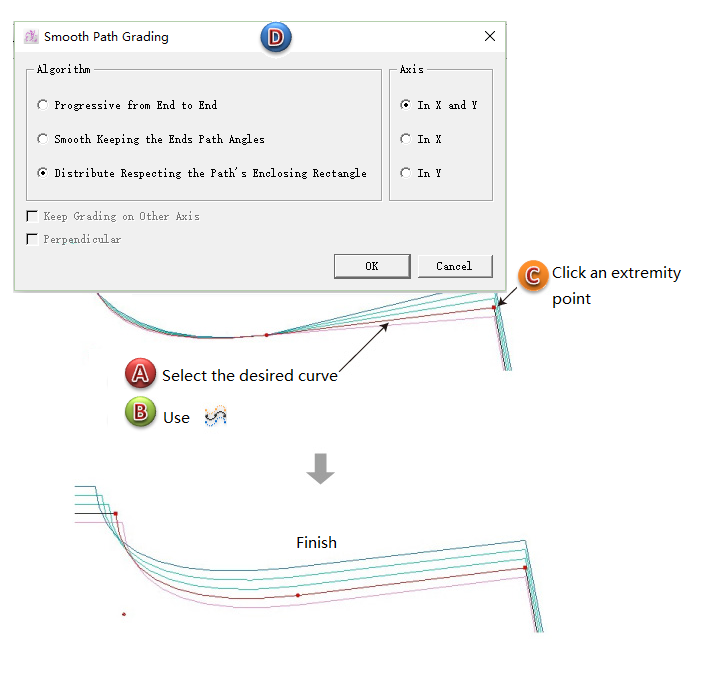
 Smooth Path Grading
Allow user to apply grading on a selected piece. User can apply grading according to the X or Y axis alone or on both axes simultaneously. This tool facilitates user to smooth the graded curve.
How to do:
Select the desired curve;
Select
Click an extremity point;
Select the appropriate radios;
Note
As for the armhole or neckline with quite deep curvature, user can select Distribute Respecting the Path’s Enclosing Rectangle.
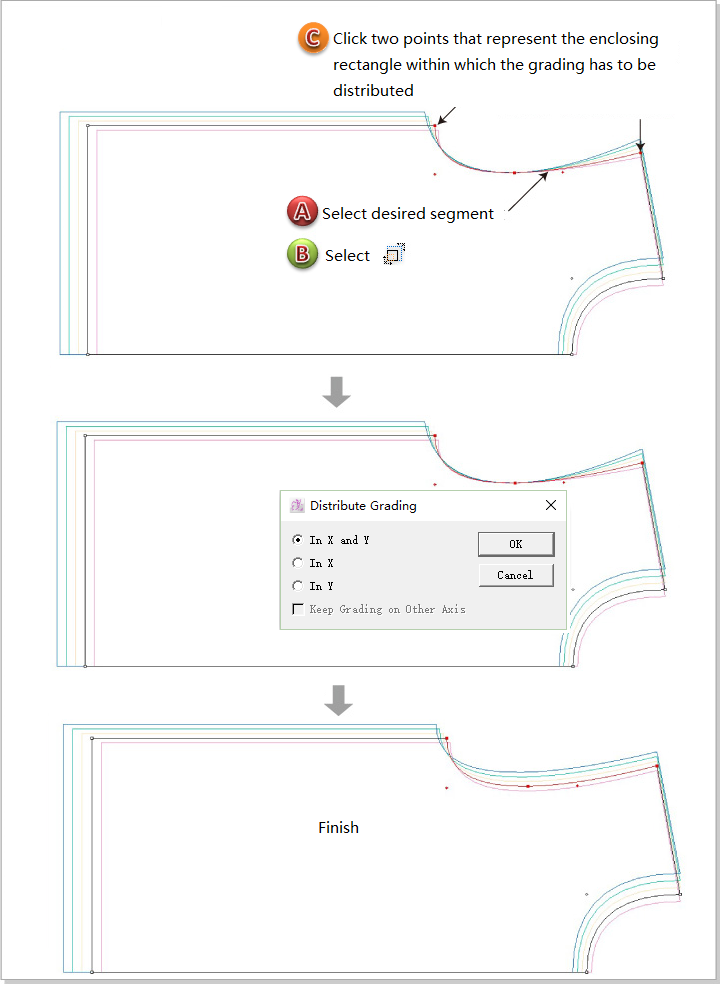
 Distribute Grading
To distribute the grading inside a partial selection, take armhole as an example:
Select the desired segment;
Select
Click two points that represent the enclosing rectangle within which the grading has to be distributed;
Select the appropriate option, click [OK].
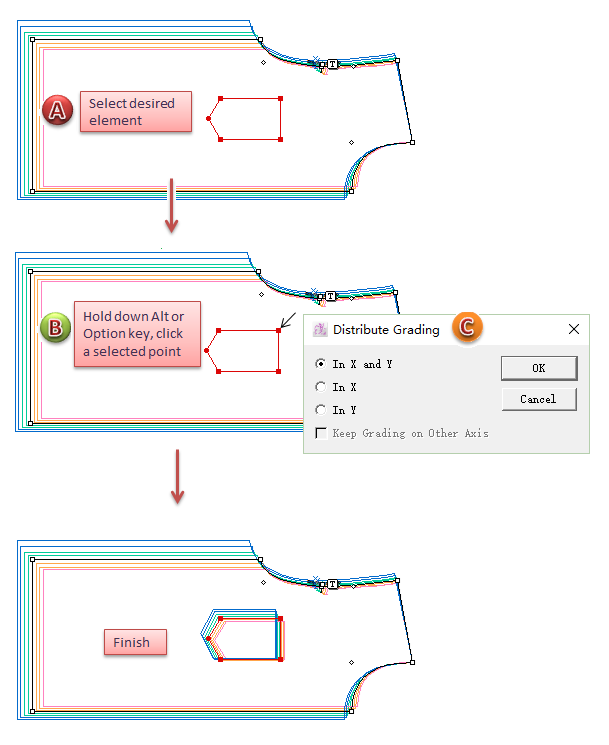
To distribute the grading inside a group like style line, pocket or pleat, take pocket as an example:
Select the desired element;
Select
Hold down Alt (Windows) or Option (Mac) key, the pointer becomes a cross, then click a selected point;
Select the desired options in the dialog box:
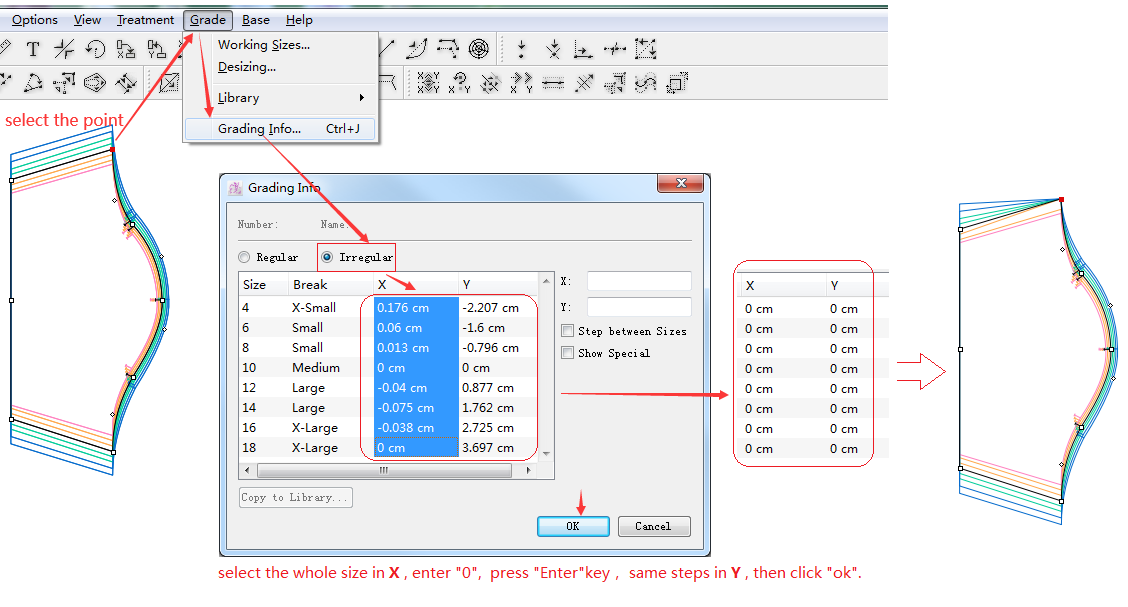
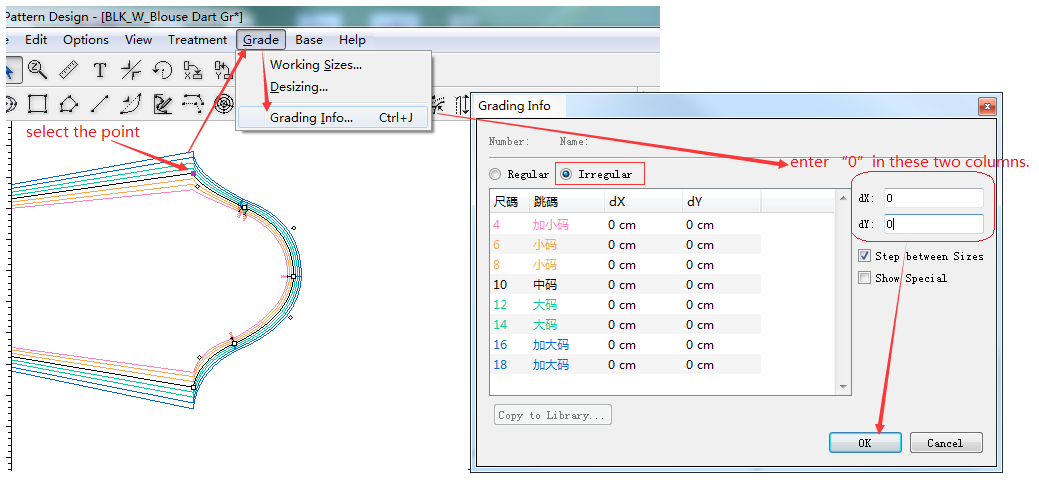
How to delete the grading
Delete single point’s grading:
V6.0:Follow the steps in the below picture:
V7.0:Follow the steps in the below picture:
Delete multipoint’s grading:
V6.0:Follow the steps in the below picture:
V7.0:Follow the steps in the below picture:
Check Grading Nest
To check the grading nest aligning a point/segment
After grading, user may want to check the grading nest aligning a point/segment.
Note
All operation involving grading need to be done in [Grade View]. Select it in [View] Menu.
How to align:
Select the desired point/segment;
Hold down Alt + Ctrl (Windows) or Option + Command (Mac) key, move the cursor to the Pointer tool icon, the cursor becomes a cross; then left-click the icon, the alignment is finished.