New cultural model
The below steps are detailed for the V6.0 version. If you are using V7.0, the steps will be slightly different.
Steps
Measure out the measurement of chest, waist, and back length.
Chest(B)= 82 cm, Waist(W)= 72 cm, Back length = 38 cm
Use(B+12)÷ 2 = 47cm, back length = 38cm, to draw rectangle.
Select
 , hold down the Option (Mac) or Alt (Windows) key, left click the mouse, enter the value, click “OK”.
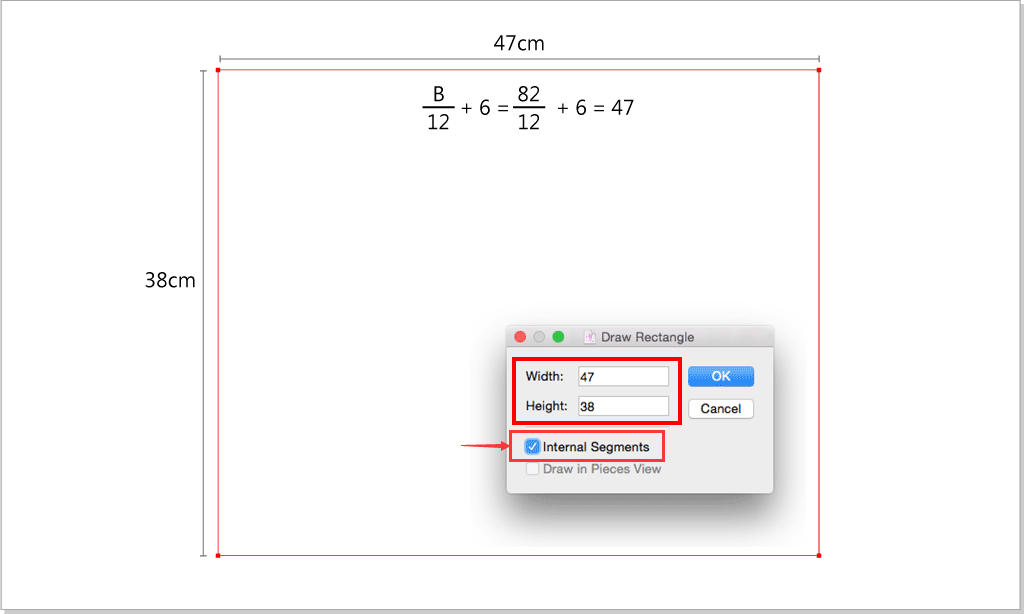
Draw out the chest line:
Use
 to select the red line, select
  ,left click inside the rectangle, enter the vaule 20.5cm to draw out the chest line:
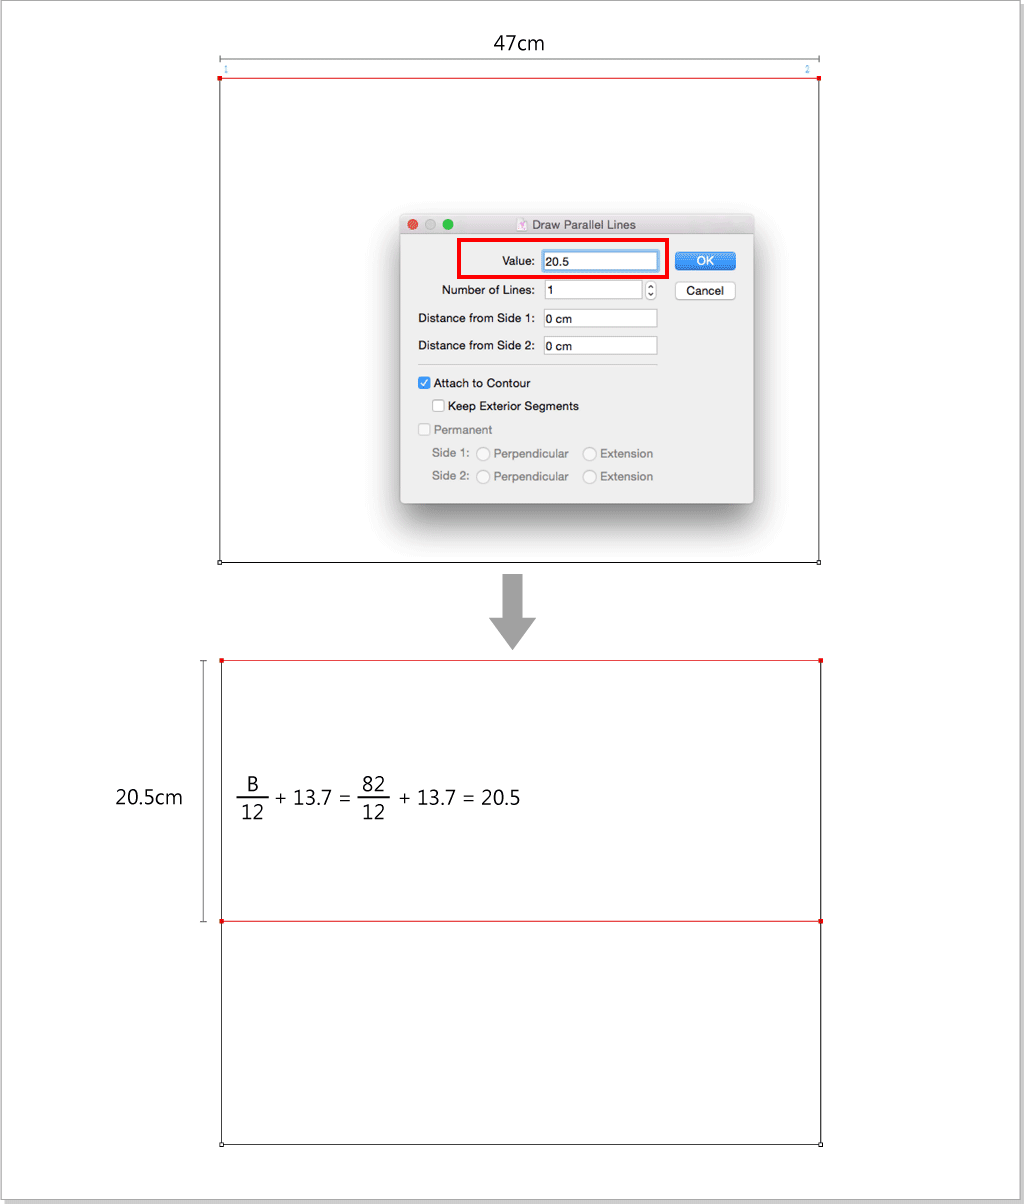
Add points: 17.65cm from point A :
Use
to select the below red segments, select  ,hold down the Option(Mac)or Alt(Windows) key, left click point A, select “Horizontally”, enter 17.65cm.
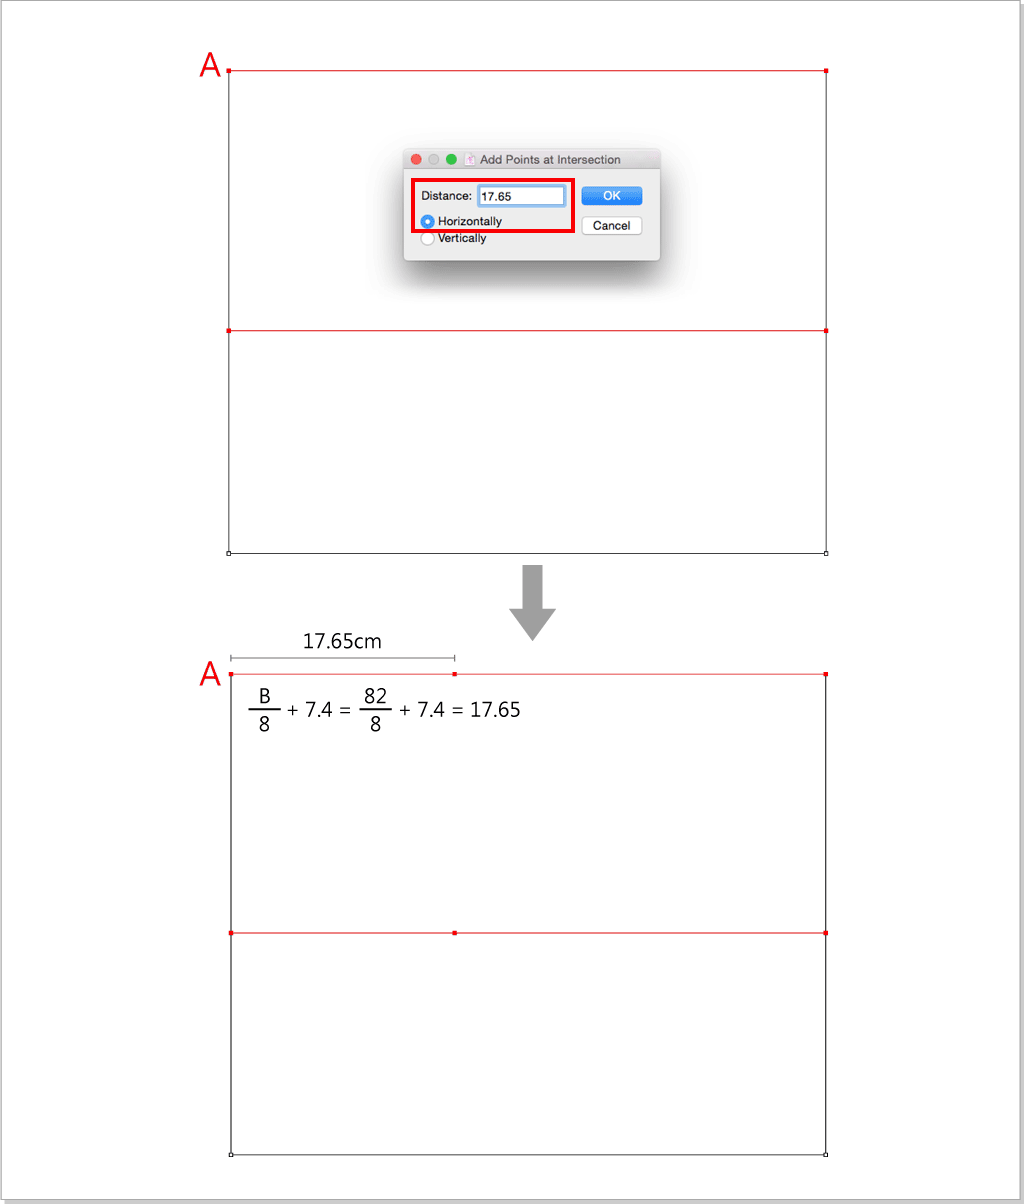
Select
 ,left click point B then point C to create BC segment.
Draw a parallel line 24cm from the selected line.
Use
to select the red line, select ,left click inside the rectangle, enter the values as the below picture shows, click “ok”: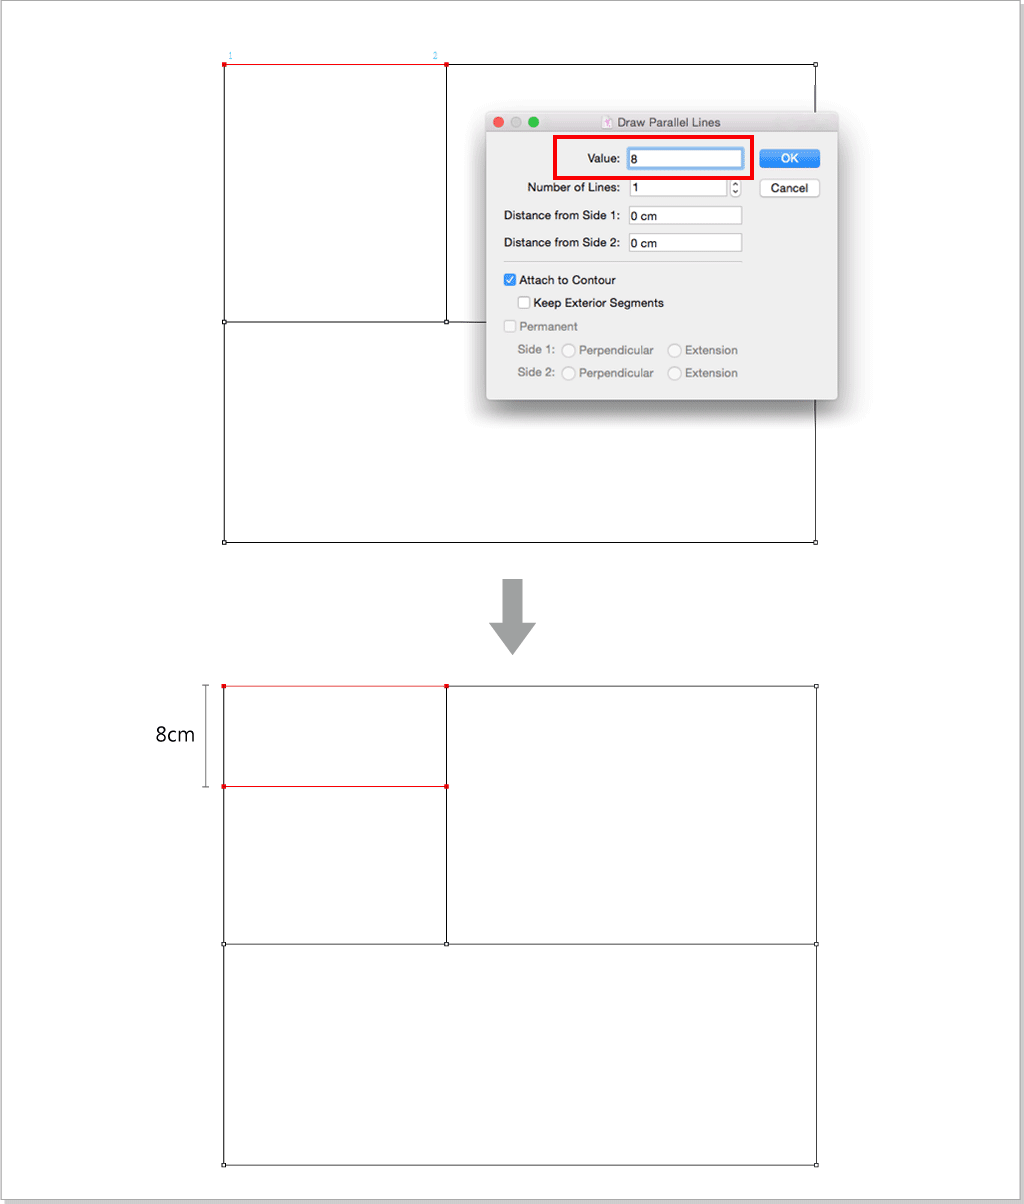
Edite the center front length to 42.2cm :
Use
to select the center front, select  ,left click point A, enter 42.2cm.
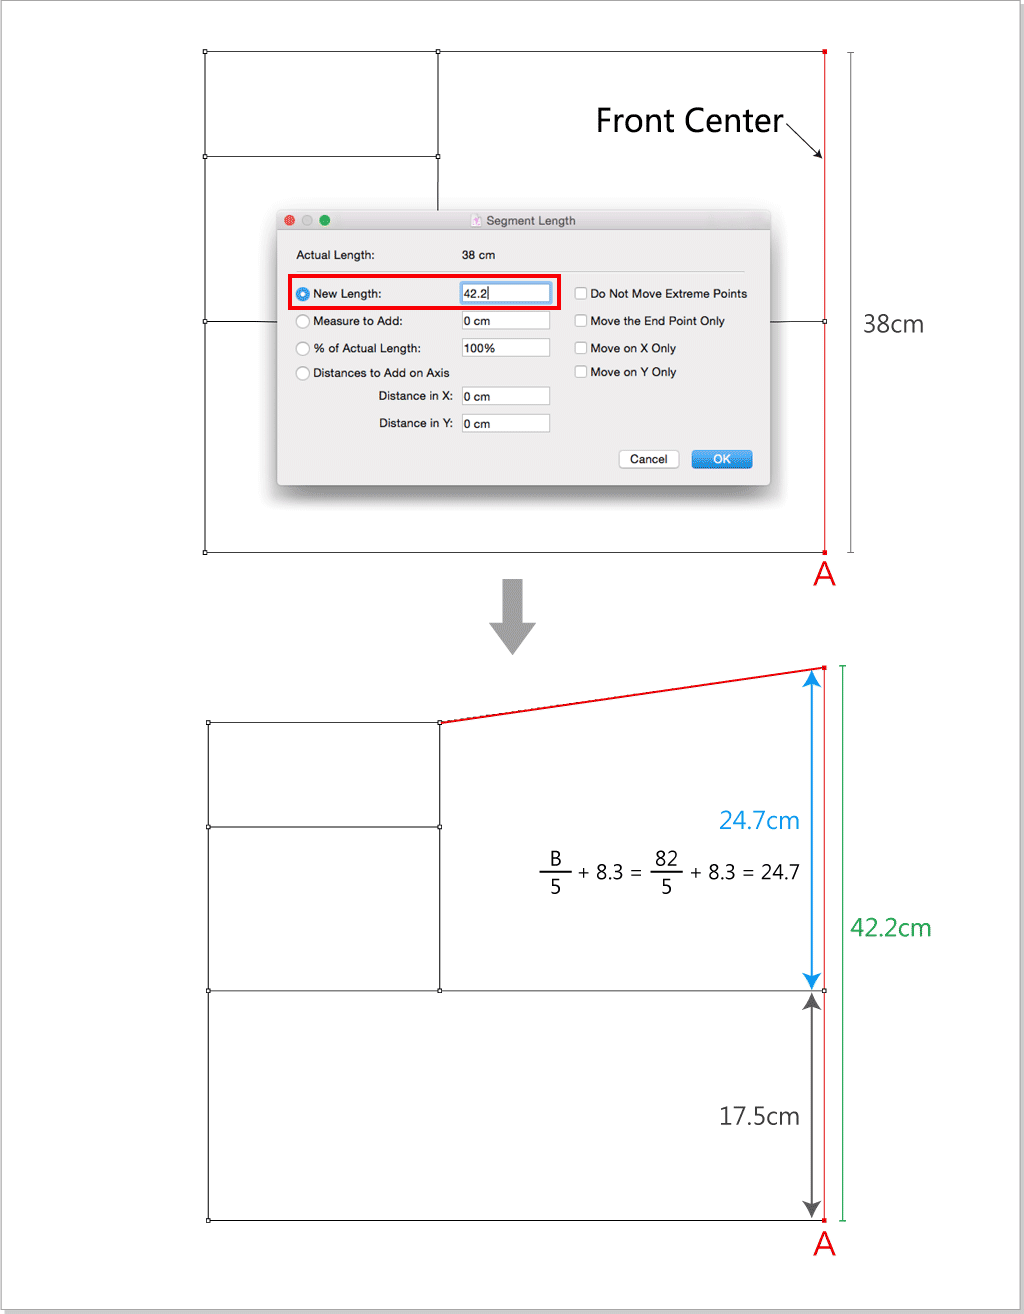
Use
to select the below red lines, press the Delete(Mac)or Backspace(Windows) key to delete them.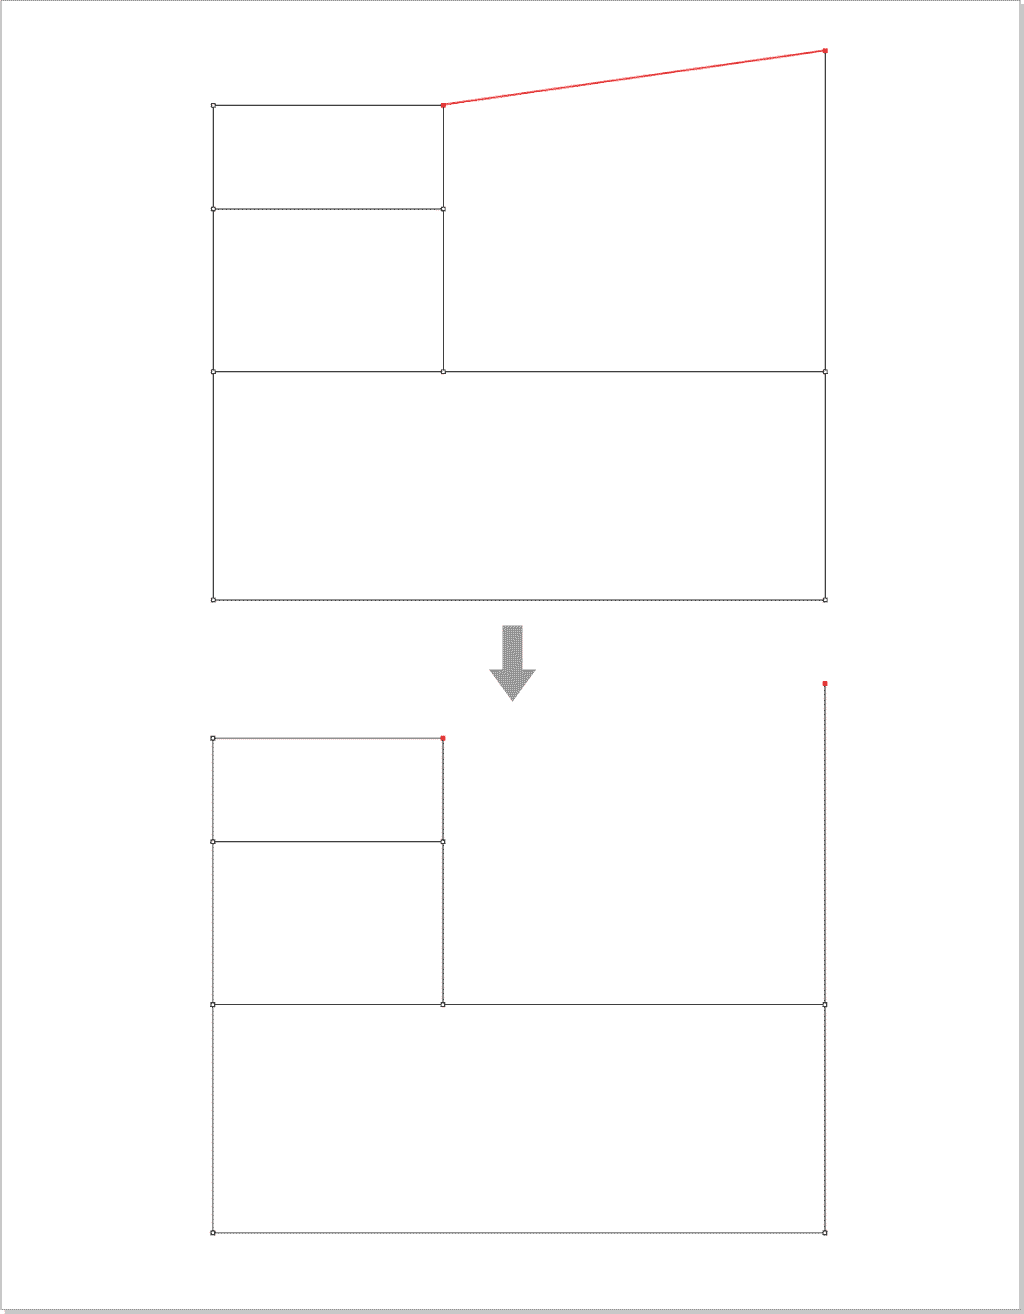
Add point 16.45cm from point A:
Use
to select the red line, select  ,left click point A, enter 16.45cm.
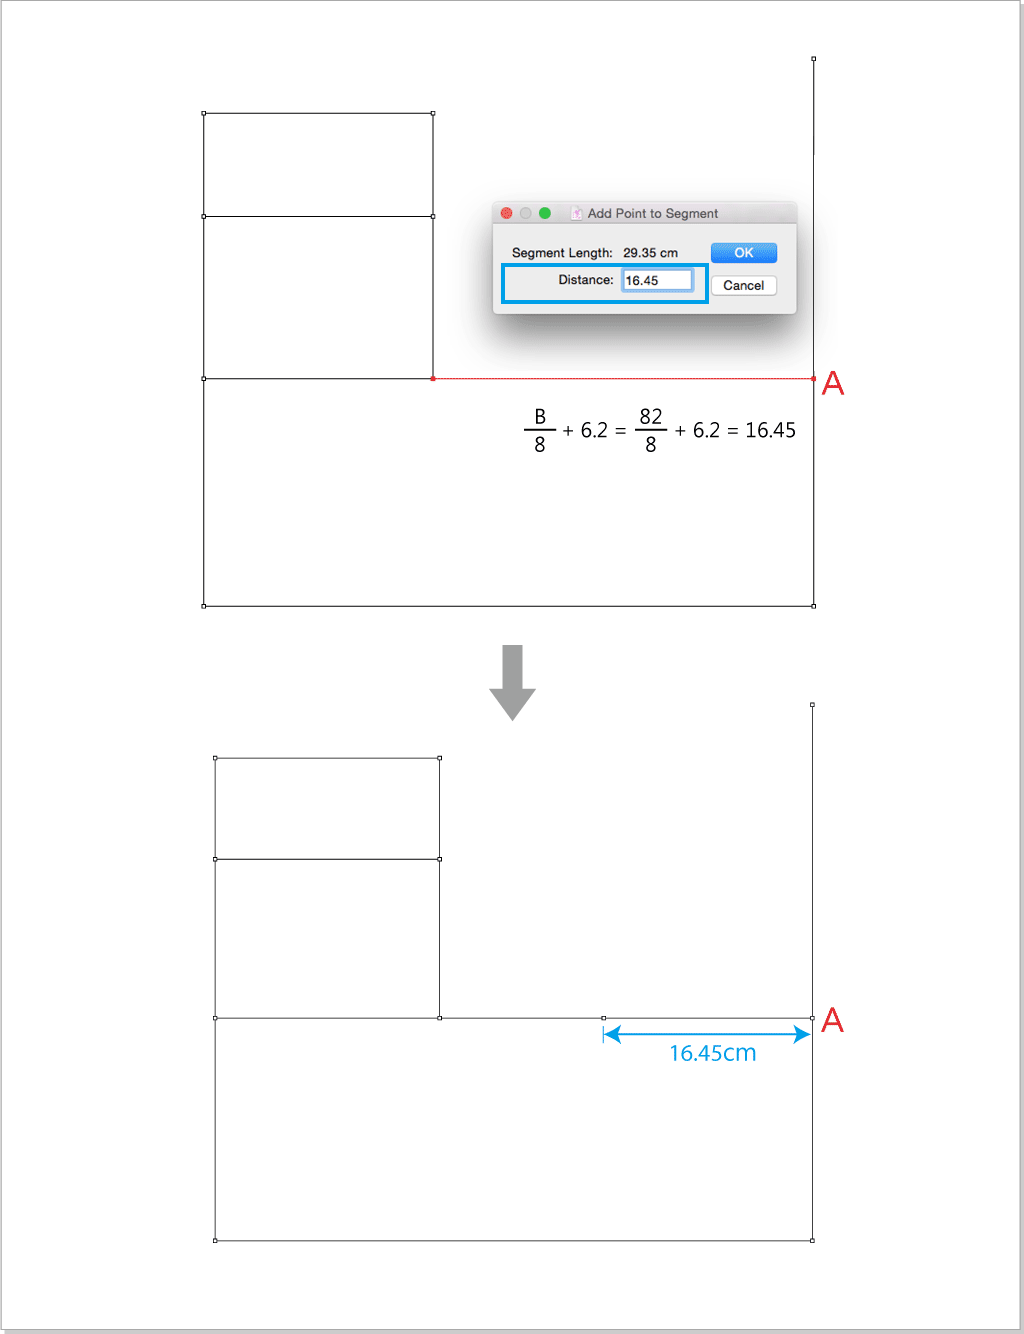
Select
,hold down the Option(Mac) or Alt(Windows) key, left click point B, enter the below value: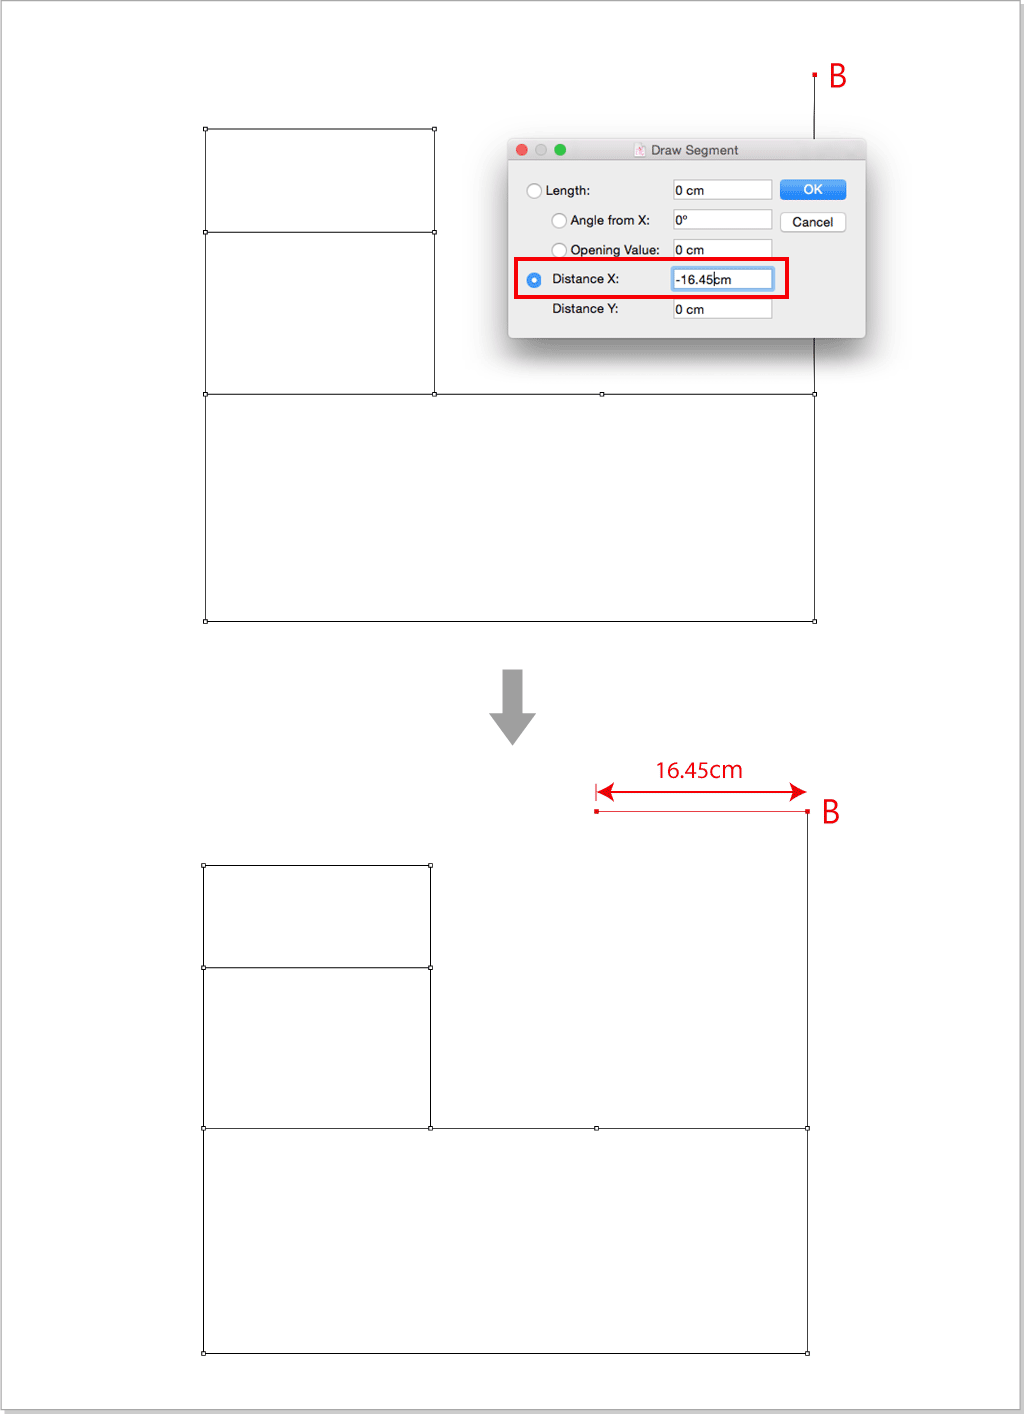
Select
,left click point C then point D to create CD segment.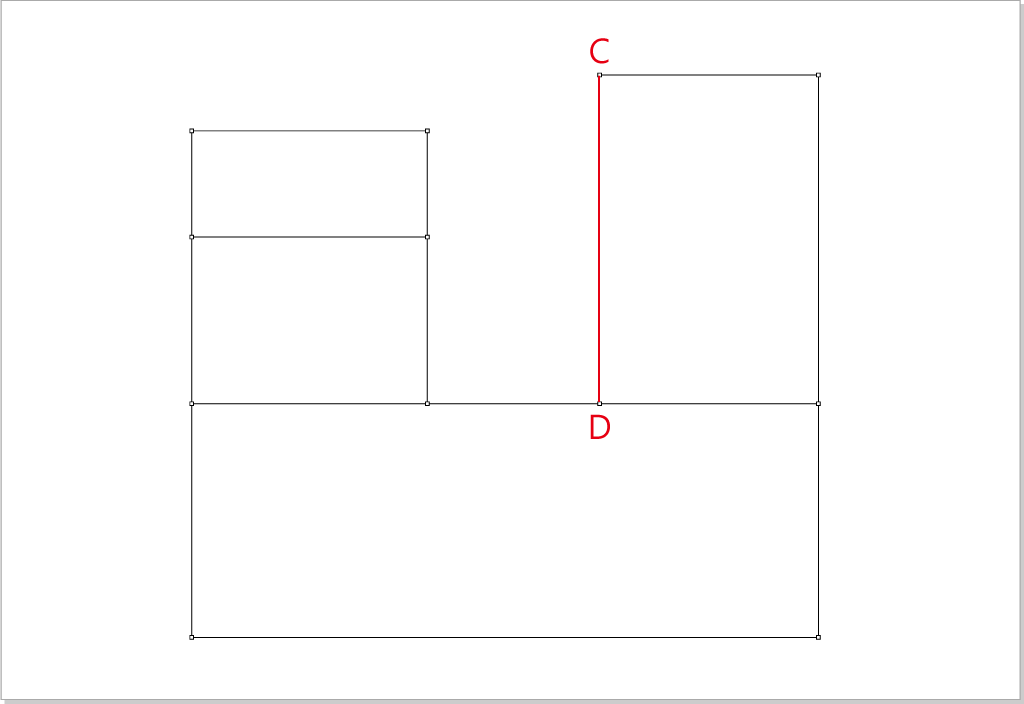
Add point 2.7cm from point A:
Use
to select the red line, select ,left click point A, enter 2.7cm.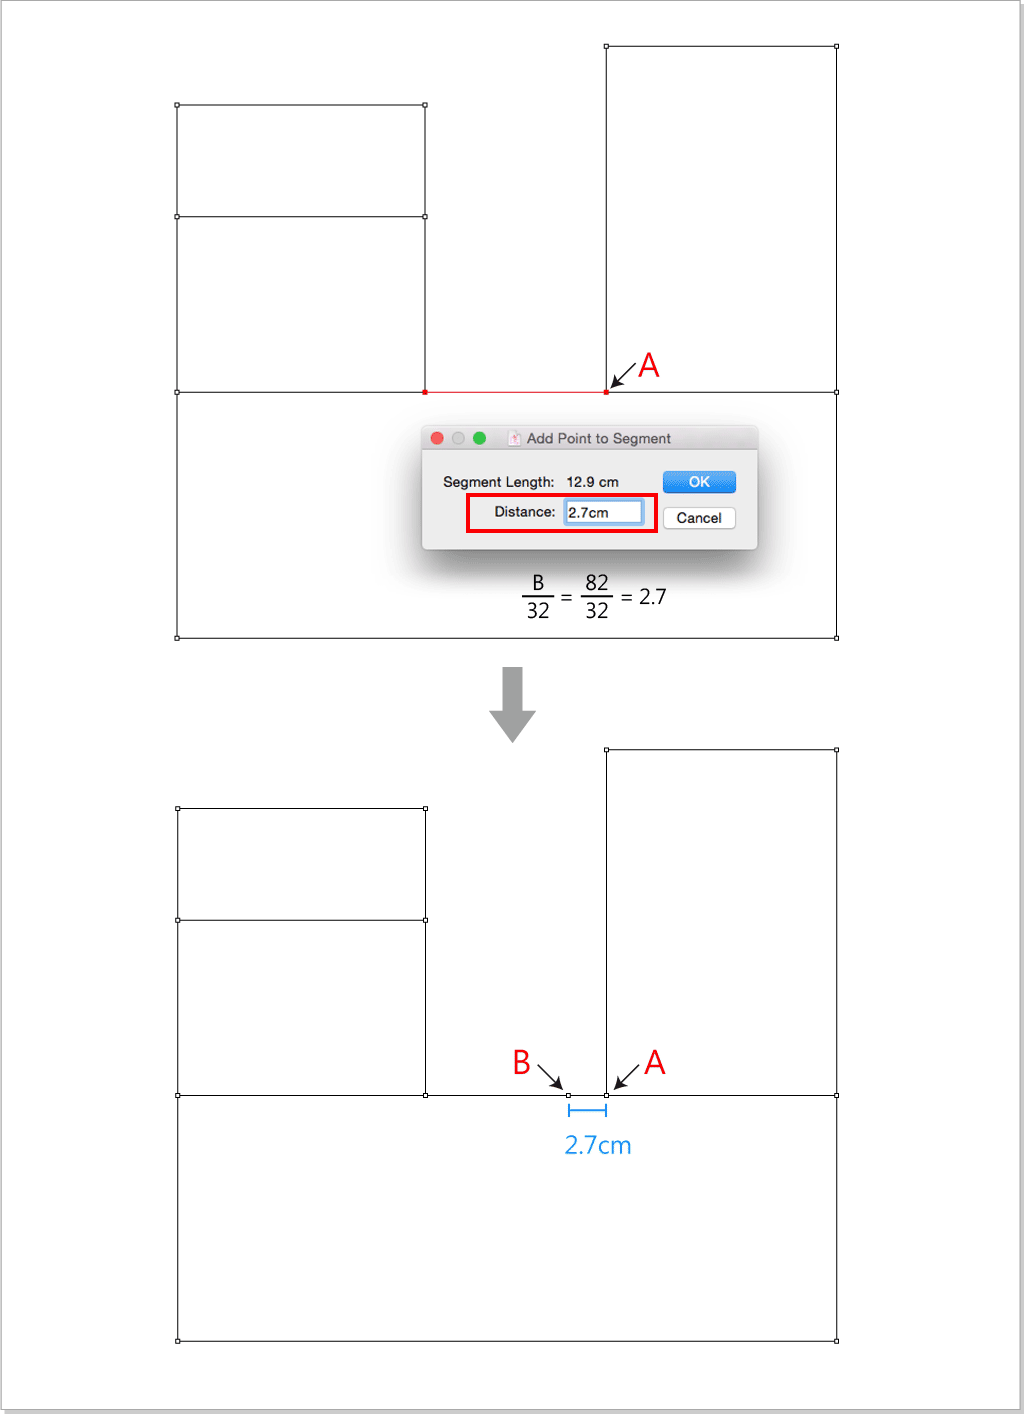
Use
to select BC segment, select  , left click BC segment, enter 2 to divide the segment into 2 equal parts.
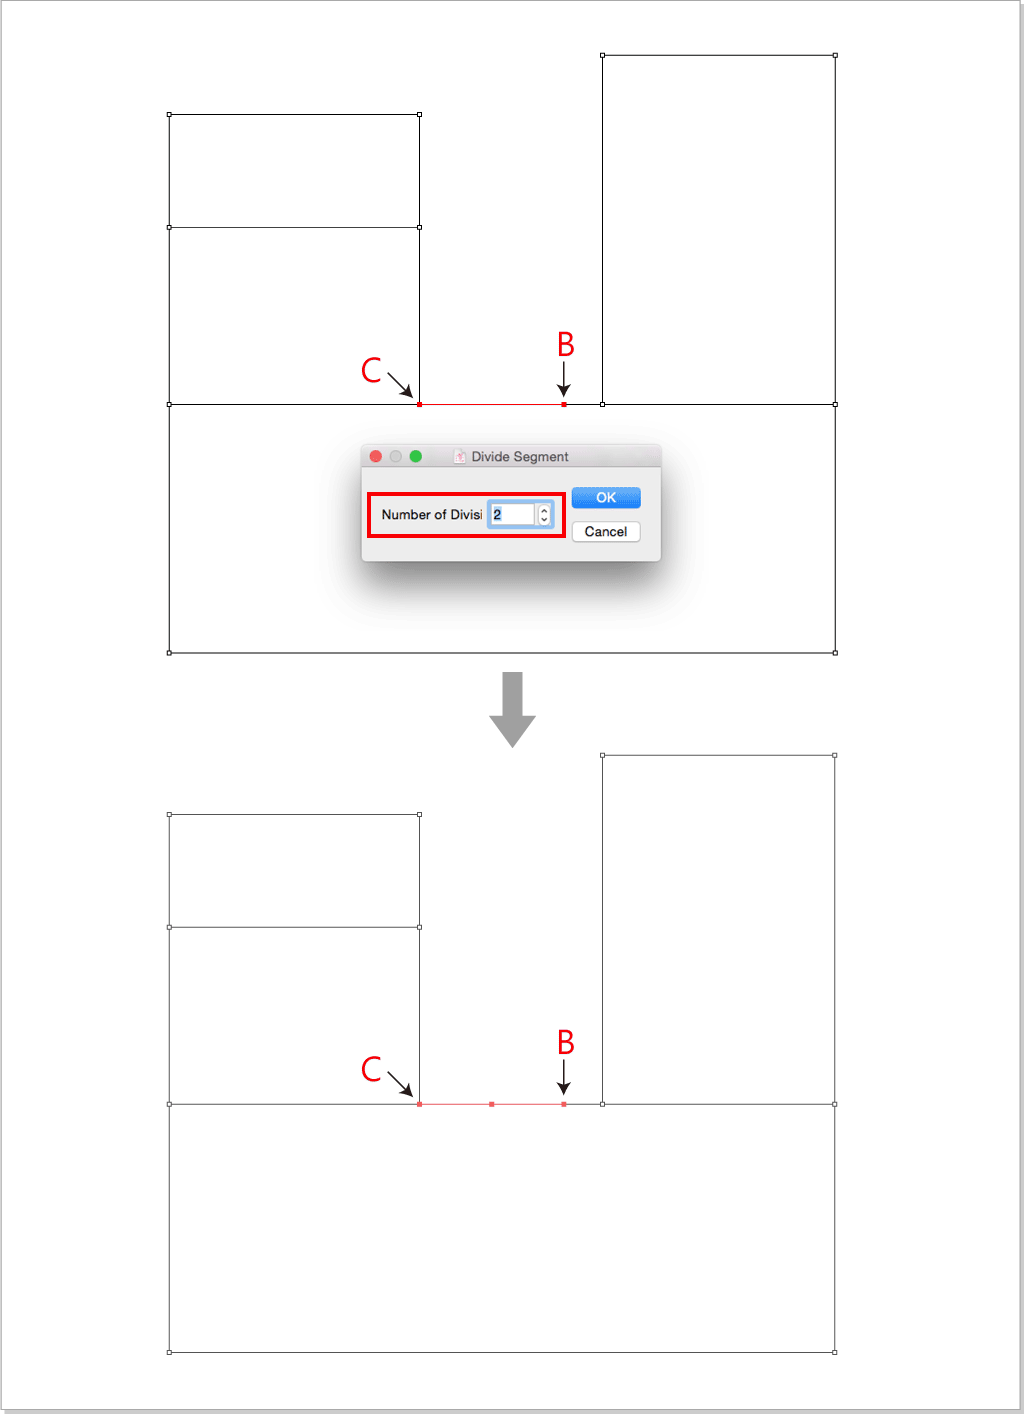
Add point 6.75cm from point A:
Use
to select the red line , select ,left click point A, enter 6.75cm.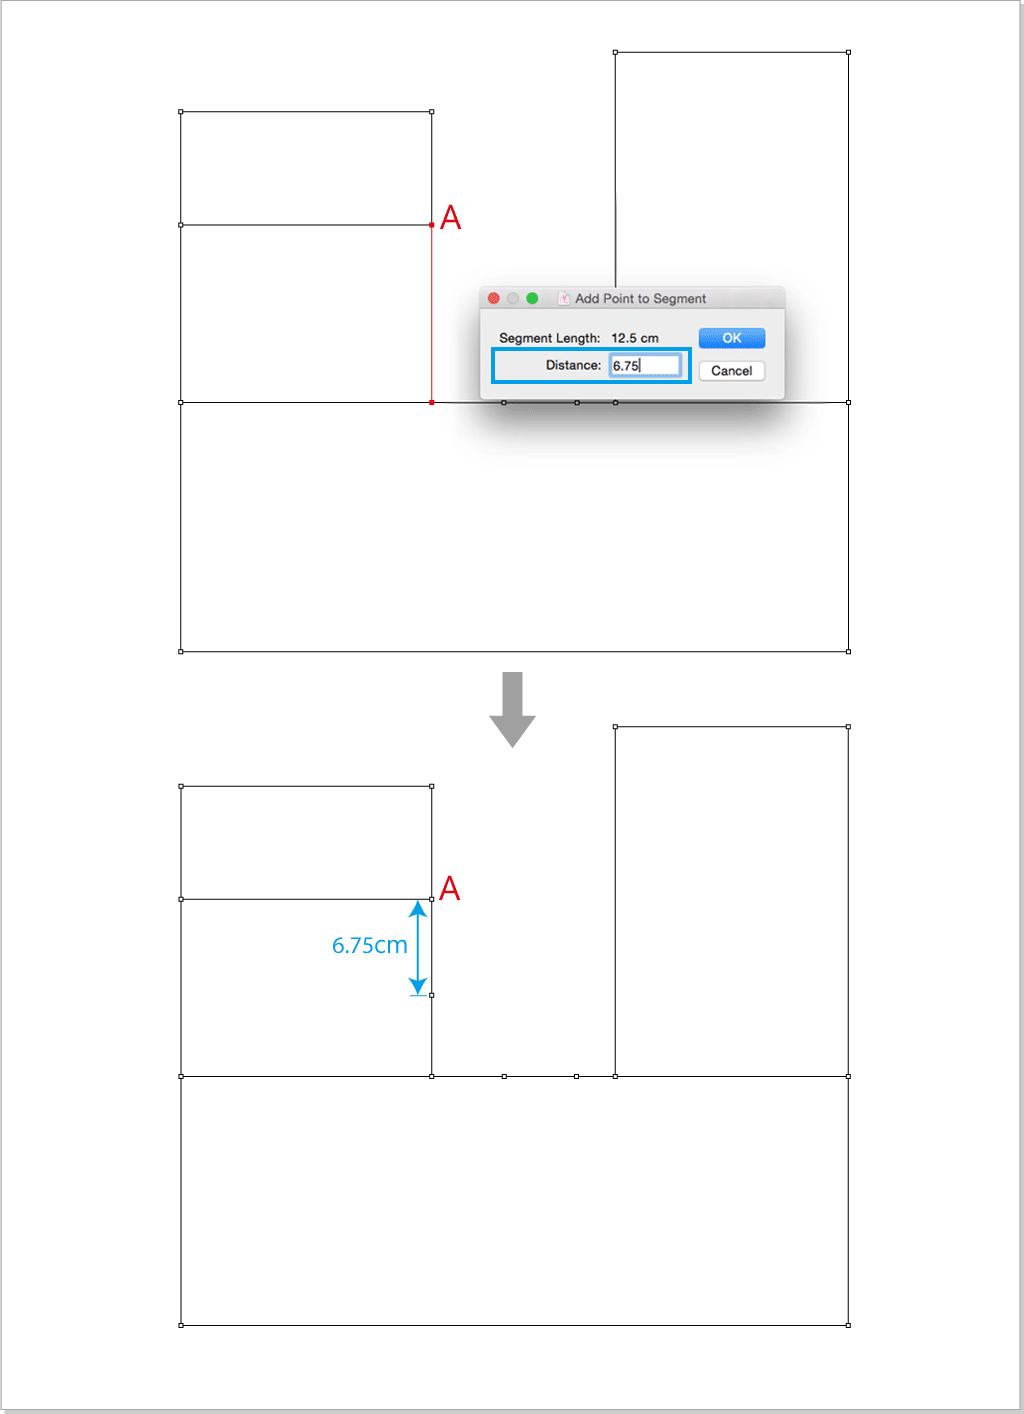
Select
,left click point B then point C to create BC segment.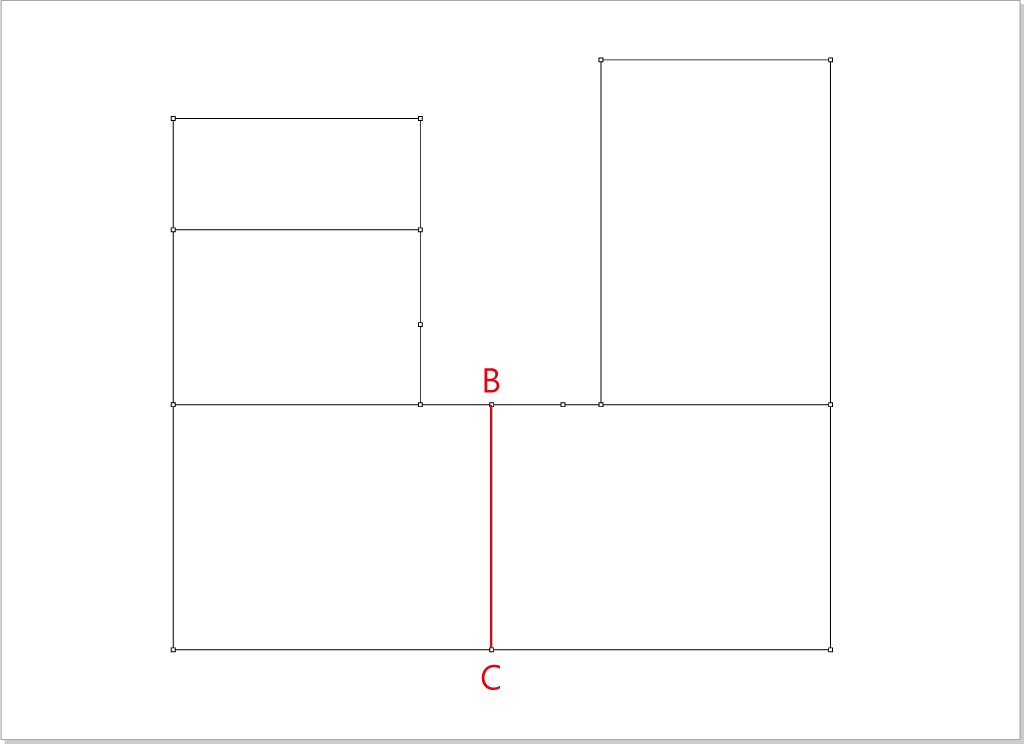
Select
,hold down the Option(Mac) or Alt(Windows) key, left click point A, enter the below value: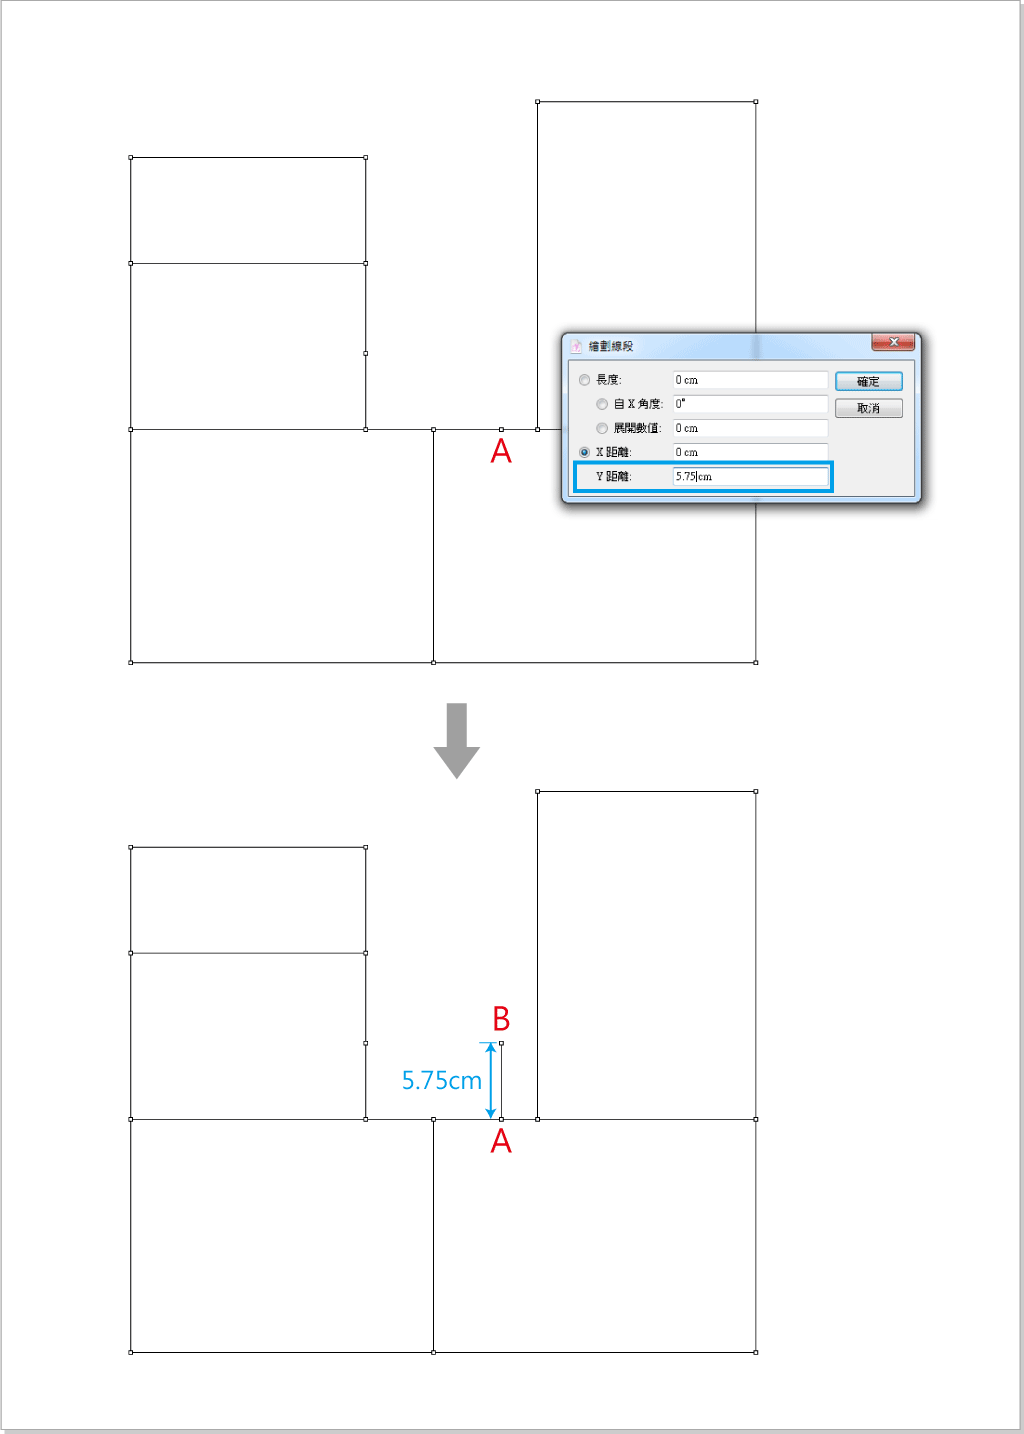
Select
,left click point B then point C to create BC segment.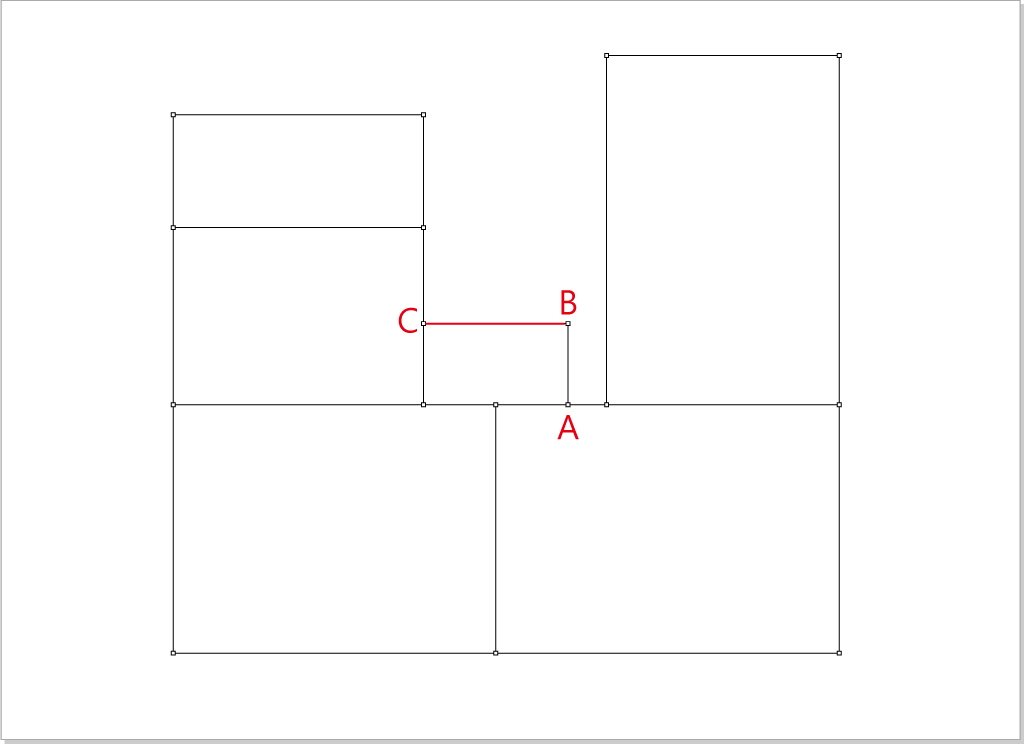
Draw the front collar.
Use
to select the red line, select ,left clicl point A, enter 6.8cm.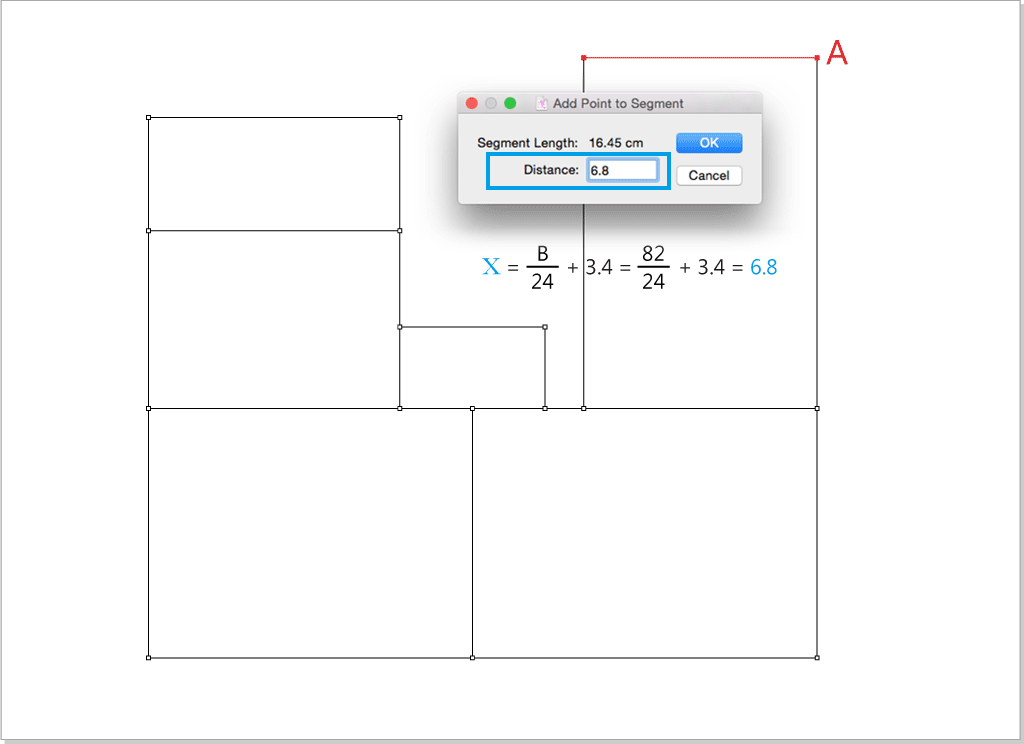
Use
to select the red line, select , left click point A, enter 7.3cm.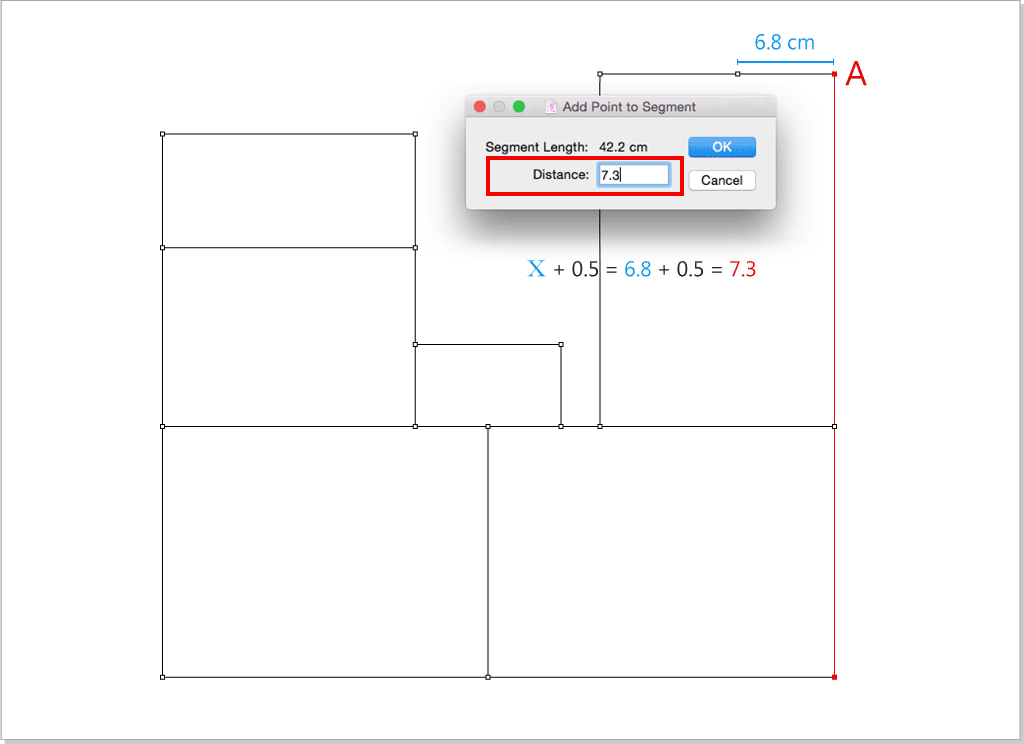
Use
to select point A , hold down the Option+Command(Mac) or Alt+Ctrl(Windows) key, move the mouse back to the Pointer tool icon, left click the icon, the dialog box appears, enter the below values: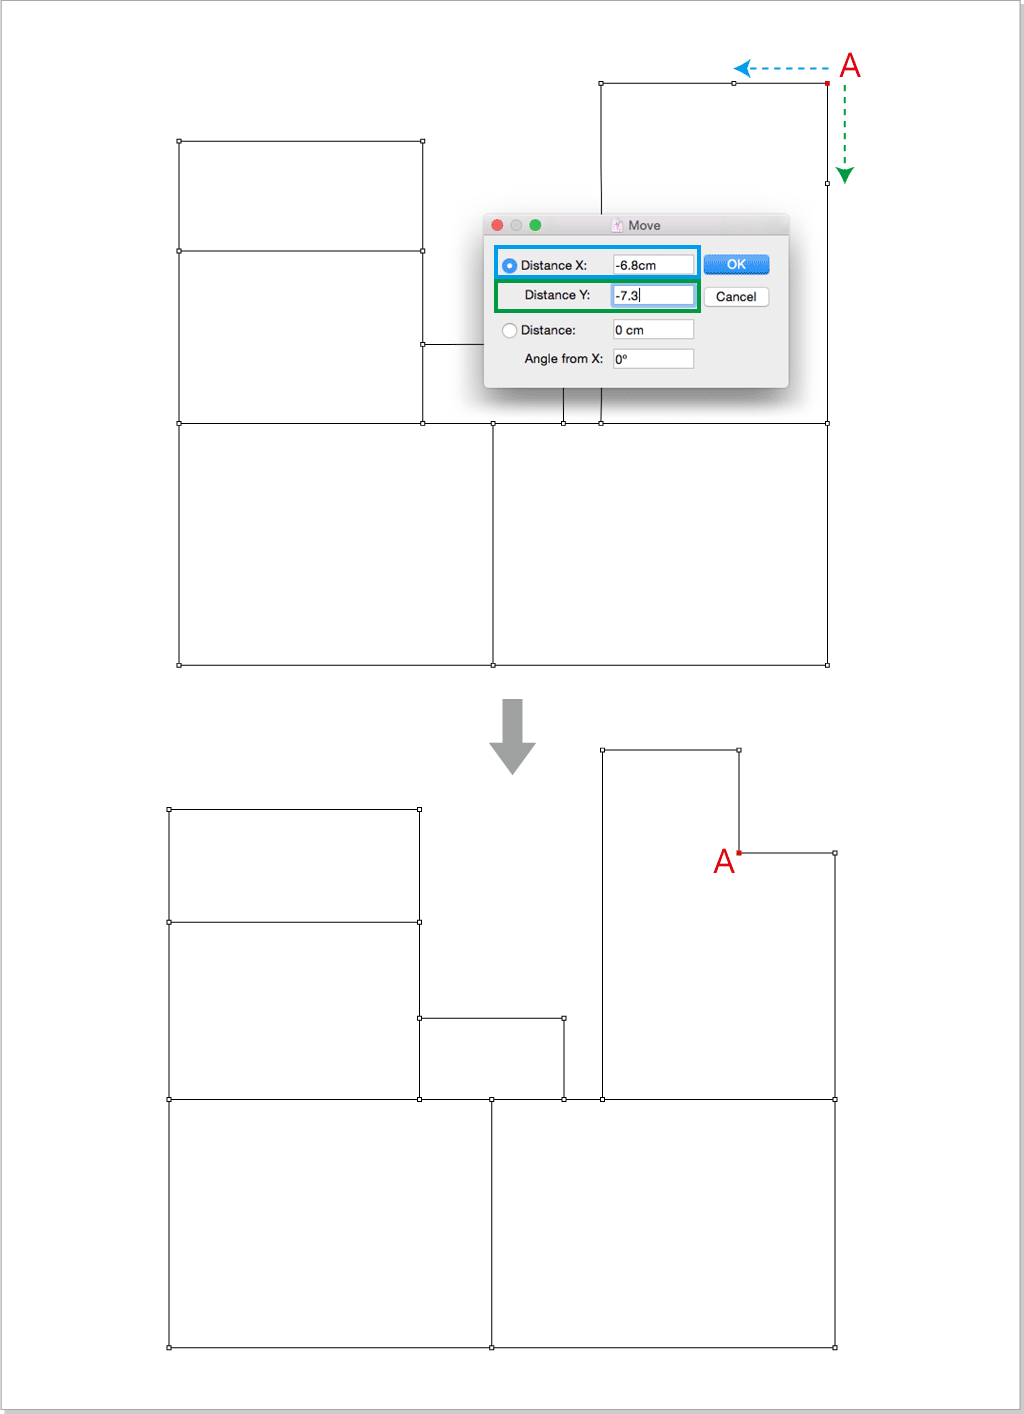
Select
,hold down the Option(Mac) or Alt(Windows) key, left click point A, enter the below values: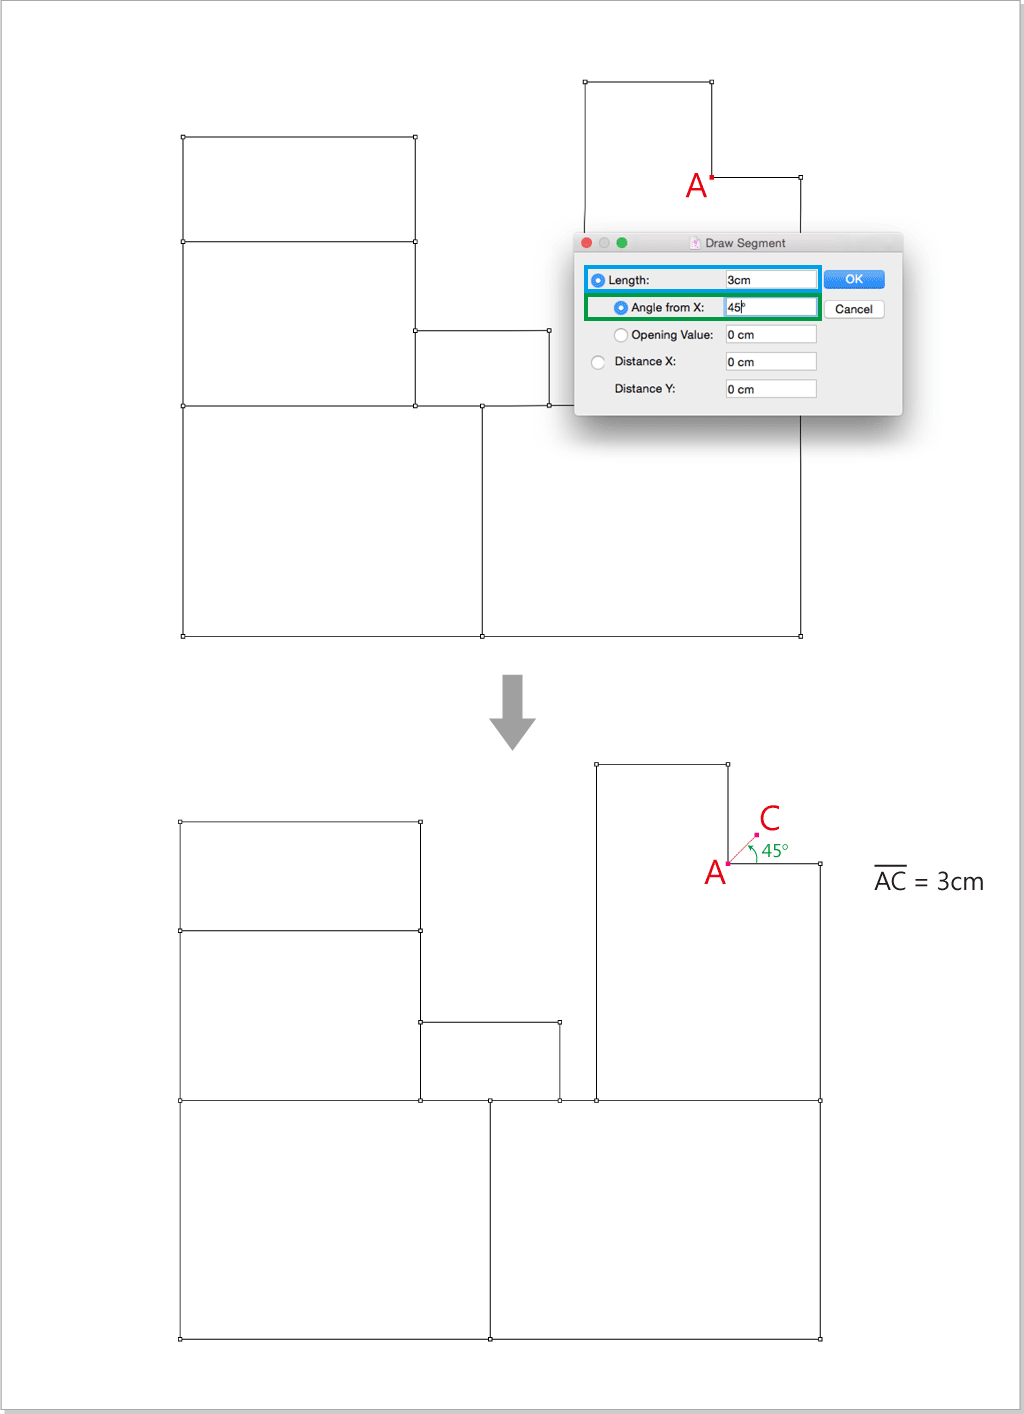
Select
 ,left click B,C,D points one by one to create cruve BD.
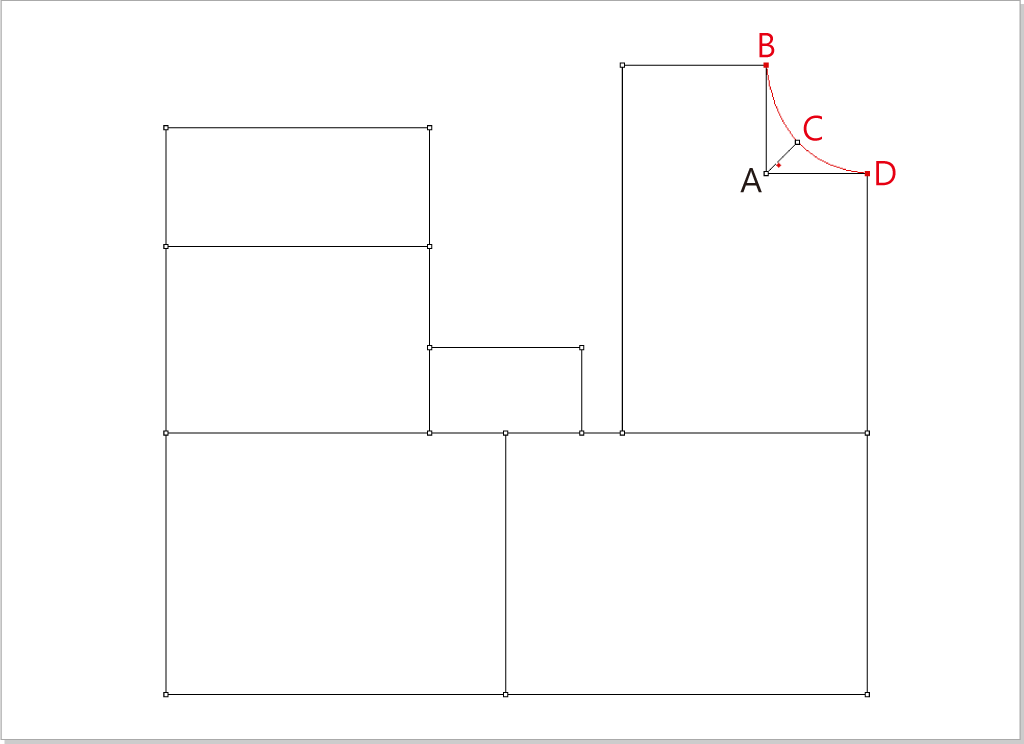
Draw the front shouder:
Use
to select the red line, select ,left click point A, enter 8 cm: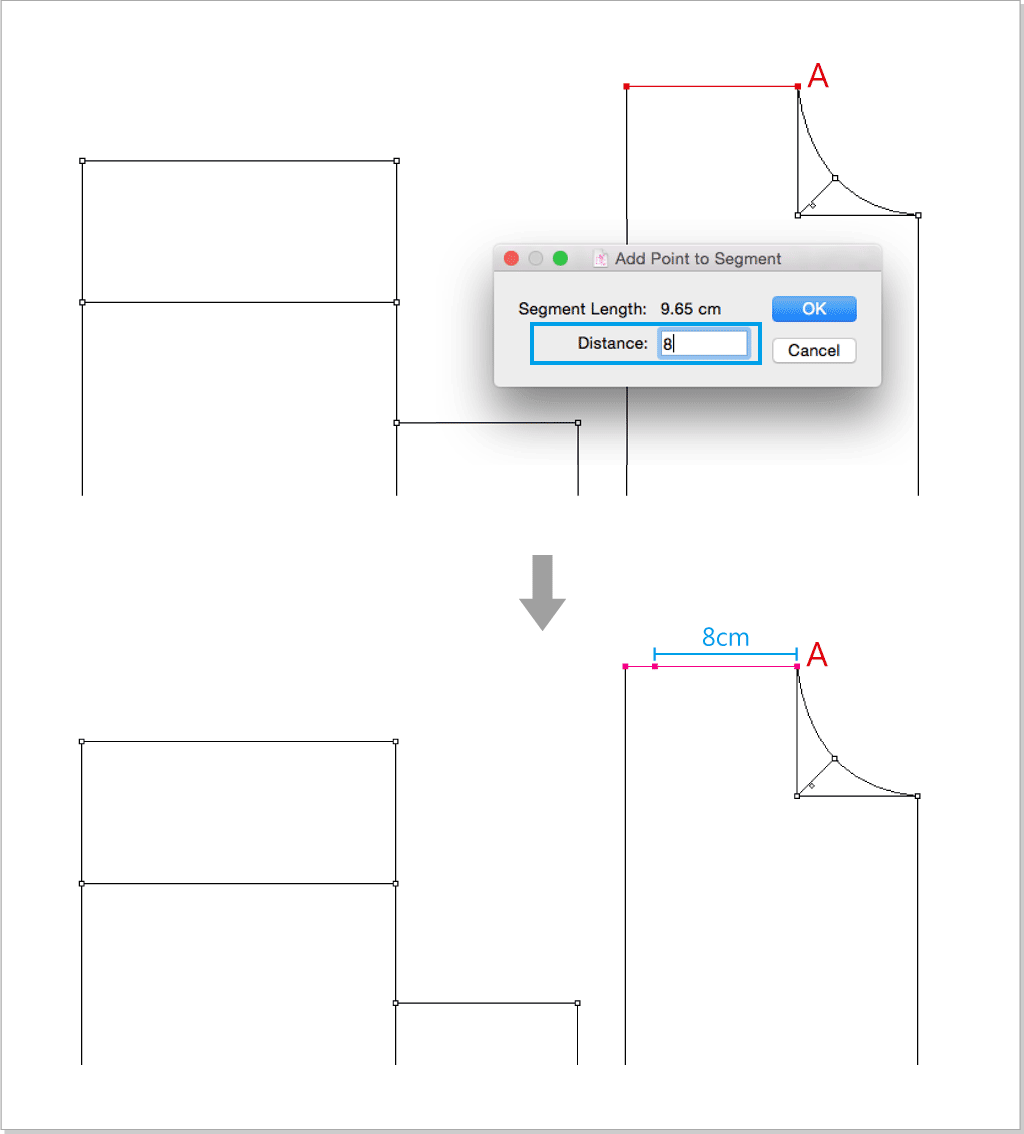
Select
,hold down the Option(Mac) or Alt(Windows) key, left click point B, enter the below value: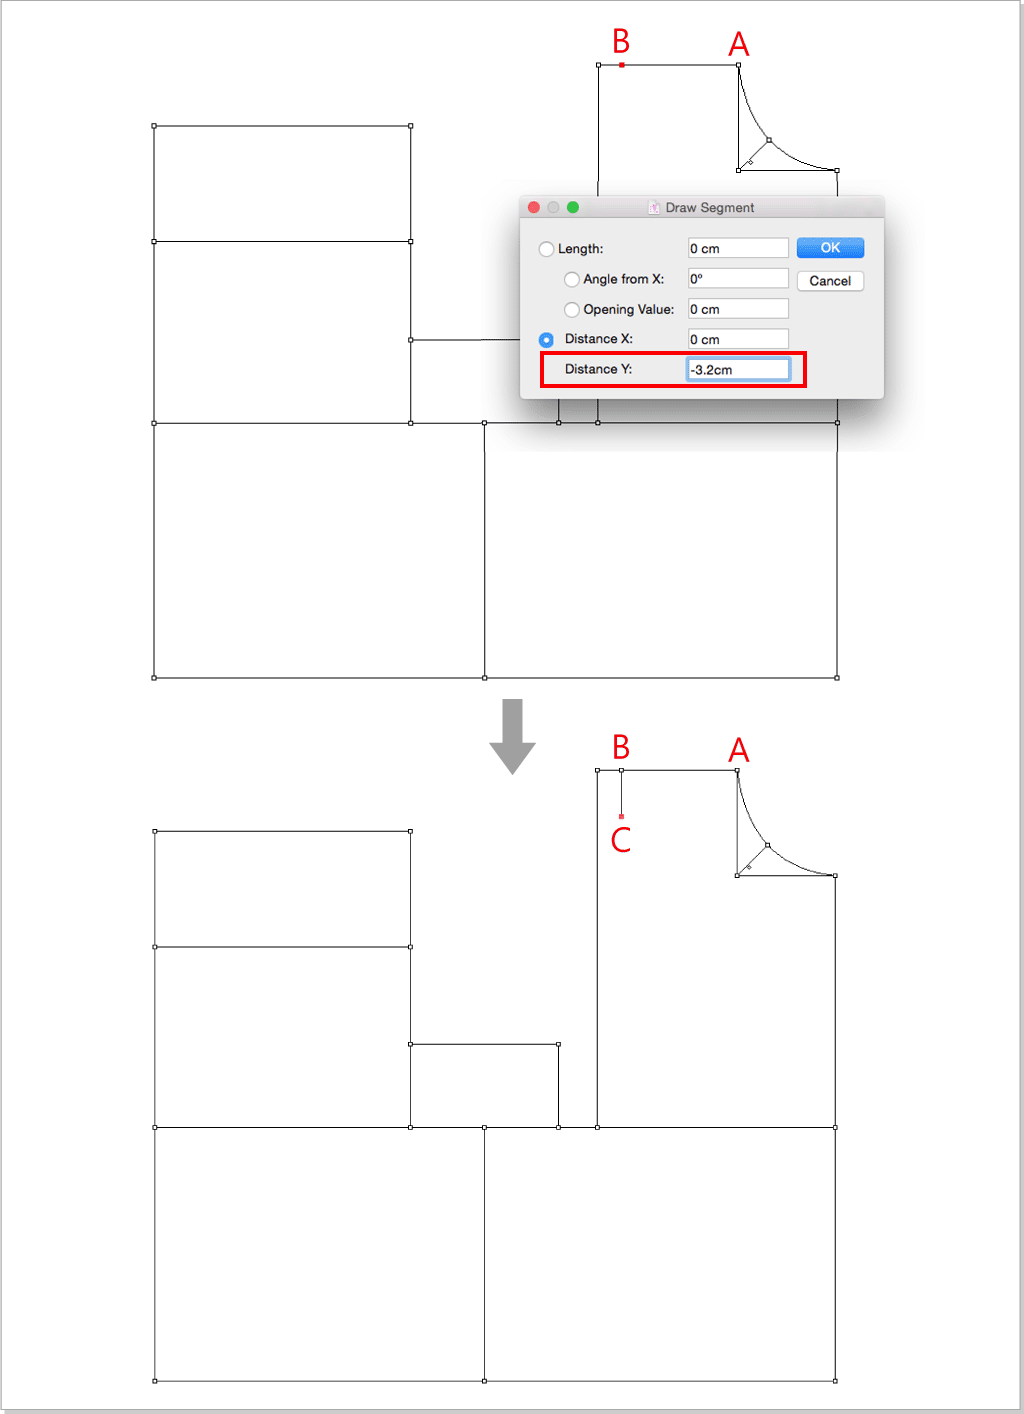
Select
,left click point A then point C, select ,left click point A, enter the below value to add 1.8cm to the segment.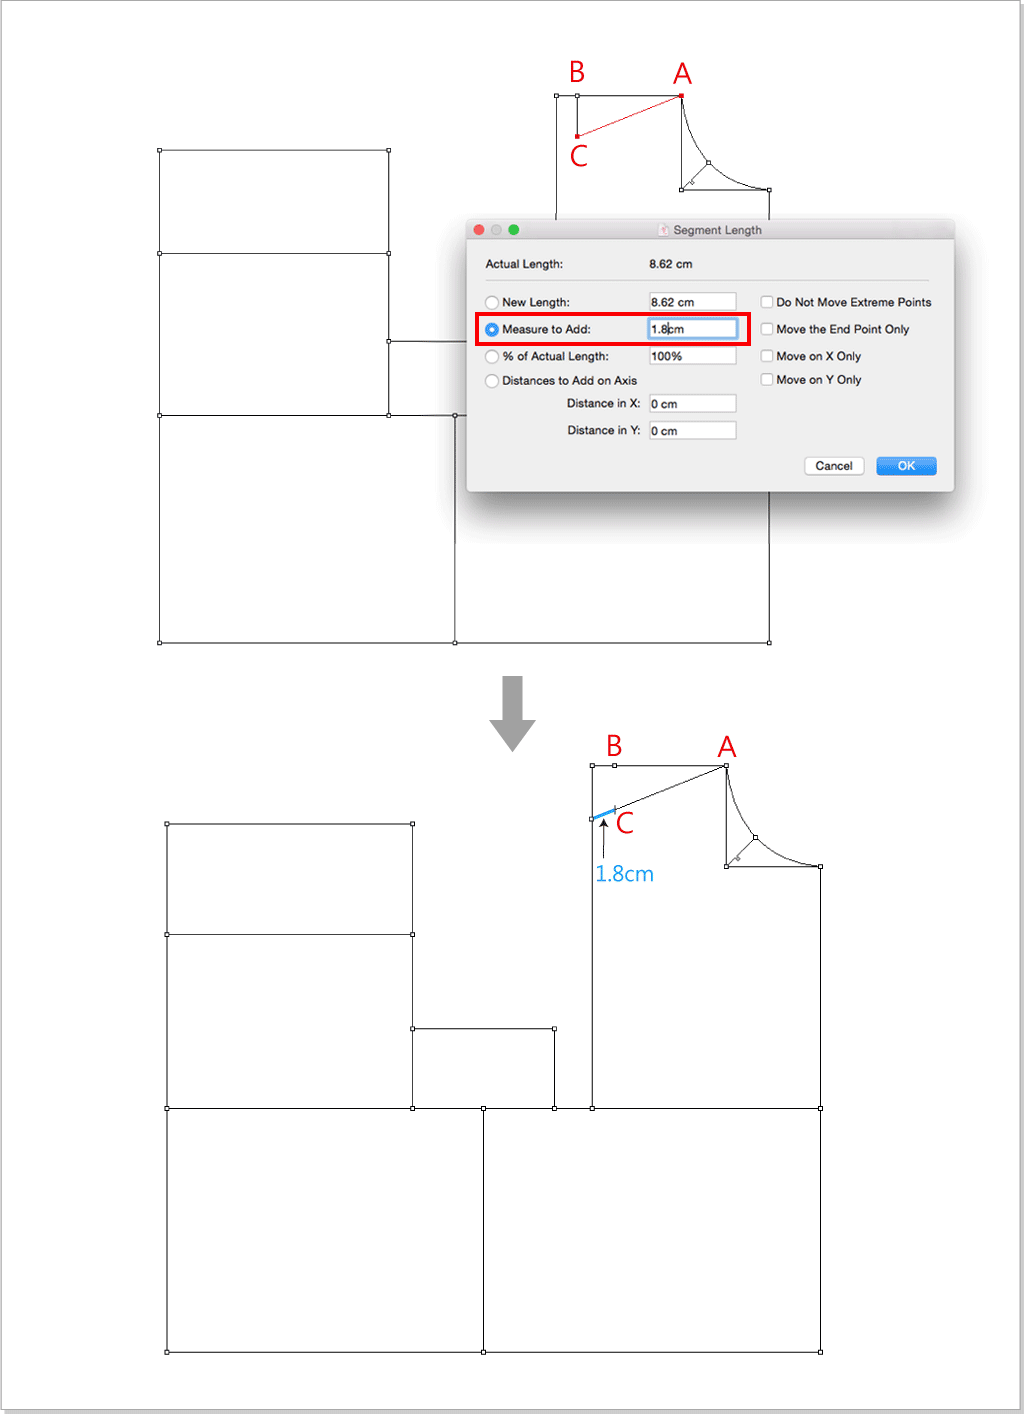
Find out the BP point, draw the chest dart and armhole curve:
Use
to select the red line, select ,left click the selected segment, enter 2 in the dialog box to divide the segment.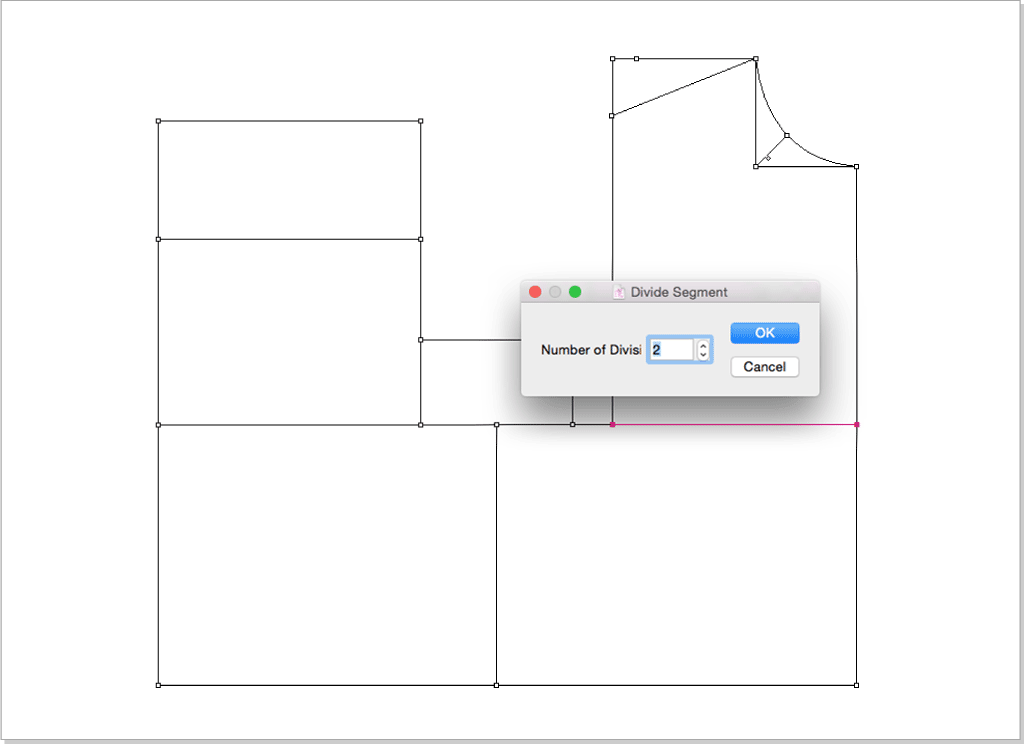
Use
to select the red line, select ,left click point A, enter 0.7cm to gain BP point.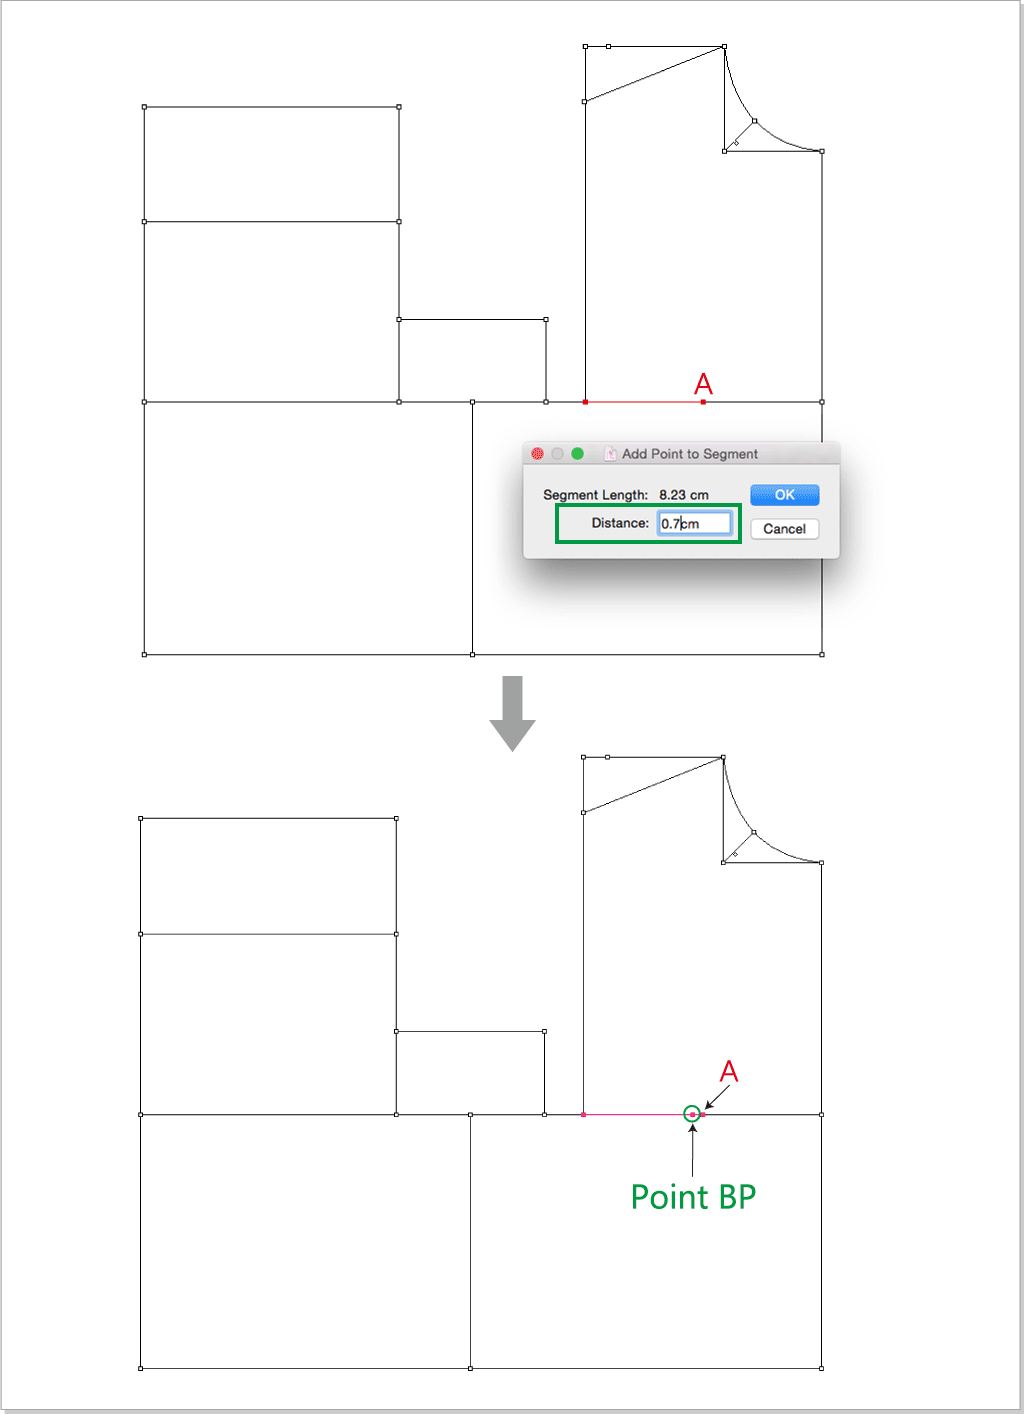
Select
,left click point B then point C to create BC segment.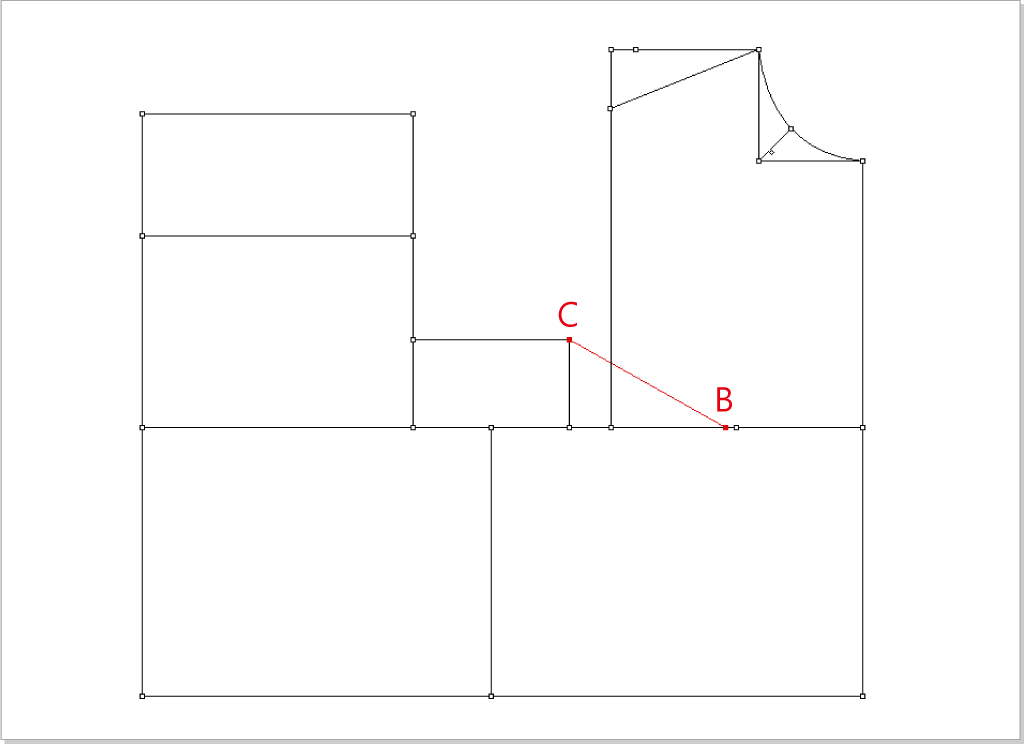
Select
,hold down the Option(Mac) or Alt(Windows) key, left click point C, enter the below value: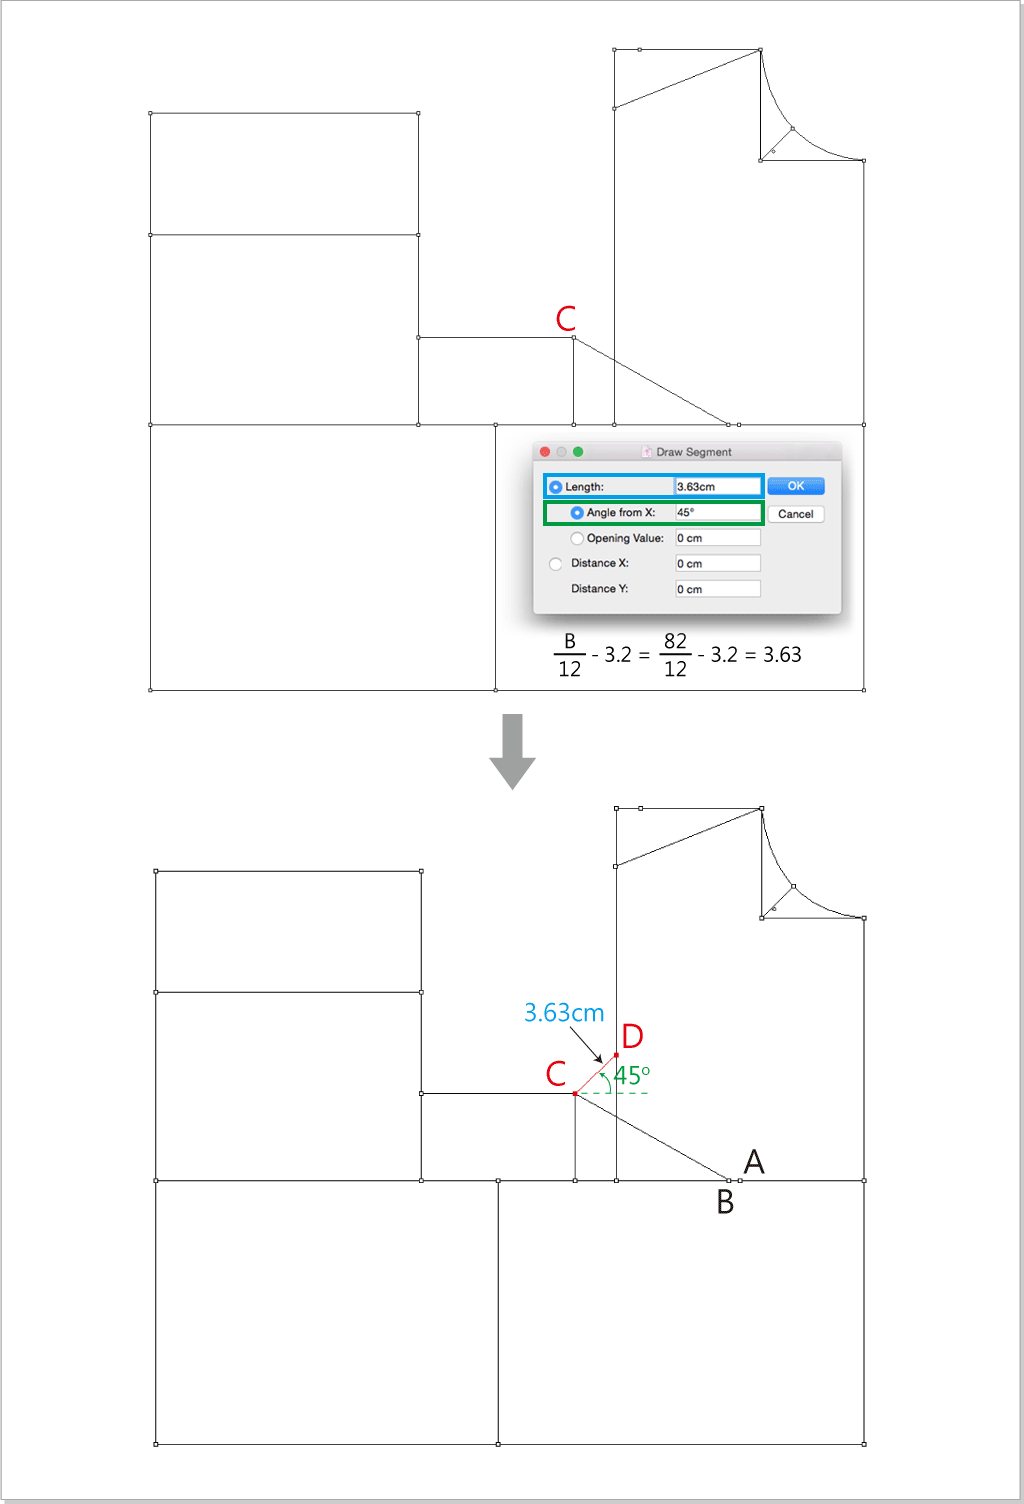
Select
,left click point B then point D to create BD segment. Select ,left click point B to change the length to 11.731 cm. Select ,left click the 3 points that the arrows pointed.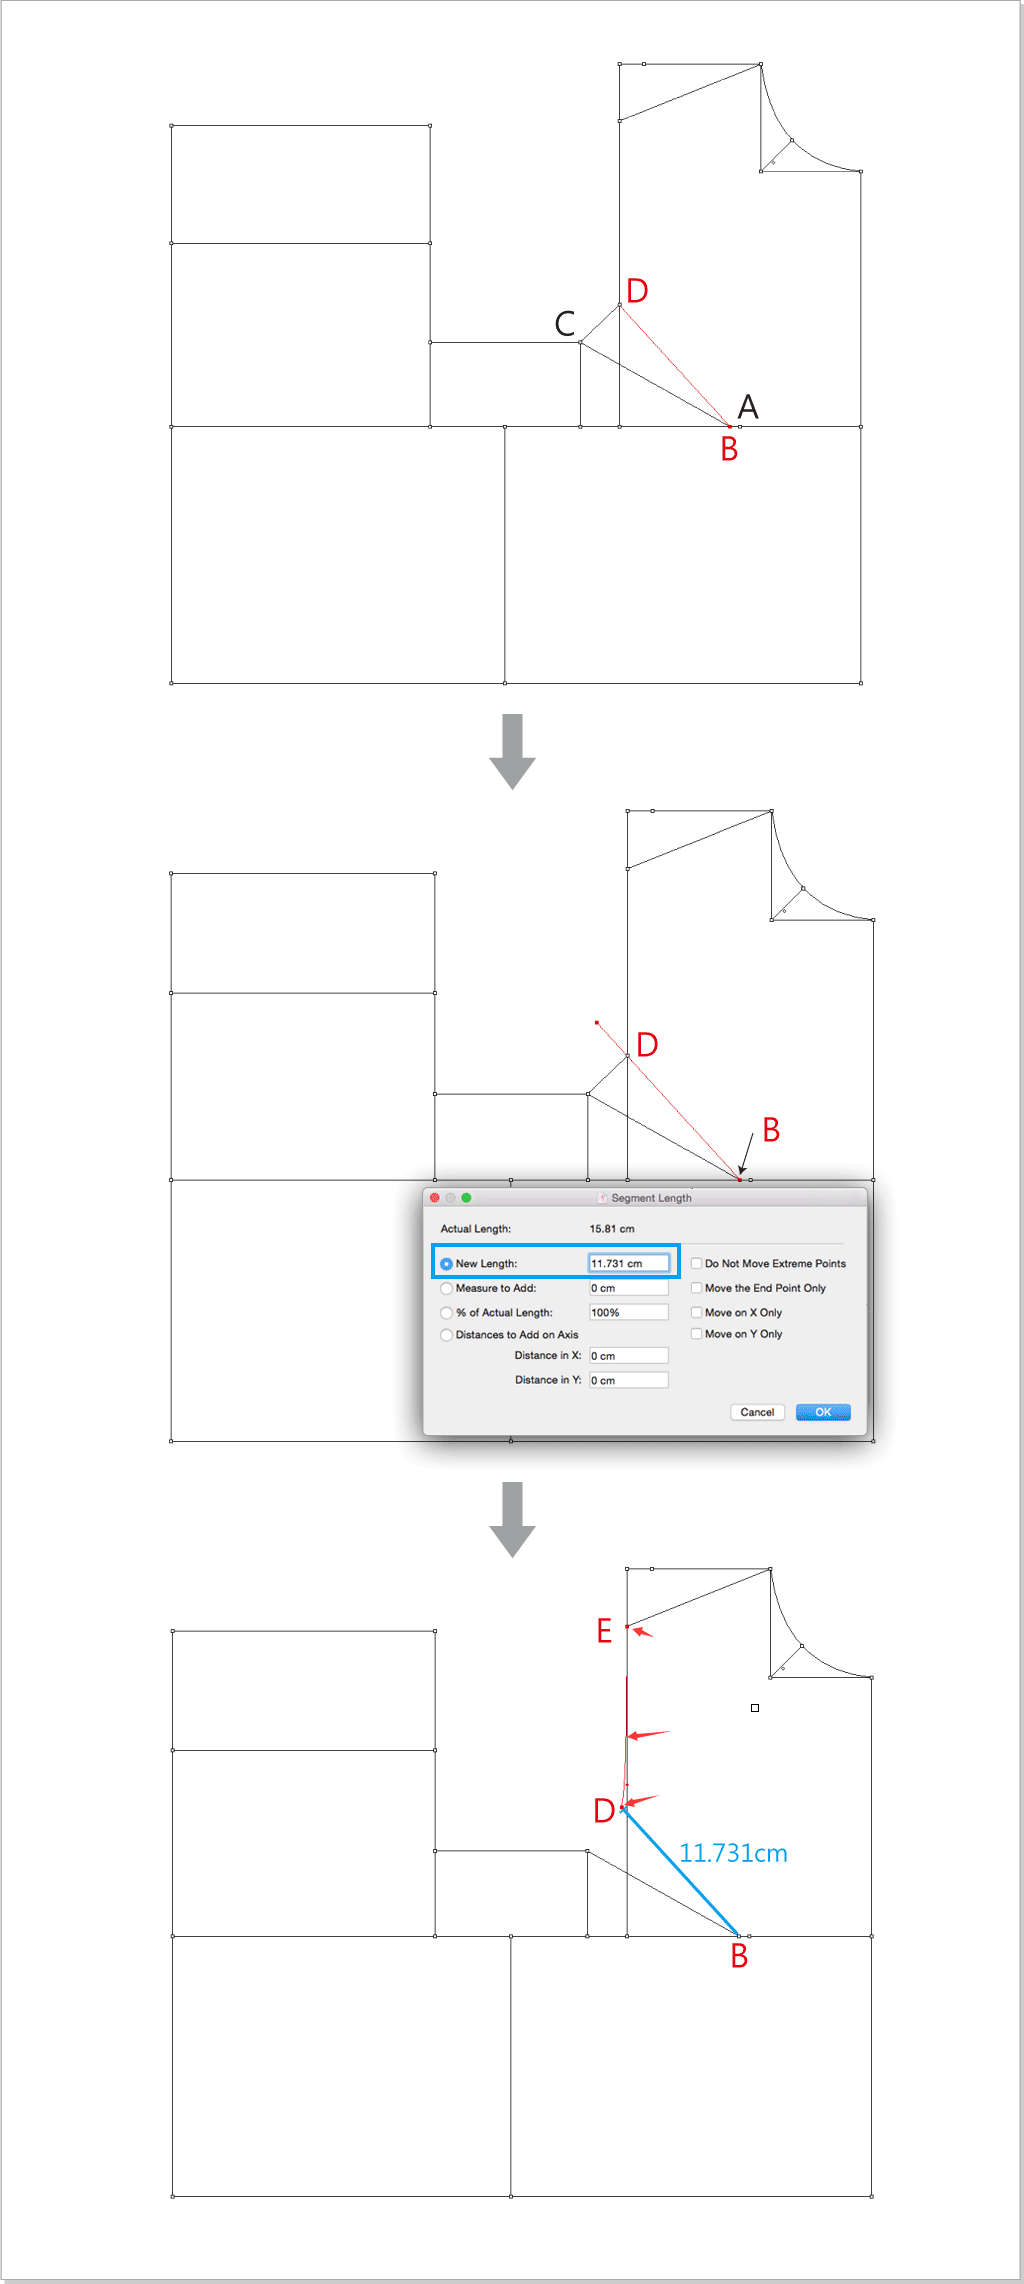
Use
to select AB segment, select ,enter 3 in the dialog box to divide the segment into 3 equal parts. Select ,hold down the Option(Mac) or Alt(Windows) key, left click point B, enter below values.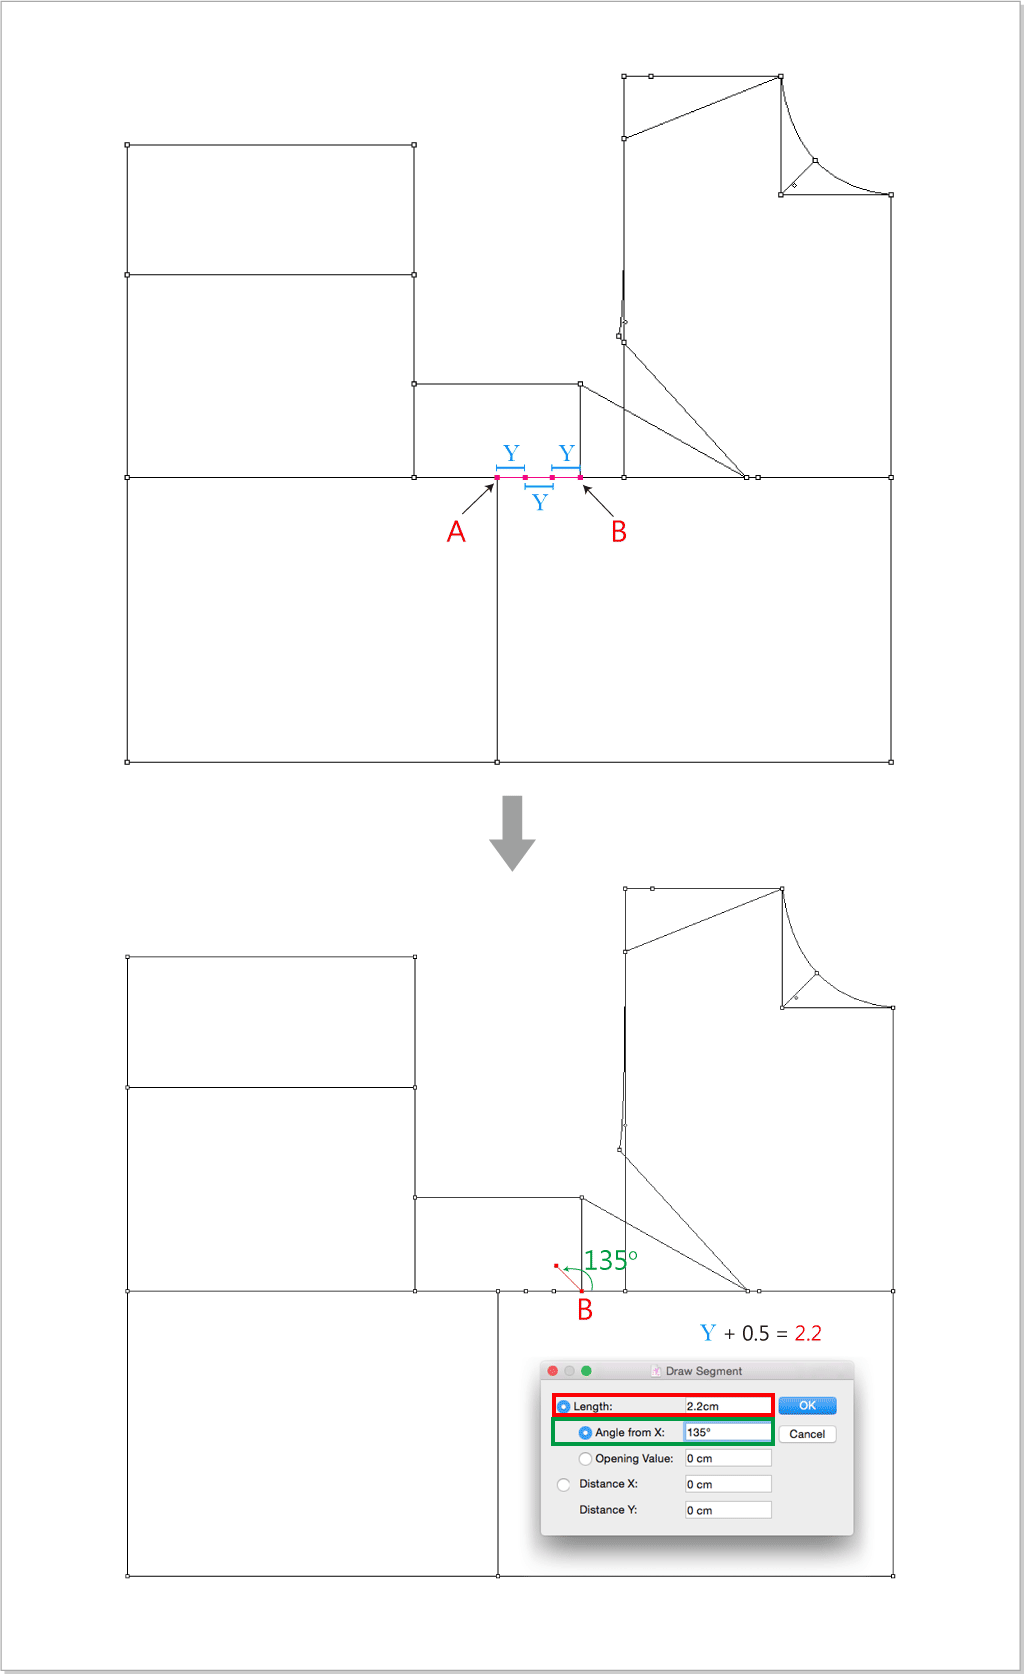
Select
,left click C,D,A points one by one to create AC cruve.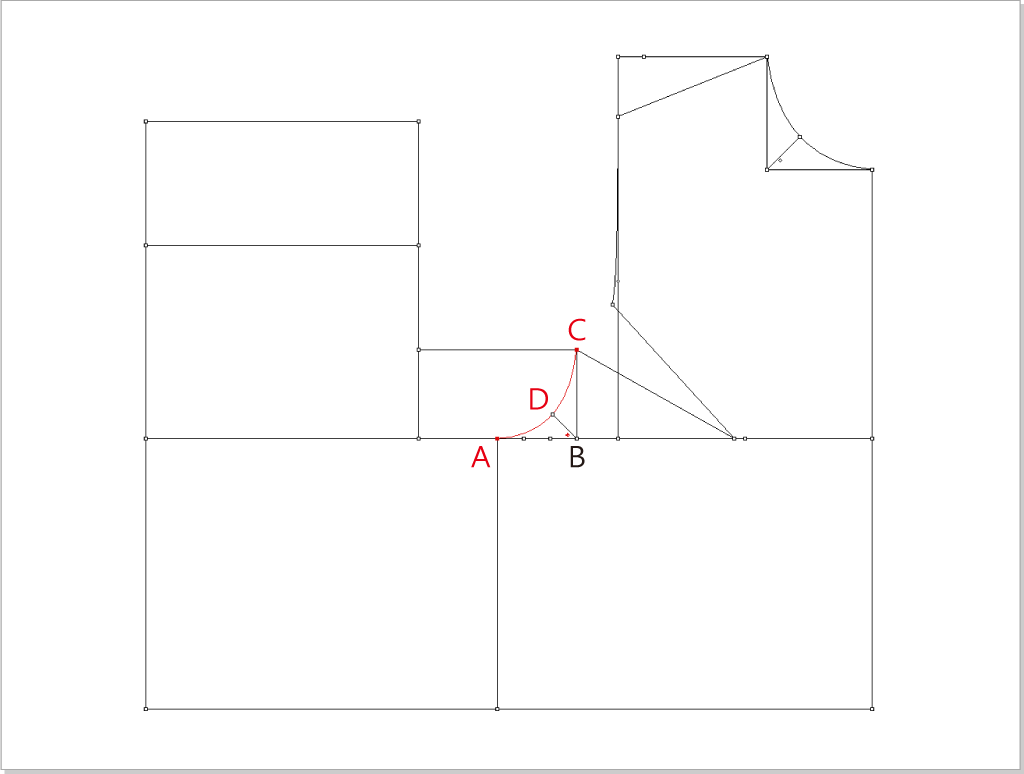
Draw the back collar:
Use
to select the red line, select ,left click point A, enter 7cm.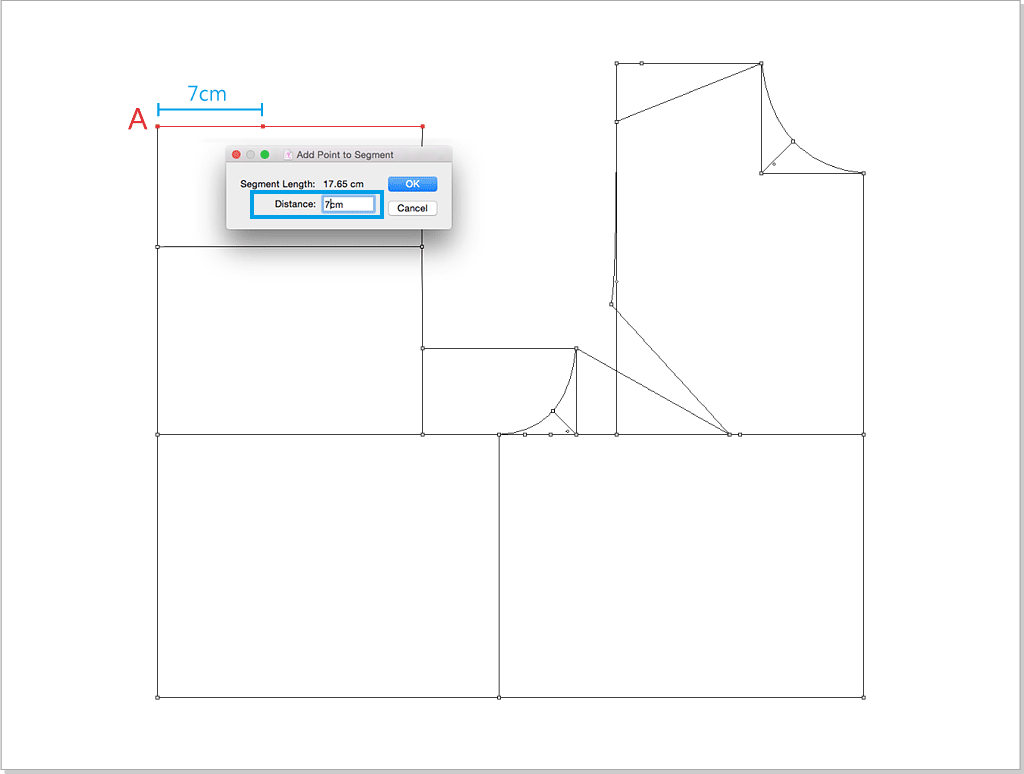
Use
to select the red line , select , left click the selected segment, enter 3 to divide the segment into 3 equal parts.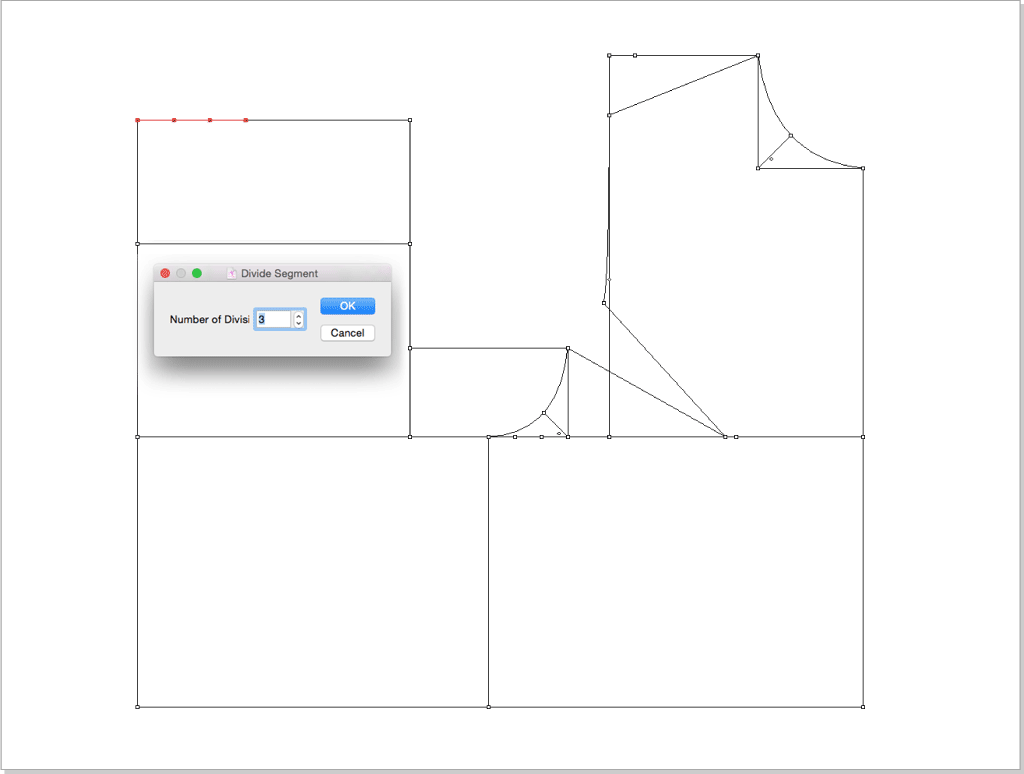
Select
, hold down the Option(Mac) or Alt(Windows) key, left click point B, enter the below value.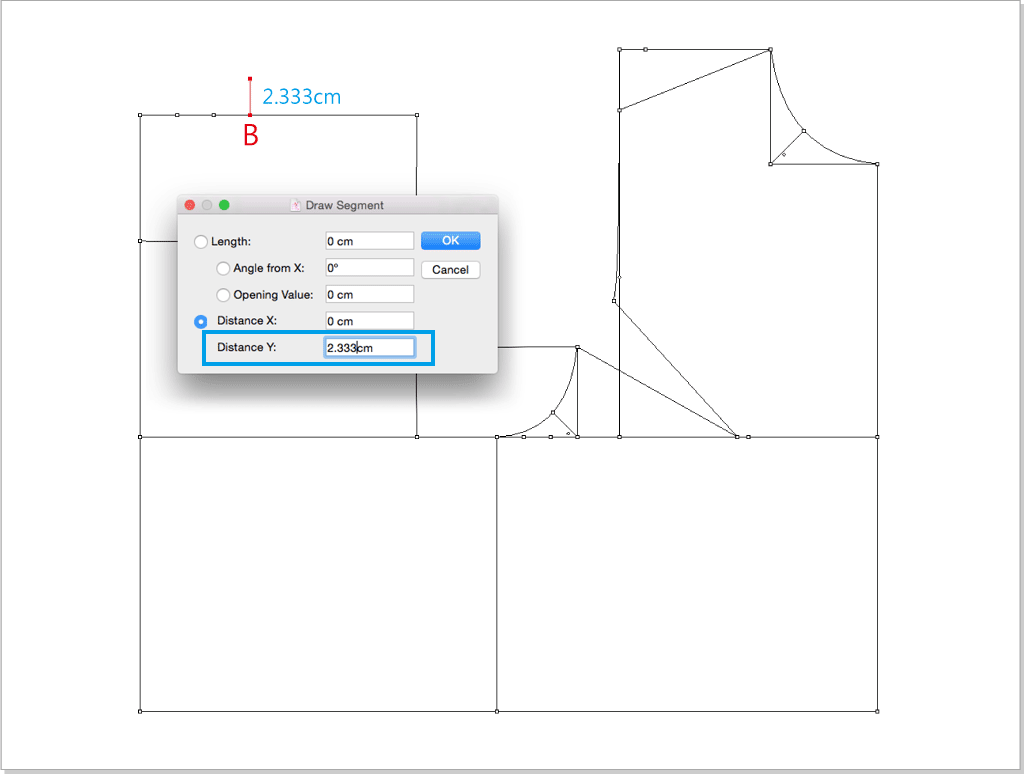
Select
,left click point A then point C to create AC segment. Select ,left click AC segment and drag it to be cruve shape as the below picture shows.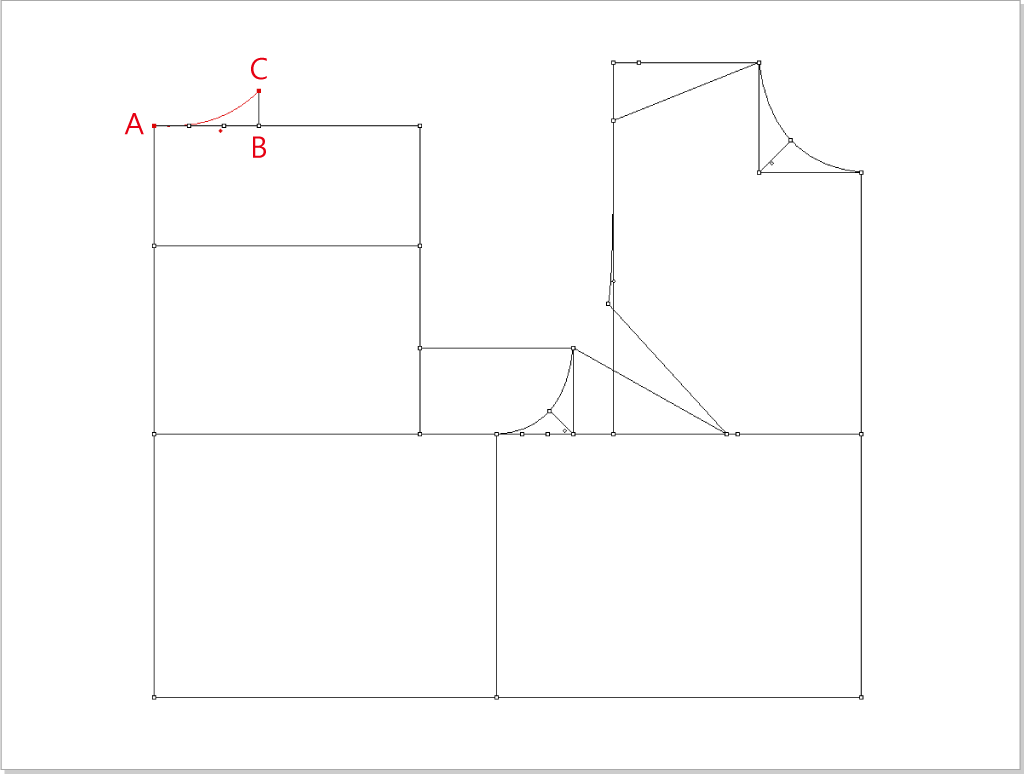
Draw the back shoulder line and shoulder dart.
Select
,hold down the Option(Mac) or Alt(Windows) key, left click point A, enter the below value.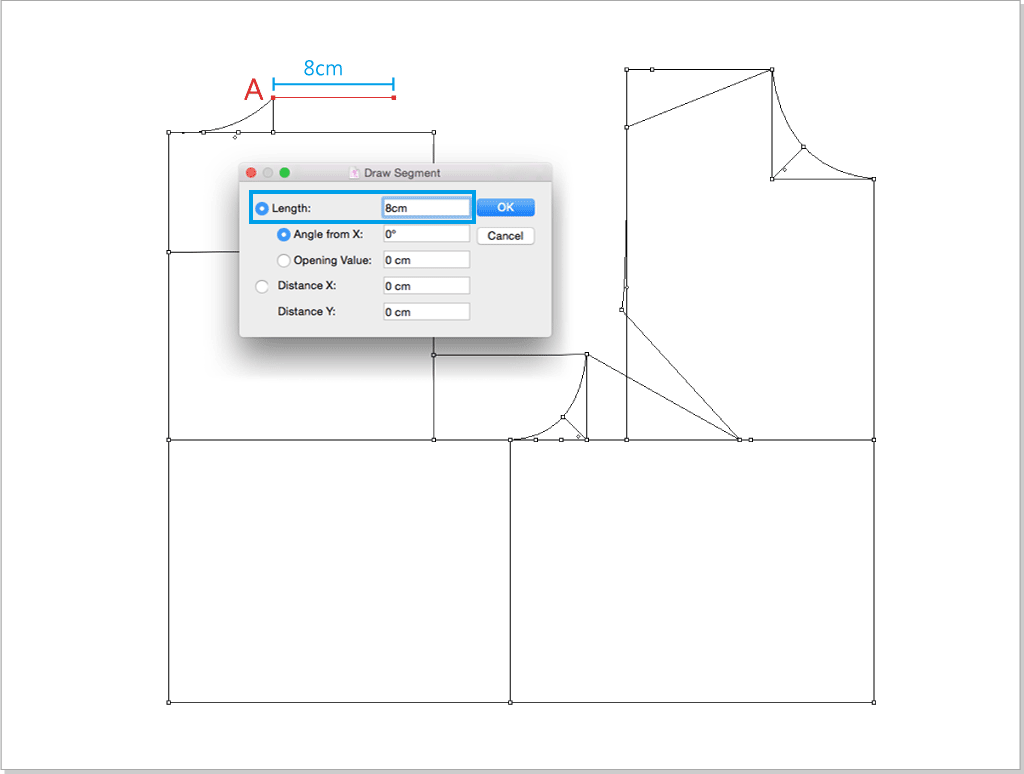
Select
,hold down the Option(Mac) or Alt(Windows) key, left click point B, enter the below value.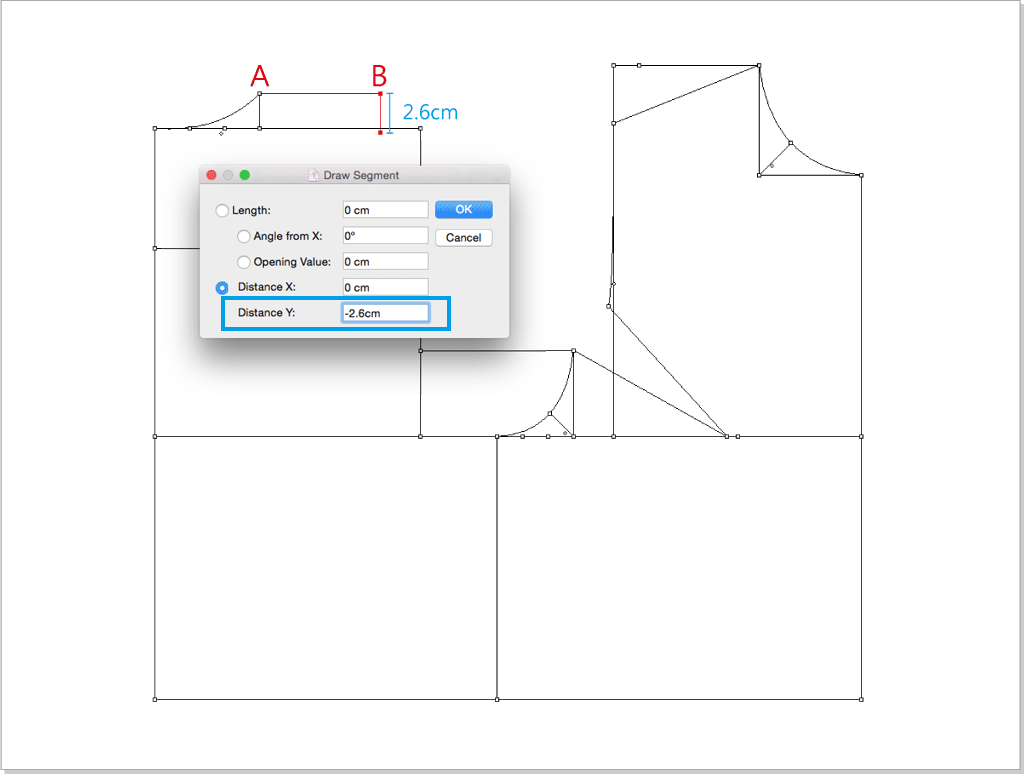
Select
,left click point A then point C to create AC segment, left click point A to change the segment length into 12.18cm.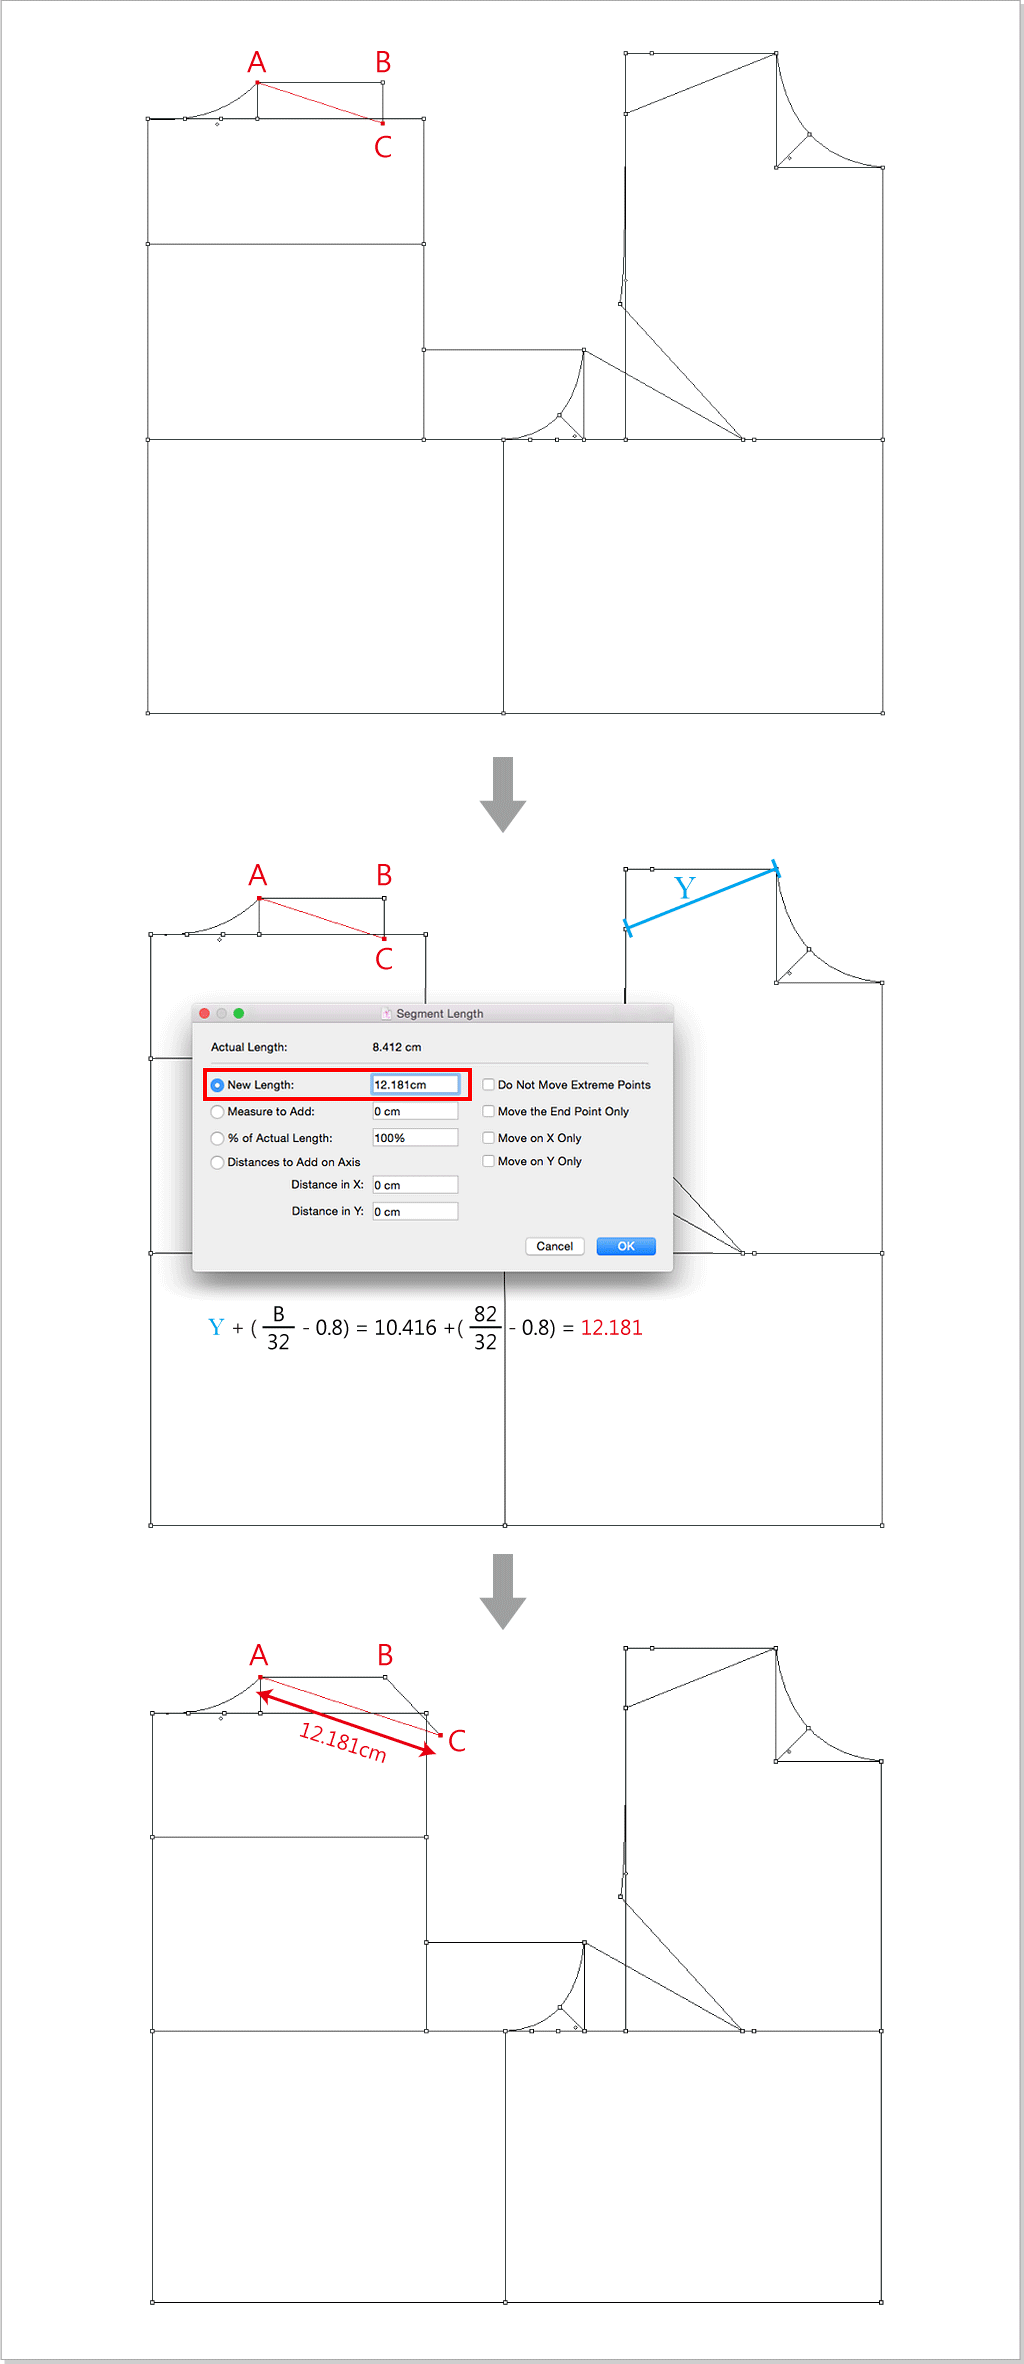
Use
to select the red line, select ,left click point D, enter 1cm.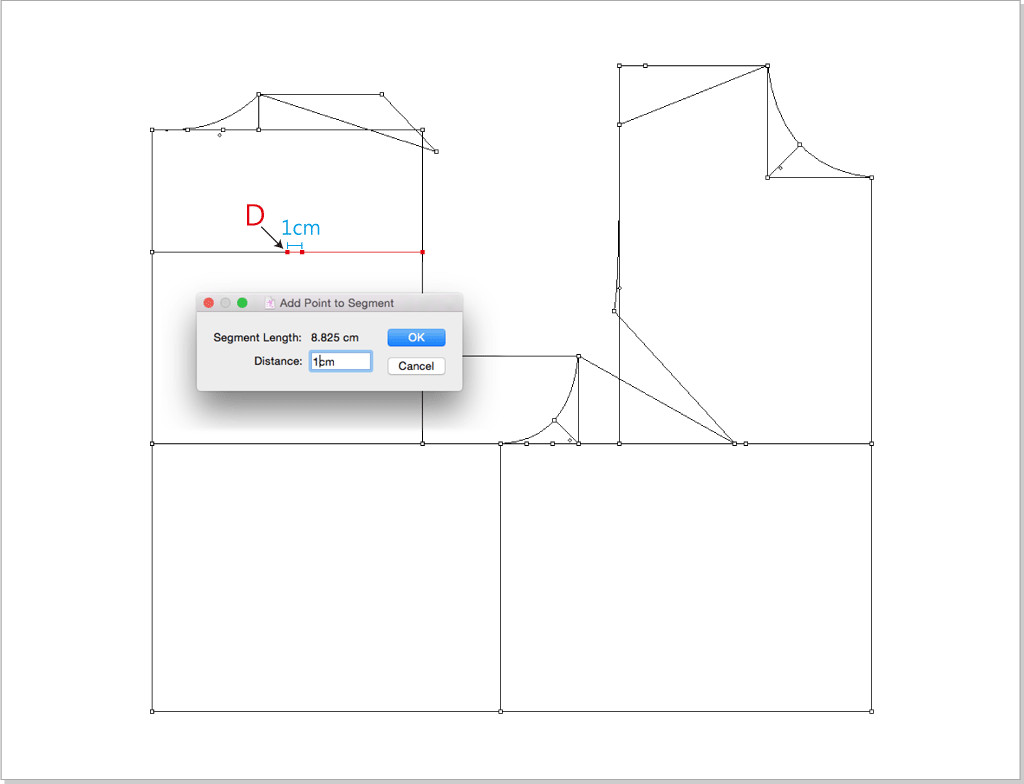
Select
, hold down the Shift key,draw a perpendicular line from point E intersects with the shoulder line. Select  , left click the intersection to add a crosspoint.
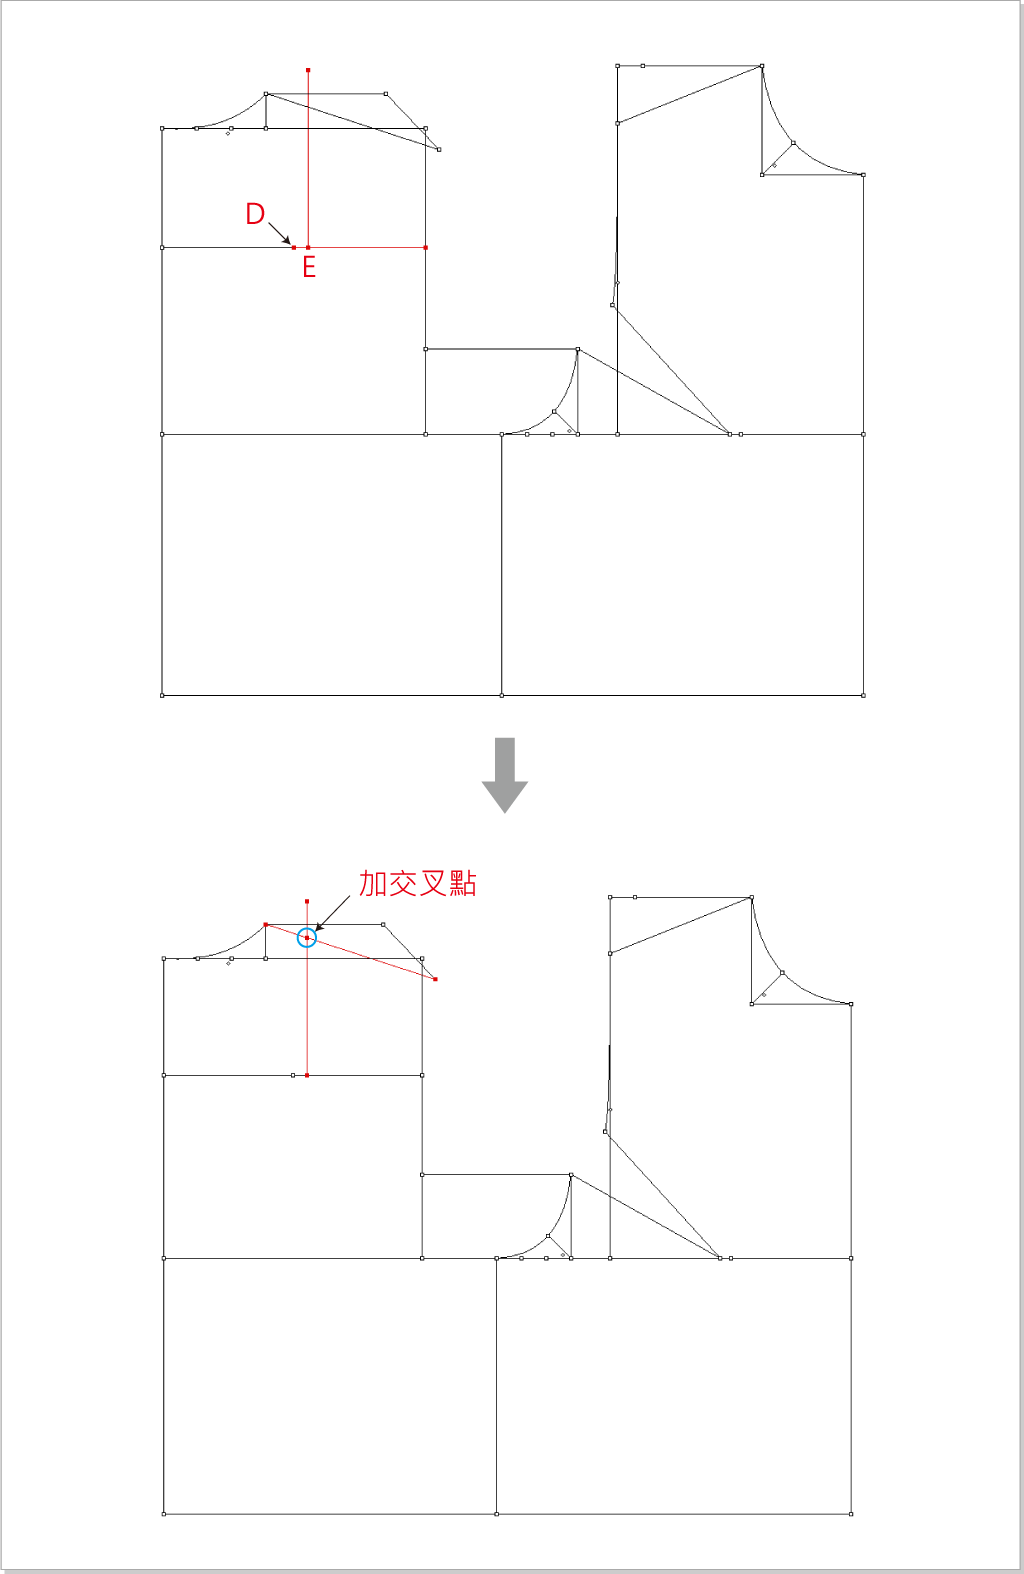
Use
to select the red line, select ,left click point F, enter 1.5cm.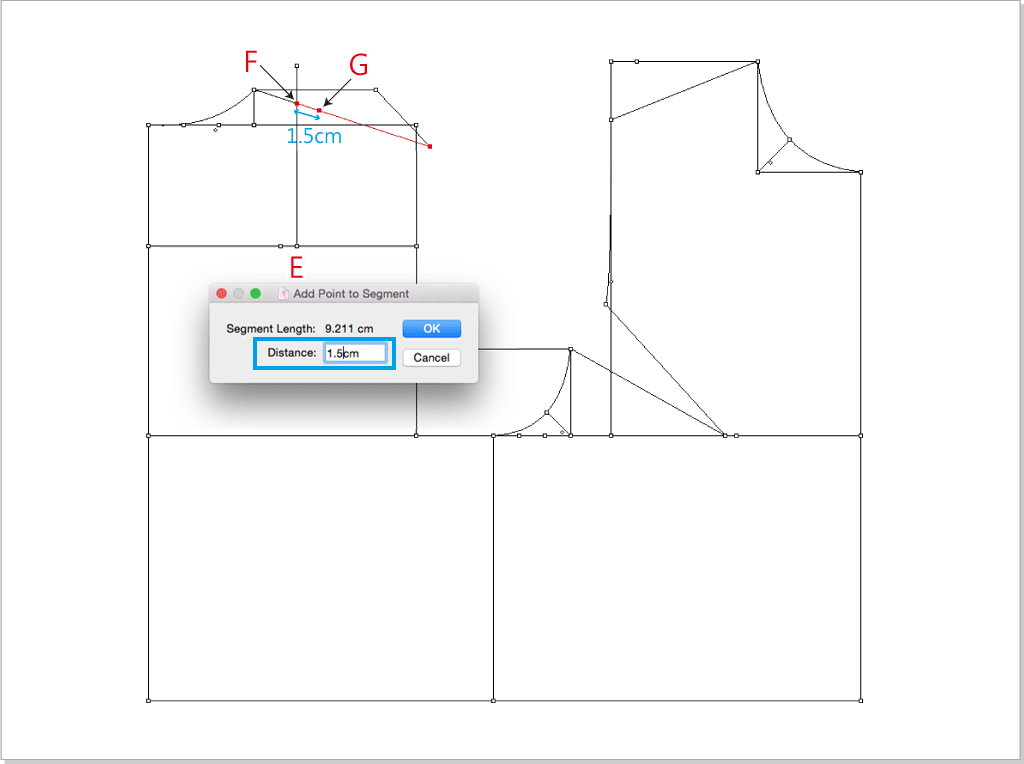
Use
to select the red line, select ,left click point G, enter 1.76cm.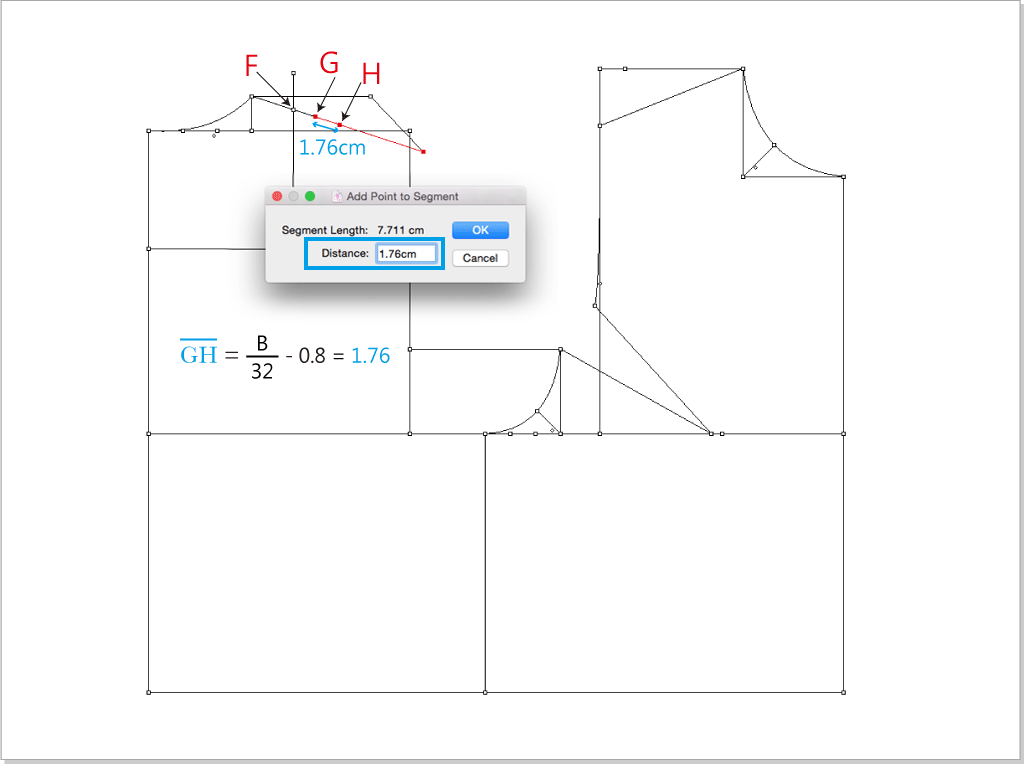
Select
,left click point E then point G to create EG segment.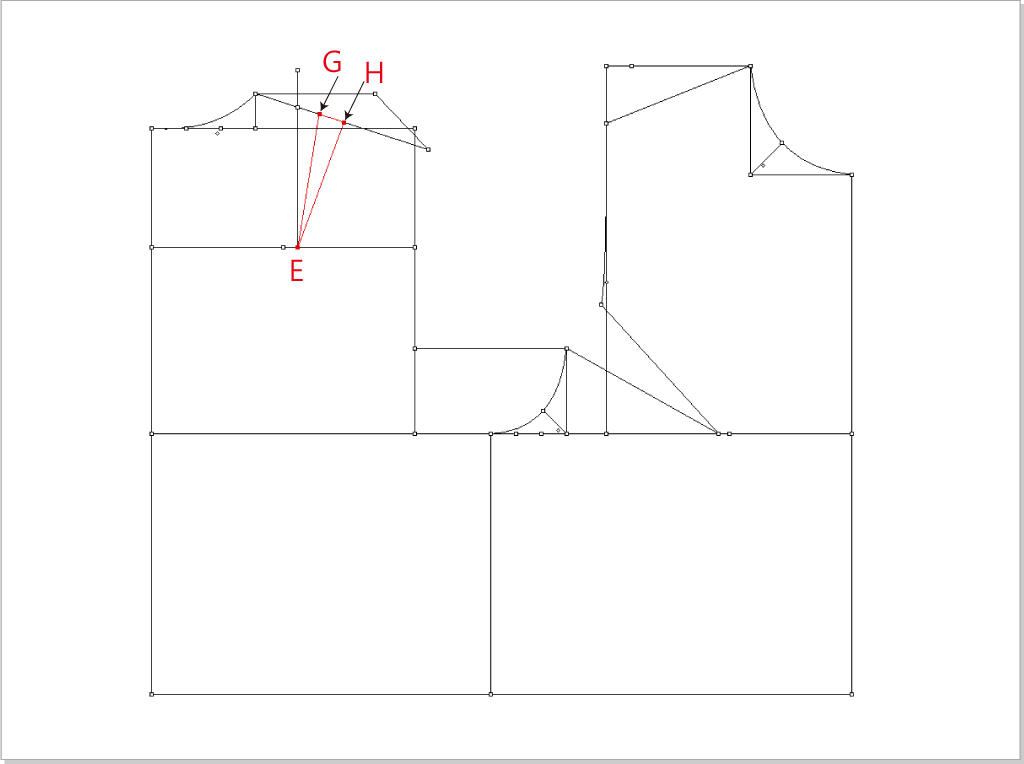
Create back armhole cruve.
Select
,hold down the Option(Mac) or Alt(Windows) key, left click point A, enter below value.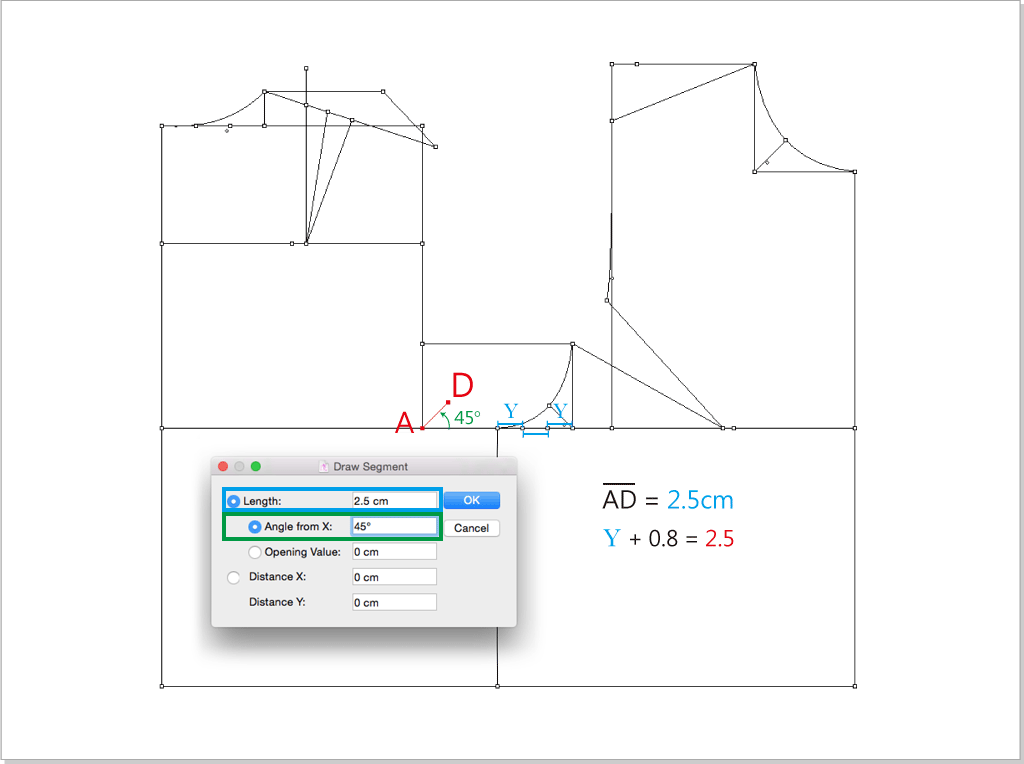
Select
,to create BC cruve: left click point B then mid of BC. Create CE cruve:left click C, D, E points one by one.
Use
to select the redundant points and lines, press the Delete(Mac)or Backspace(Windows) key to delete them.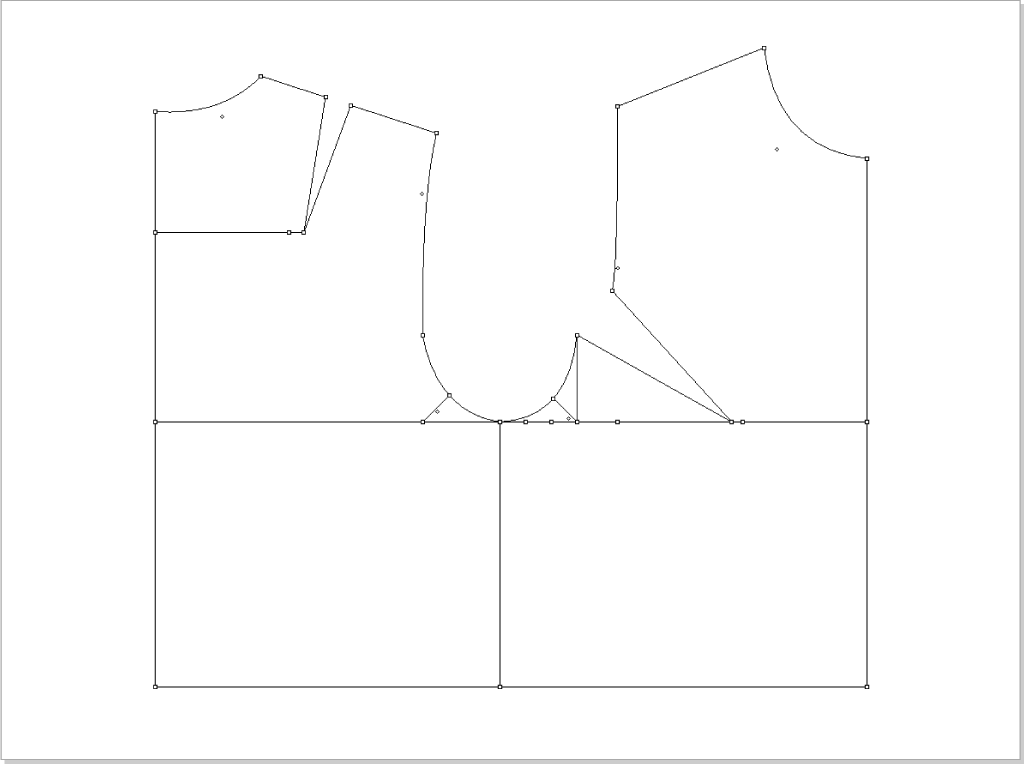
Create the dart line of waist dart.
Create A, B, D points first: select
 ,hold down the Option(Mac) or Alt(Windows) key, left click point F, enter -1cm in the “X distance” column, click “OK” to create point A.
Similarly, left click point G, enter -1cm in the “X distance” column to create point B.
Similarly, left click point B, enter 1.5cm in the “X distance” column to create point D.
,hold down the Option(Mac) or Alt(Windows) key, left click point F, enter -1cm in the “X distance” column, click “OK” to create point A.
Similarly, left click point G, enter -1cm in the “X distance” column to create point B.
Similarly, left click point B, enter 1.5cm in the “X distance” column to create point D.Select
,hold down the Shift key, left click point A, move the cursor to hem and then left click the hem line, then you can get AA1 segment. Same to create BB1, CC1, DD2, EE1 segments.Select
, left click the intersection which the arrow pointed to add a crosspoint.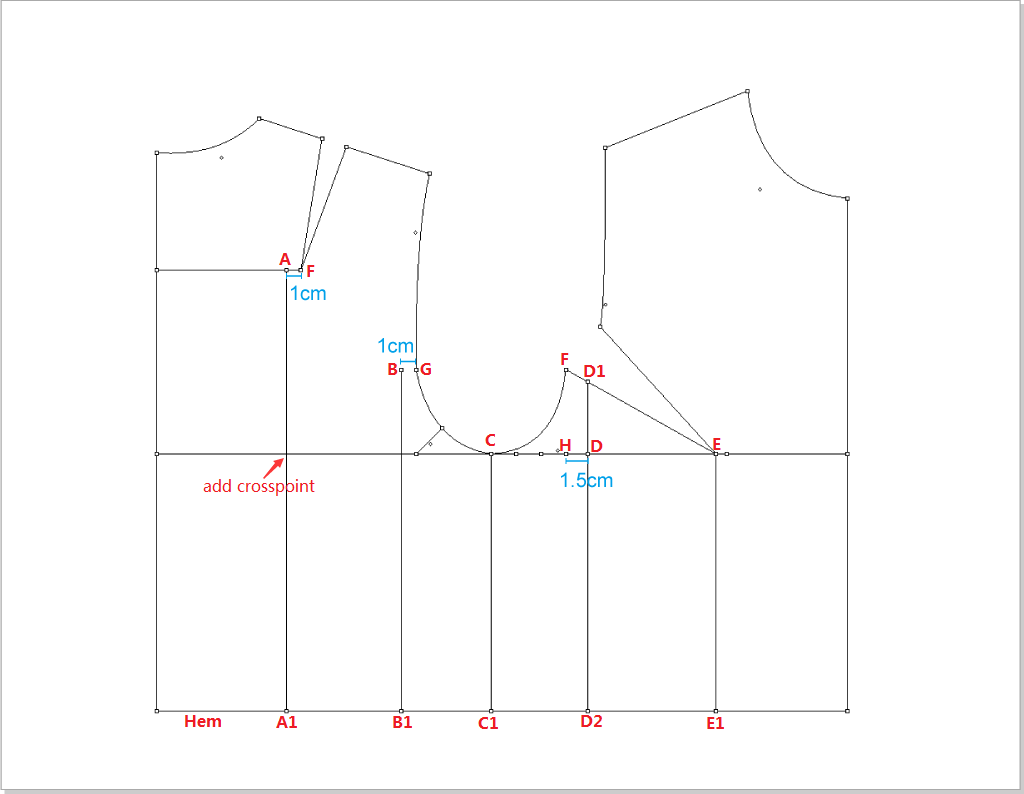
Create B, D, F points:
Select
,hold down the Option(Mac) or Alt(Windows) key, left click point A, enter 2cm in “Y Distance” column, click “OK” to create point B.
Similarly, left click point C, enter -1cm in “Y Distance” column to create point D.
Similarly, left click point E, enter -2.5cm in “Y Distance” column to create point F.
Use
to select the redundant lines and points, press Delete(Mac) or Backspace(Windows) key to delete them. Then select the whole piece, click menu [Treatment]→[Pathfinder]→[Create Outline].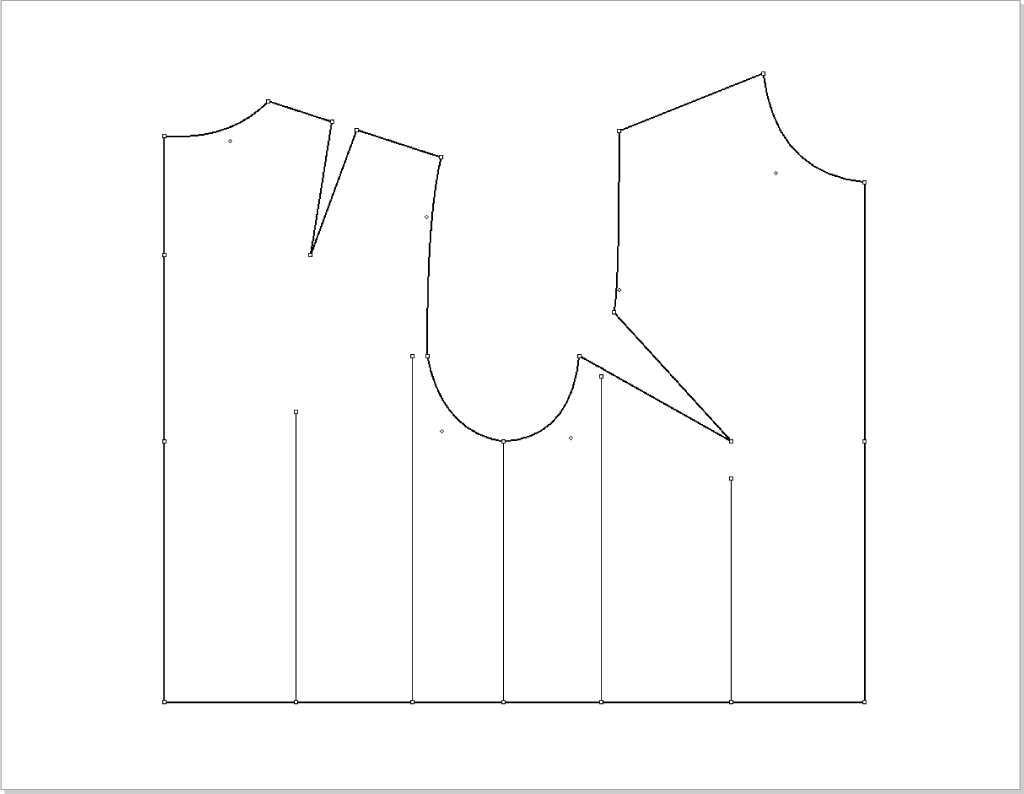
Use Dart tool to create darts:
Use
to select the dart line, select  ,left click the dart point, the dialog box appears, enter the below value, click “OK” to create dart a.
Use the same mathod to create dart b, d, e.
,left click the dart point, the dialog box appears, enter the below value, click “OK” to create dart a.
Use the same mathod to create dart b, d, e.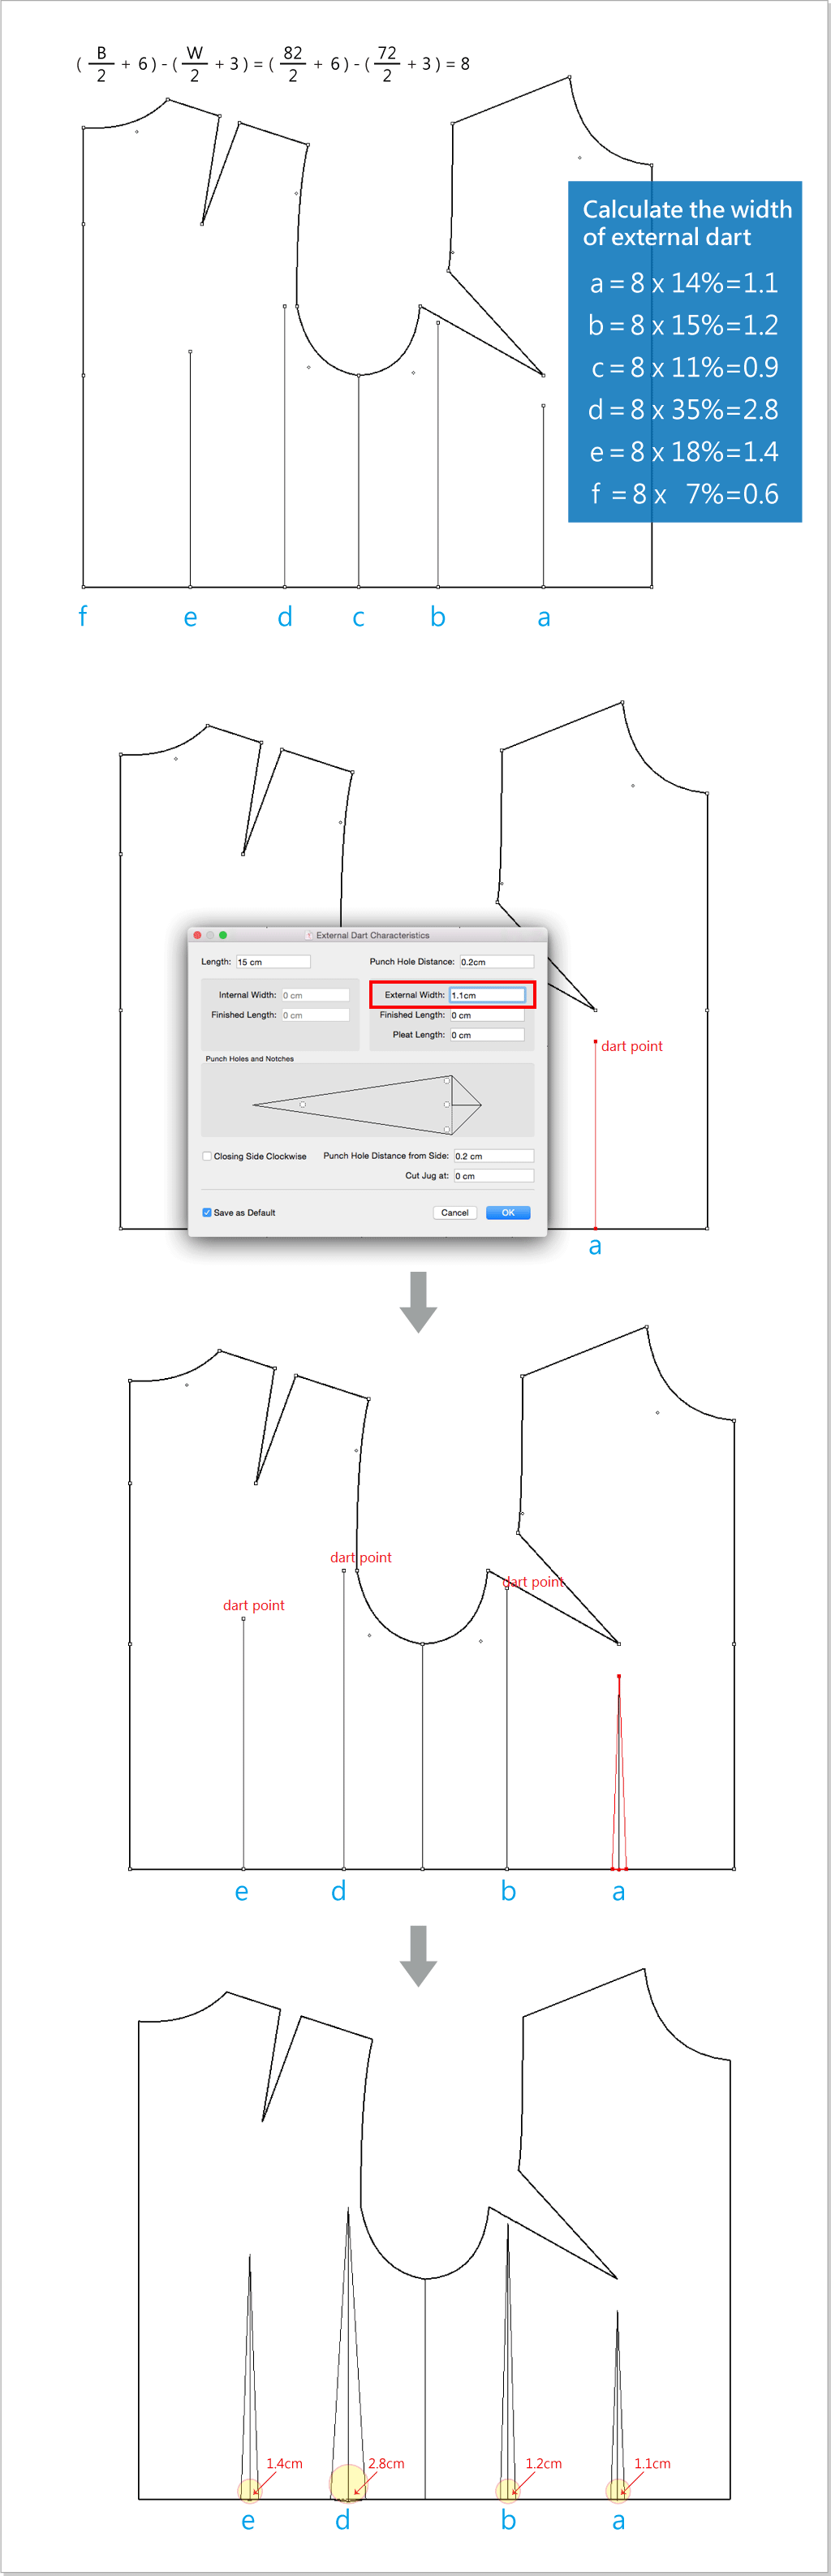
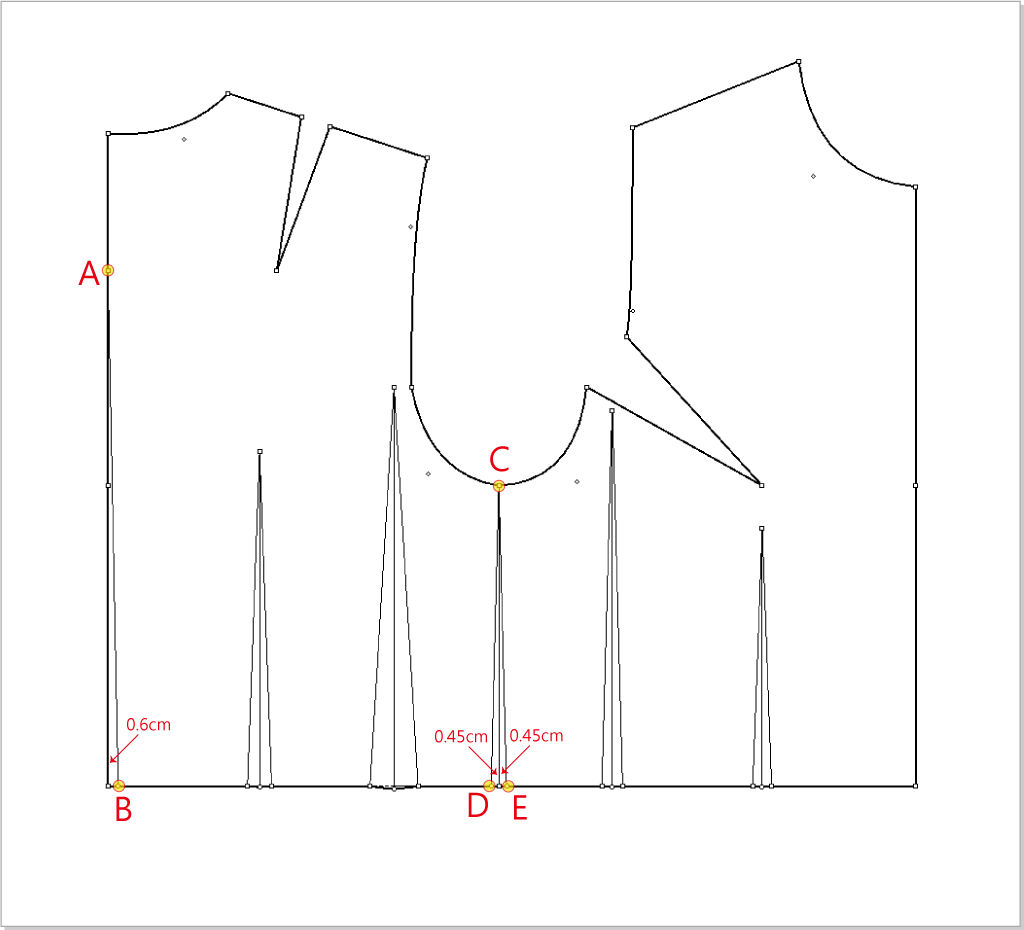
Add points and create lines:
Select
, left click point C, enter 0.45cm to create point D (E); same steps to enter 0.6cm to create point B.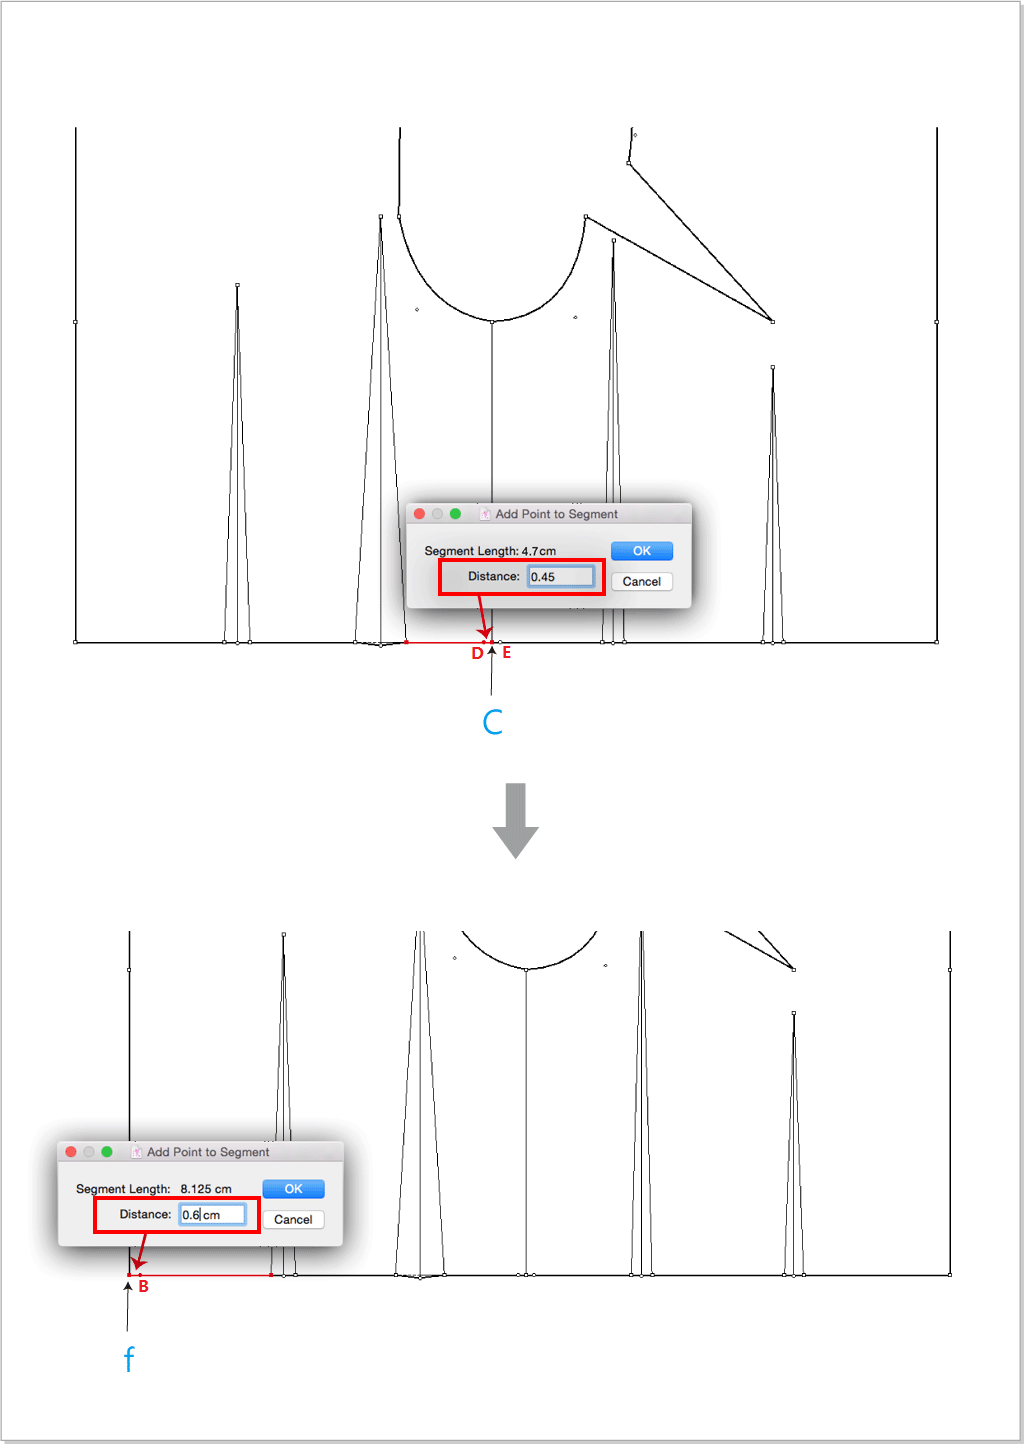
Select
,left click point A then point B to create AB segment, same steps to create CD, CE segments.